Local Security Authority Protection is Off: 3 Ways to Fix it
If Secure Boot is off, this issue might pop up

Many users reported that Local Security Authority Protection is off on Windows 11 and that can be a problem and leave your PC vulnerable.
Issues with Windows updates can cause this problem and certain security policies. Disabling Safe Boot can also cause this problem.
Before we start, make sure that LSA and CPU virtualization are turned on. Make sure you’re signed in as administrator and enable additional protection for LSA.
How do I turn on Local Security Authority protection?
1. Use the Windows Security app
- Press the Windows key to open the Start Menu, type Windows Security in the search box, and press Enter.

- From the left pane, choose Device security. Under the Core isolation section, select the Core isolation details option.

- Enable the toggle under the Local Security Authority protection section.
- Then, click Yes in the UAC prompt that appears.
- Restart your PC to apply the changes.
2. Use Registry Editor
- Press the Windows + R keys to open the Run dialog box. Type regedit in the dialog box and press Enter.
- In the Registry Editor, navigate to the following path:
Computer\HKEY_LOCAL_MACHINE\SYSTEM\CurrentControlSet\Control\Lsa
- Then, double-click on RunAsPPL in the right pane. Change the Value data to 1 (or 2 as some users claim this worked for them) and press Enter.
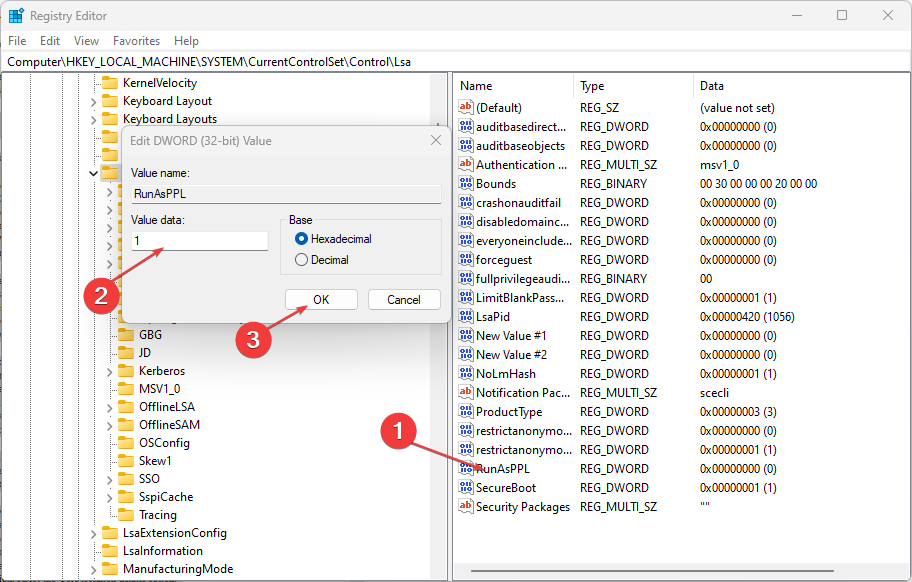
- Repeat step 3 for the RunAsPPLBoot entry. You may create DWORD entries for RunAsPPLBoot and RunAsPPL if you do not have them.
- Restart your PC to apply the changes.
3. Via the Local Group Policy Editor
- Press the Windows + R keys to open the Run dialog box, type gpedit.msc, and press Enter.
- In the Local Group Policy Editor window, navigate to the following path:
Computer Configuration\Administrative Templates\System\Local Security Authority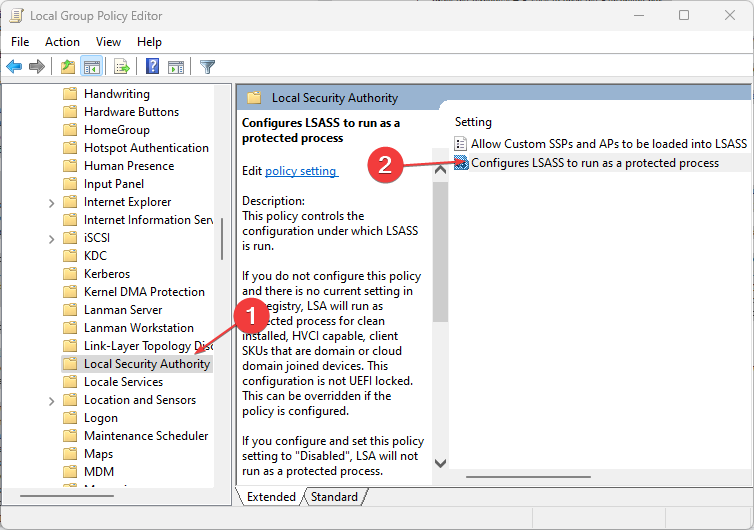
- On the right pane of the window, right-click the Configure LSASS to run as a protected process.
- Next, click on Enable.
- Under Options, select Enabled with UEFI Lock, then click Apply and OK to save the changes.

- Restart your device.
 NOTE
NOTE
What happens if Local Security Authority protection is off?
As we outlined above, the LSA protection protects your PC from threats, and if the feature is off, your device is exposed.
Now that you know some factors responsible for disabling the local security authority protection, check out the solutions below to turn it back on.
Some users also claim that signature verification could also be why LSA protection is off. So, if LSA is not signed as expected, you can explore this guide for further assistance.
We also wrote about high Local Security Authority CPU and memory usage in another guide, so don’t miss it.
Before you go, check our dedicated guide to learn what to do if the Local Security Authority Protection option missing. We also have an article explaining why is Local Security Authority trying to access the Internet, so don’t miss it.
And that’s how to re-enable Local Security Authority Protection if it is turned off. If you have any questions or suggestions, please use the comments section below.
Read our disclosure page to find out how can you help Windows Report sustain the editorial team. Read more


Improve this guide


User forum
2 messages