WiFi says no IP address on Mac? Check out these 3 solutions
4 min. read
Updated on
Read our disclosure page to find out how can you help Windows Report sustain the editorial team. Read more
Key notes
- If you see the No IP address message when using the Wi-Fi on your Mac can be extremely annoying because you can't connect to the Internet.
- Start by diagnosing the problem using IObit's Advanced Network Care.
- To never have to worry about not being able to fix Mac problems, check out our Mac Fix Hub.
- If you want correct information, consider bookmarking our useful Mac section.

Sometimes you might encounter Internet issues on your MacBook due to the No IP address message. This can be a problem, but there are a couple of methods you can use to fix this problem once and for all.
What can I do if Wi-Fi says no IP address on my Mac?
1. Remove all remembered Wi-Fi networks
- Open the Apple menu and select System Preferences.
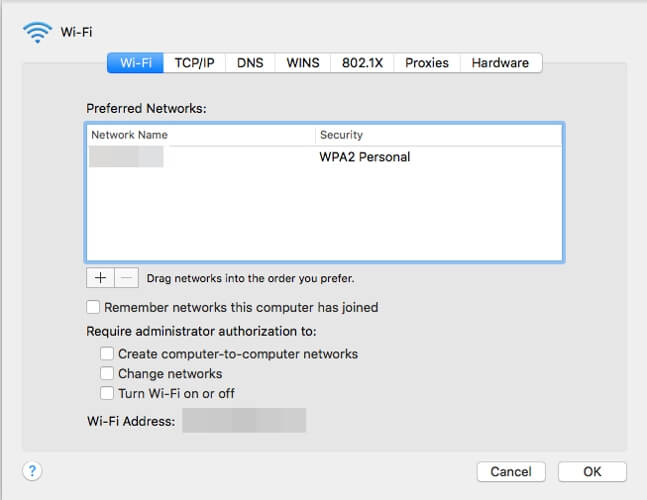
- Click on Network , then select Wi-Fi and choose Advanced.
- Remove all Wi-Fi networks one by one. To do that, select the network you wish to remove and click the minus icon.
- Go to the TCP/IP tab and set Configure IPv6 to Link-local only.
2. Connect to a different Wi-Fi network
Few users reported that they fixed this issue simply by connecting to a different Wi-Fi network.
According to them, the issue can be caused by a temporary glitch, and switching to a different network might help.
After connecting to a different network, switch back to your desired network, and check if the problem is still here.
If the issue still persists, perhaps there’s a problem with your network or with network configuration.
3. Restart your router and change your network settings
3.1 Renew the TCP/IP lease
- Turn off your router for 30 seconds and turn it back on
- After the router restarts go to System Preferences, then click on Network and select Wi-Fi.
- Click on Advanced.
- Go to the TCP/IP tab and click on the Renew lease.
3.2 Set a manual IP address
- Go to System Preferences, then click on Network
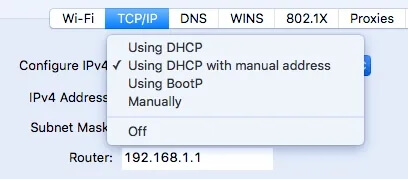
- Click on Wi-Fi, then go to Advanced and choose TCP/IP.
- Set Configure IPv4 to Using DCHP with manual address.
- Set the IP address that you want to use in your local network. Make sure that the address isn’t taken by any other device.
- Save the changes and check if the issue is resolved.
4. Use a dedicated network diagnostic tool
Internet connection problems may be caused by various issues so first, it would be extremely useful if you can pinpoint the issue.
IObit’s Advanced Network Care can diagnose network problems which include the IP, the DNS and proxy, and even the Ethernet & AirPort Connectivity.
This can save you a lot of time since many of the connection problems can be caused by external issues that you’re not able to control.
This awesome tool can also boost your Internet connection to load websites faster and eliminate streaming buffering or lag and can speed up Safari, App Store, iTunes, iCloud, or any other connected app.
There you go, a couple of simple solutions that should help you if your MacBook Wi-Fi gives you No IP address message.
If you have any additional solutions or problems in mind, leave us a line in the comments section below.
FAQ: Learn more about the IP Address problem on MacBook
- How do I fix my IP address on a Mac?
To change or fix your IP address on Mac, you need to renew the DHCP lease from the TCP/IP menu.
- What does it mean if someone is using your IP address on a Mac?
If you see that someone else is using your IP address on a Mac, it might be somebody else using your network, or just another device that you own.
- Is IP address conflict dangerous?
No, it can’t cause any harm to your device, and to resolve it, simply unplug the WiFi router from the power source, wait for 30 seconds, and then plug it back in.
Editor’s Note: This post was originally published in May 2020 and has been since revamped and updated for freshness, accuracy, and comprehensiveness.
User forum
0 messages