Is your Master Boot Record on the wrong drive? Try this
3 min. read
Updated on
Read our disclosure page to find out how can you help Windows Report sustain the editorial team. Read more
Whenever you boot your PC, it will usually boot off of whatever drive has the bootloader installed on it.
This is usually an issue those with multiple drives encounter. This generally happens because the computer may not know which drive has the bootloader by default.
One common misconception is that the drive that has the Windows install files is also the drive that has the bootloader, but that couldn’t be more wrong.
Thus, you may need to change the Master Boot Record (MBR) if it is not on the intended drive. Since this process requires several steps, we’ve compiled a step-by-step guide to show you how you can do this.
How do I change the Master Boot Record?
1. Mark System Partition as Active with Windows Installation Media
- Enter your PC’s BIOS setup
- This procedure varies from PC to PC, so check on your manufacturer’s website for more info
- Go to Boot order
- Set the CD-ROM (for CDs and DVDs) or Removable Device (for bootable USB drives) as the first boot devices
- Save the changes and exit the BIOS setup
- The PC will now reboot from the Installation Media
- Boot your PC using Installation Media
- This could be a CD, DVD or a bootable USB flash drive
- Once in the menu, select Repair your computer
- Choose Troubleshoot
- Select Advanced Options
- Enter the Command Prompt
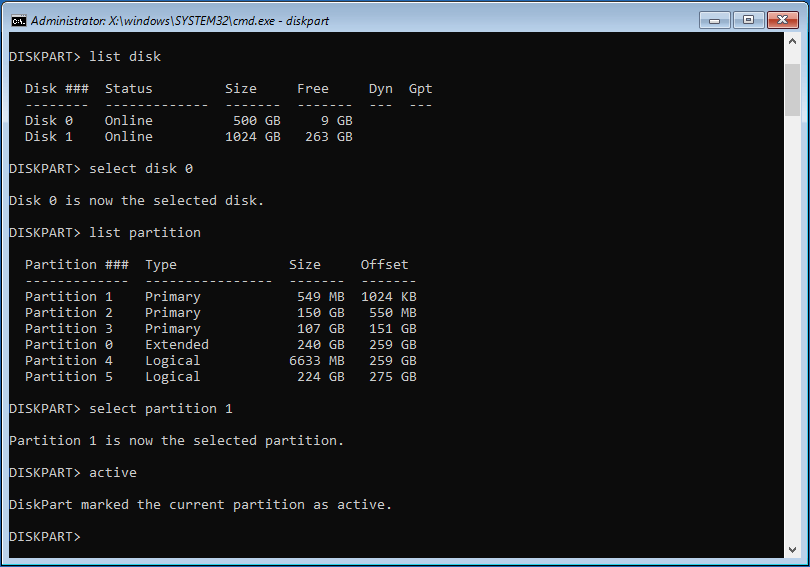
- Input these commands, and hit Enter after each of them:
- list disk
- select disk x (In your case x is the number of the disk you will operate)
- list partition
- select partition y (In your case y is the number of the correct system partition)
- active
Your Windows PC should now booth from the appropriate drive.
2. Mark System Partition as Active with MiniTool Partition Wizard
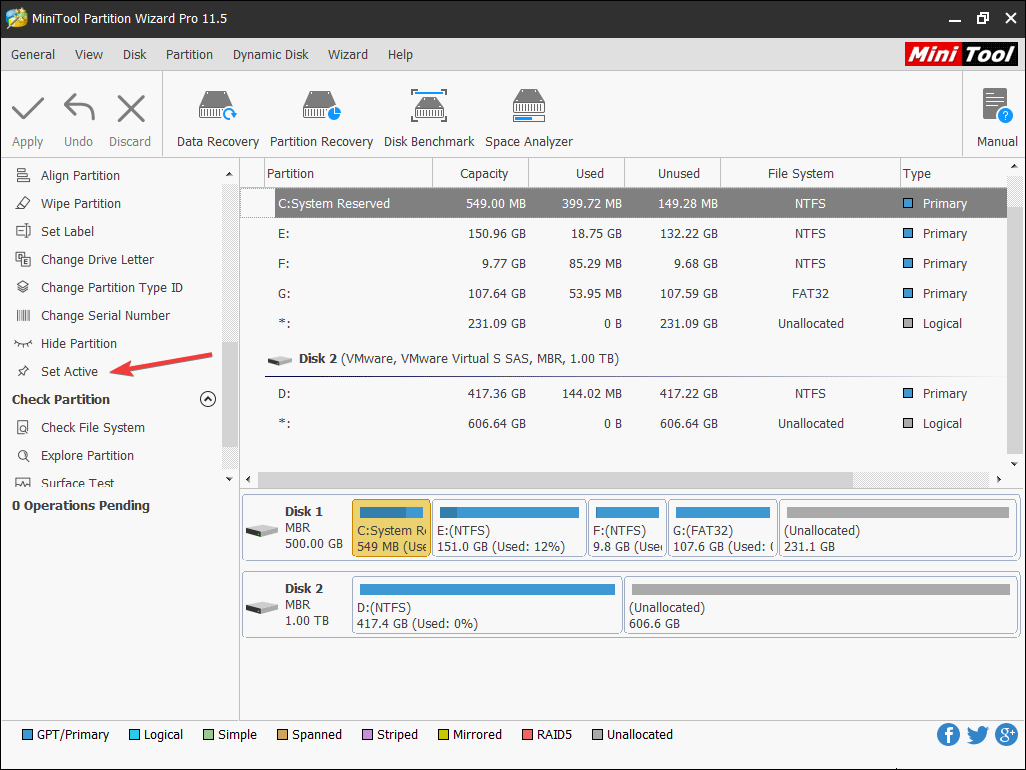
There are plenty of third-party tools out there that can do the same job as the first method, only with fewer steps. One such tool is MiniTool Partition Wizard.
If you want to use it to change the boot drive, then follow the steps below:
- Create a bootable USB drive using the MiniTool Partition Wizard’s Bootable Media Builder
- Enter your PC’s BIOS setup
- Go to Boot order
- Set the Removable Device as the first boot devices
- Select the partition that you want to make bootable, and mark it as Active via the Set Active feature
- Select Apply to save the changes
- Restart the PC
- Go back to the BIOS
- Set the drive as the first Boot order choice
- Save your changes and press Exit
Your Windows PC should now boot from the appropriate drive.
By following any of the two steps, you should be able to change the boot drive of your PC without any issues.
Did you find this guide to be useful? Let us know if you know other methods of changing the boot drive in the comment section below.
RELATED ARTICLES YOU SHOULD CHECK OUT:
User forum
0 messages