5 Easy Ways to Fix Movavi Video Editor Export Failed
Apply these fixes to fix Movavi Video Editor export failed error
5 min. read
Updated on
Read our disclosure page to find out how can you help Windows Report sustain the editorial team. Read more
Key notes
- Movavi Video Editor is a popular video editing tool, but sometimes it cannot export video.
- When encountering a Movavi export problem, you must first update the graphic card driver.
- In this guide, you can also try switching to a dedicated GPU to fix the issue and other solutions.
Movavi Video Editor is a popular video editing tool among beginners as it allows them to edit, enhance videos and add effects without a tedious learning curve.
However, some users reported that Movavi Video Editor failed to export some files. The error can occur due to hardware acceleration problems as well.
If you are also troubled by this issue, here are some troubleshooting tips to fix Movavi video export issues on Windows 10, so keep reading.
Why won’t Movavi export my video?
After some research, we found some common reasons that would trigger the Movavi not exporting your video error.
- You don’t have sufficient storage in the drive you are exporting the video.
- You are using the wrong version of the Movavi Editor.
- Some important files are missing from the Movavi Editor.
- You have not installed the latest update for your graphics driver.
- The dedicated GPU isn’t selected.
How can I fix the Movavi export problem?
1. Install Adobe Premiere Pro
While Movavi is an excellent video editing platform, if it’s causing you problems, the solution might be to switch to an industry-leading video editor like Adobe Premiere Pro.
Thousands of content creators and professionals use it from blockbuster movies to YouTube or home videos. Premiere Pro is a powerful tool that offers creators complete control over their videos.
Thanks to its seamless integration into the Creative Cloud, you can easily add resources from other programs like Photoshop, After Effects, or Illustrator (to name a few).
Check out some of its features:
- On-the-go edits with the Premiere Rush mobile app
- Automated editing with Adobe Sensei
- VR support
- Perfect color grading with Lumetri Color Tools
Adobe Premiere Pro
With Adobe Premiere Pro, you can easily edit video and audio from any source in 8K resolution.2. Disable the Hardware acceleration
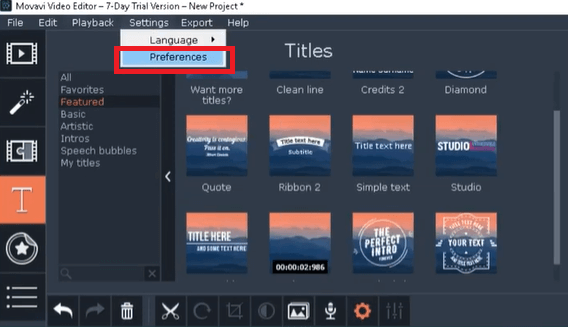
- Launch Movavi Video Editor.
- Click on Settings, and select Preferences.
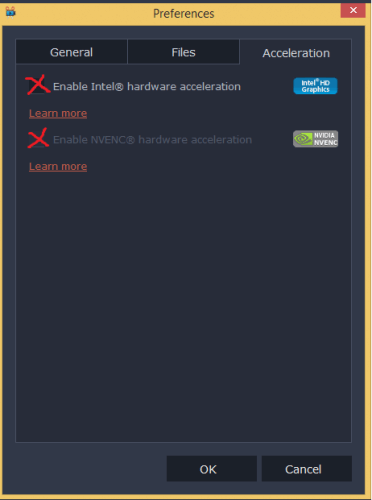
- In the Preferences window, click the Acceleration tab.
- Uncheck the Enable Intel Hardware acceleration option.
- Click OK to save the changes.
- Close, and relaunch Movavi Video Editor.
- Now try to export the video with the error, and you should be able to export the video this time without any issues.
3. Update the graphic card driver/display adapter
- Press Windows + R to open Run.
- Type devmgmt.msc and click OK to open the Device Manager.
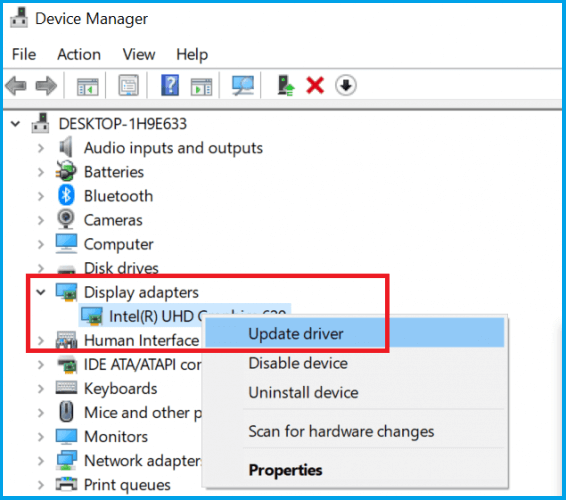
- Expand the Display adapter.
- Right-click on Intel UHD Graphics and select Update Driver.
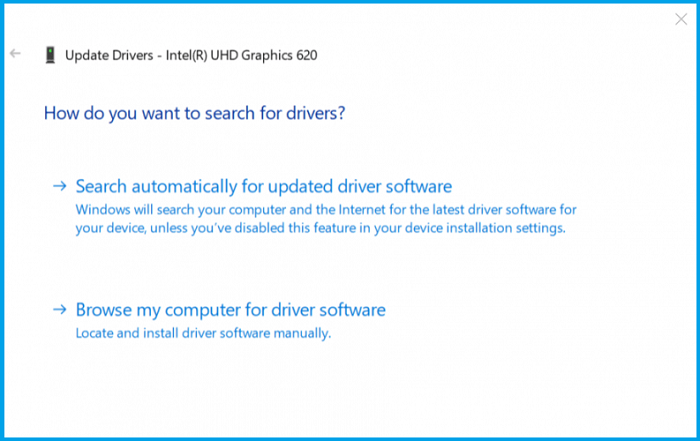
- Select the Search automatically for updated driver software option.
- Wait for Windows to download and install any updates available for the display adapter.
- After the update is installed, reboot the system and check for any improvements.
- If you have a dedicated GPU, update the GPU graphics driver from the Device Manager or use the GPU manufacturer’s proprietary software.
Often, this method will not find the latest driver from the manufacturer. If this happens, you should use an automated tool to find the update online, Outbyte Driver Updater.
Outbyte Driver Updater is specialized software that will scan your PC for outdated drivers and update all of them if possible. It has a database of over 18 million driver files to facilitate this process.
4. Switch to dedicated GPU for video rendering
For NVIDIA GPU:
- Right-click on the Desktop, and select NVIDIA Control Center.
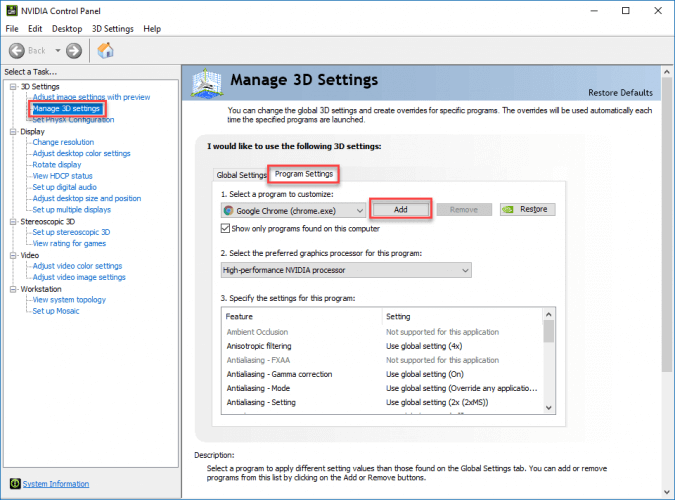
- Go to Manage 3D Settings, and select Program Settings.
- Add videoeditor.exe manually and select High-Performance NVIDIA GPU as the preferred option.
- Click OK to save the changes, and close the Control center.
For AMD (ATI) Users:
- Right-click on the Desktop, and select Radeon (Catalyst) Control Center.
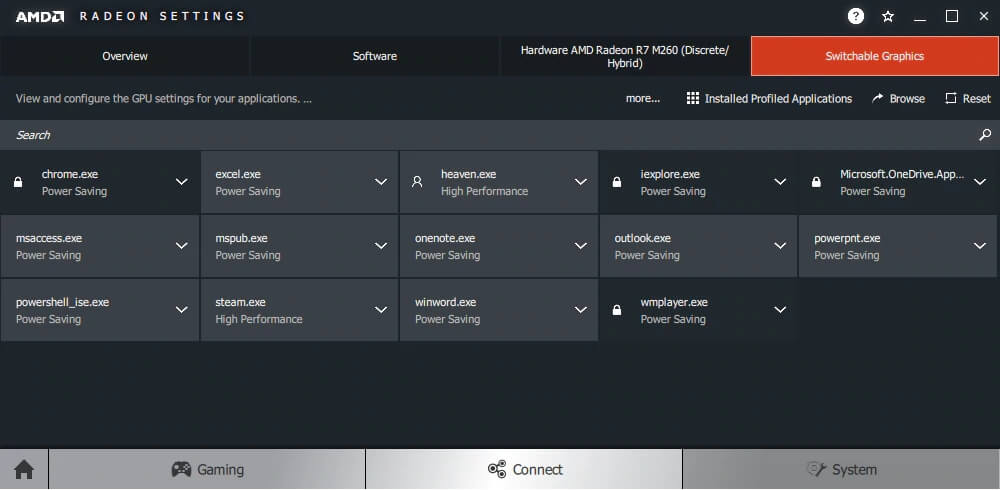
- Click on Power, and select Switchable Graphics Application Settings.
- Now add videoeditor.exe manually (make sure you add the correct module depending on the Movavi video editor suite installed).
- Select High performance as the preferred adapter.
- Click OK to save the preference, and close the Control Center.
If you are using an integrated Intel Graphic processor to render the video, try switching to the discrete graphics card installed in your system.
Once you have set the preferred graphics adapter to the dedicated GPU, try to export the video and check for any improvements.
5. Other solutions to try
- Check the amount of free space on your hard drive. Make sure you change the output drive if the current drive is low on space.
- If the files were added from a secondary device, ensure they are still connected until the video is exported.
Why does Movavi crash when exporting?
- The encoder has stopped due to faulty drivers.
- Your PC does not have sufficient free space to export the file.
- The integrated GPU might be selected as your default graphics card, which cannot handle the export process.
- The codec activation is rejected, restricting you from exporting videos in specific formats.
- If you have applied stabilization to your video due to a lack of resources, the Movavi Editor cannot render the output.
Following this article’s steps should help you resolve the video export issues in Movavi Video Editor. Do let us know which solution worked for you in the comments.


User forum
0 messages