Fix: No Signal on the Monitor but the PC is Working
Choose the correct display resolution
Key notes
- The no signal on monitor error may suddenly show up whenever you power on your Windows PC.
- This issue mostly occurs due to hardware issues such as a damaged HDMI cable as well as an outdated graphics card driver.
- Updating your display drivers and choosing the correct input source may prove helpful in this scenario.

In an unfortunate circumstance, you might have noticed a no-signal error on the monitor as soon as you turn on your Windows PC. When this happens, no image is displayed on the screen, rendering your monitor useless.
If you are facing the same issue on your system, this guide has got you covered.
Why is there no signal on the monitor, but the PC is working?
- Loose or faulty cables – A loose connection between the PC and Monitor and a broken cable often causes this error.
- Incorrect display settings – The no signal on monitor error also indicates that the display settings are not properly configured.
- Faulty monitor – You may also witness the no signal on the monitor message if there is some fault in the output device itself.
- Outdated drivers – If the display drivers become corrupt or outdated, you are likely to face display errors like the one at hand.
- Hardware issue – Some physical damage to the hardware, particularly the monitor, CPU, and cables, can also trigger the error.
Regardless of the reasons why the no signal error on the monitor error shows up, it is quite easy to troubleshoot.
How do I fix the no signal on the monitor error?
Before moving on to advanced fixes, you should check that the video cable is firmly connected, make sure that the graphic card is firmly inserted into its slot located on the motherboard, and connect a spare monitor to the PC to check for any damage to the monitor.
1. Select the correct input source
- Power on your computer and then your monitor.
- Press the Menu button on the side of the monitor to view the menu options.
- Keep pressing the Menu button to access the Input Source and then select the correct choice. For instance, if your monitor is connected to the VGA port, you should select VGA as the input source.
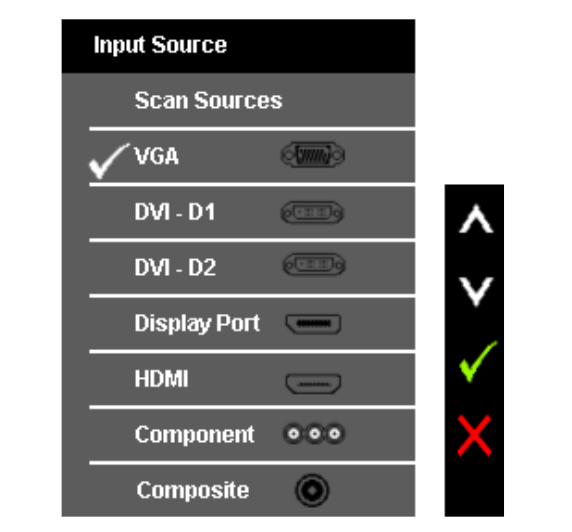
If the incorrect input source is selected, your system will run into the no signal on monitor issue. Hence, you should verify that your monitor is connected to the correct input source selected in the settings.
2. Update your graphic driver
- Right-click the Windows icon on the taskbar to access the Quick Links section and choose Device Manager from the list of options.

- Expand the Display adapter category to view the list of graphic cards installed on your computer.
- Right-click each graphic card one by one and select the Update driver option from the context menu.

- Next, click the Search automatically for drivers option on the pop-up window that appears.
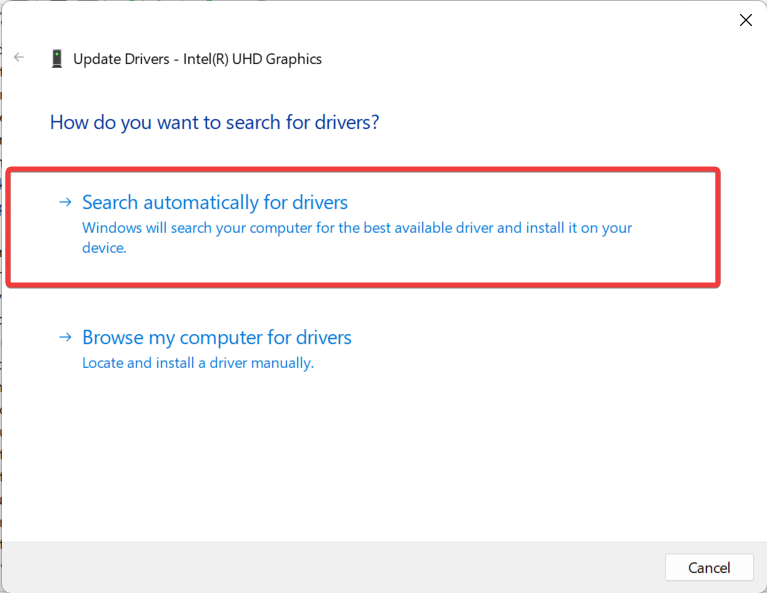
- Now wait for Windows to look for any available driver update and automatically download and install it.
Apart from this, you can visit the manufacturer’s website to download and install the latest available driver updates or use a specialized tool like PC HelpSoft Driver Updater that can automatically replace all outdated drivers with the newest versions.
Outdated display drivers often cause compatibility issues between the system and the output display device, causing errors like the one at hand.
3. Check The Resolution Settings
- First of all, boot your PC in safe mode from the bios settings.
- Now access the Windows Settings using the Windows + I shortcut keys.
- Choose the Display option located in the System settings section.

- Look for the Display resolution option under the Scale & Layout section and click to expand the drop-down next to it.

- Choose the relevant display resolution with respect to the maximum capability of the monitor.
- Press the Keep Changes button on the confirmation popup to apply the changes.
You can check the ideal display resolution settings mentioned on the graphics card to ensure that the correct options are selected.
A no signal on monitor error can occur if the display resolution is higher than your graphic card can handle.
That’s everything about the no signal error on the monitor and the different ways to tackle the problem.
If the monitor turns off or goes black randomly, check the dedicated guide to fix the problem.
Before you go, check our guide on troubleshooting DP signal loss on Dell laptop monitors if you’re having additional problems.
In case you have any queries or feedback, reach out to us in the comments section.
Read our disclosure page to find out how can you help Windows Report sustain the editorial team. Read more


Improve this guide

User forum
0 messages