How to Wrap Text in Notepad ++
A comprehensive guide on the Word wrap option
3 min. read
Updated on
Read our disclosure page to find out how can you help Windows Report sustain the editorial team Read more
Key notes
- Notepad++ is a third-party texteditorforWindows that includes a handyWordwrap option.
- You need to enable text wrapping in Notepad ++ before you can use the Word wrap option on your files.
- Users can give this feature a hotkey, for fast access in the future.

Notepad++ is one of the best text editors for Windows that’s packed with handy options, which users worldwide very much like.
One of the best is the handy Word wrap option that adds line wraps to documents. That’s an important option as it wraps lines so that they fit within the Notepad++ window.
How can I wrap lines in Notepad ++?
1. Enable text wrapping in Notepad ++
- Launch Notepad ++.
- Click the View button from the menu at the top of the window.
- Choose the Word Wrap option from the dropdown menu.
Clicking the Word Wrap option once will either turn off or turn on the feature, depending on the original state of this setting.
2. Wrap text in Notepad ++
1. Launch Notepad ++.
2. Click on File > Open, then select a text document to open from your PC.
3. To add a line wrap, click the View menu.
4. Select the Word wrap option on the menu. Thereafter, all the lines will be wrapped so they fit within the window.
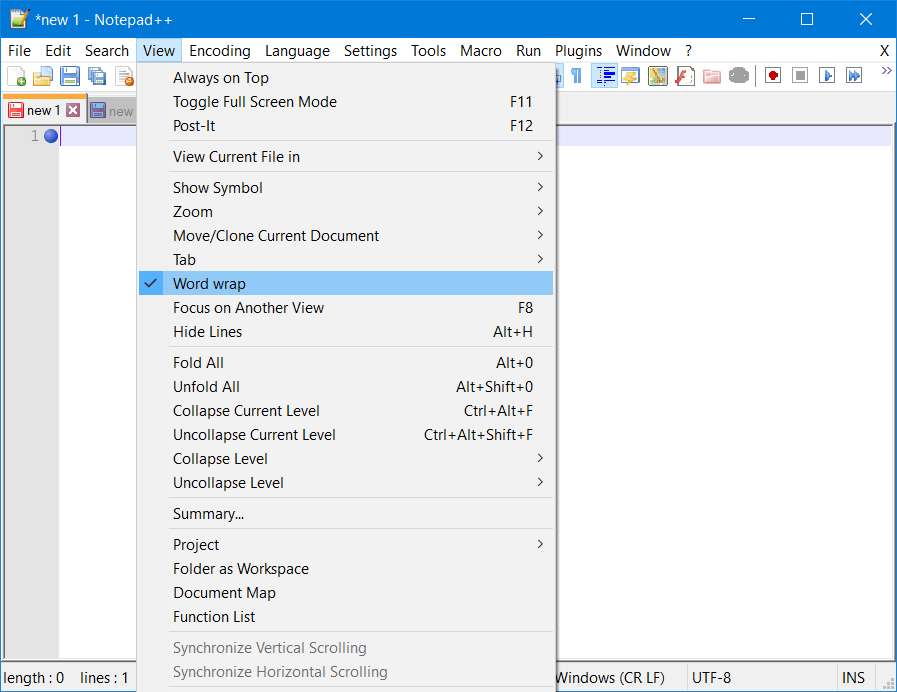
5. Alternatively, you can click the Word wrap button on Notepad++’s toolbar to add line wrap to a text document.
After you enable text wrapping in Notepad ++, you can begin using the feature to your liking. All you need to do is open the file you want to edit text in and apply the wrapping feature to it.
3. Give Word wrap a hotkey in Notepad++
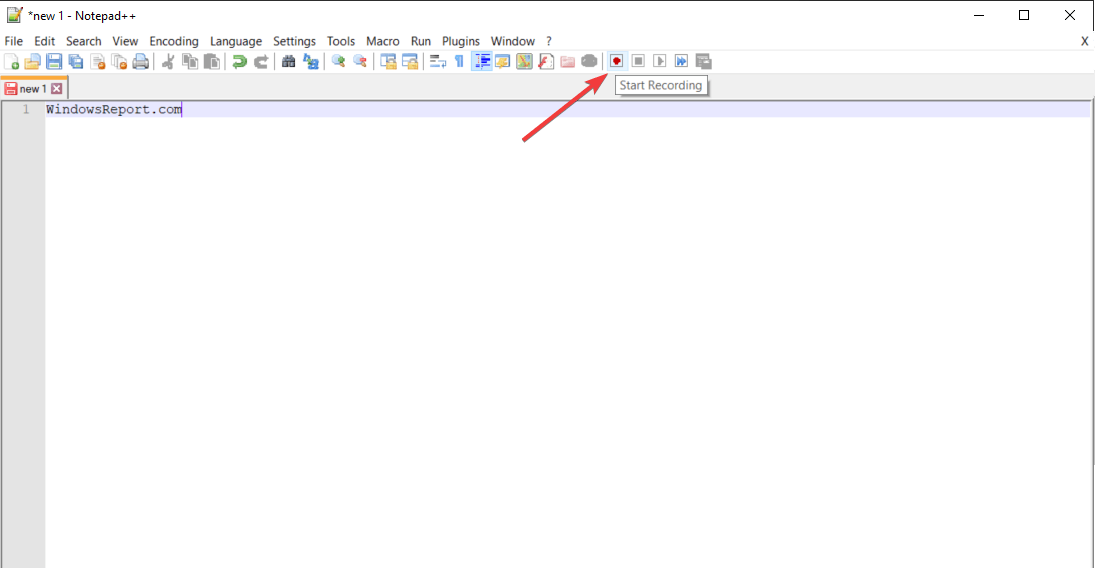
- You can assign a hotkey to the Word wrap option by recording a macro for it. To do that, click the Start Recording button shown directly below.
- Then click the View menu to select Word wrap.
- Click the Stop Recording button.
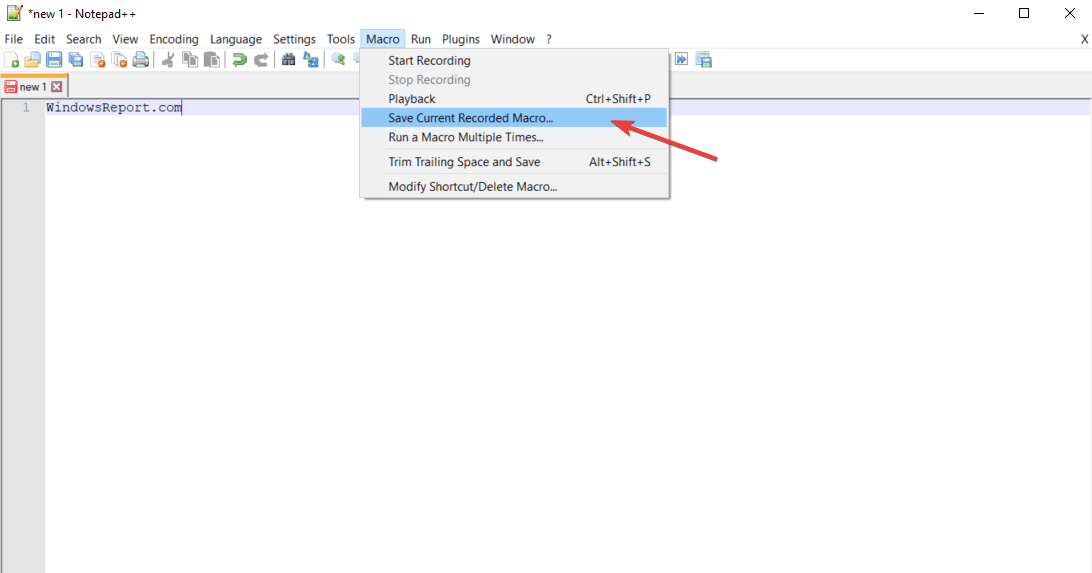
- Click the Macro menu.
- Select the Save Current Recorded Macro option.
- Enter a title for the macro in the text box.
- Select the Ctrl and Shift checkboxes. Then choose an additional keyboard key for the hotkey.
- Press the OK button.
- Then you can press your Ctrl + Shift hotkey to add line wrap to a document.
4. Wrap lines in Notepad++ after N symbols
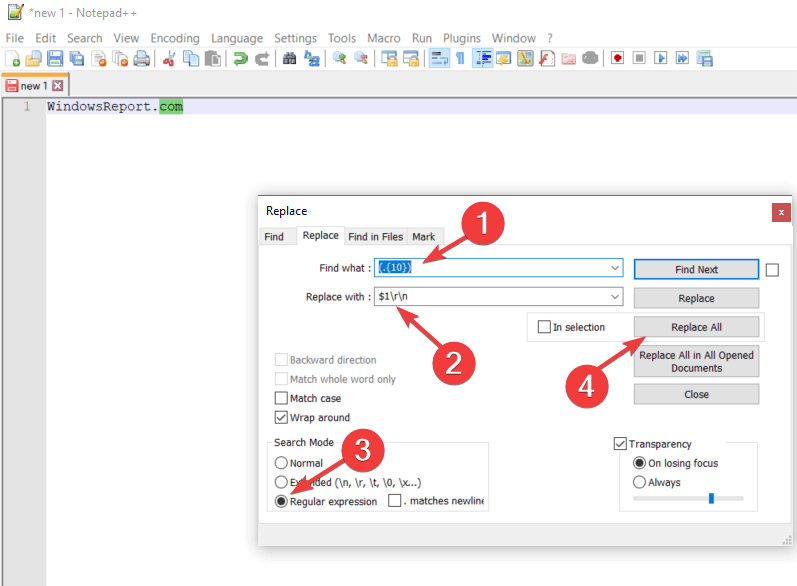
- You can also wrap lines after a specified number of characters or symbols. To do that, click the Search menu, and choose Find, and click the Replace tab.
- Enter (.{10}) in the Find what box. The 10 value specifies a maximum line length of 10 characters for lines, which you can adjust.
- Next, input $1rn in the Replace with a text box.
- Select the Regular expression radio button.
- Click the Replace All button. Then your lines will wrap to a maximum 10 (or whatever value you entered) character length.
5. Get the file to wrap the line at 70+ characters
- Make sure to back up your file before attempting this method.
- Download and install the TextFX plugin to your Notepad++ (download will start automatically).
- Note the number that represents the length you want your text to wrap to (70+ in this case).
- Copy the number to your clipboard.
- Select the piece of text you want to wrap.
- In the top menu, click on TextFX, and choose the TextFX Edit option.
- Choose the option ReWrap Text to your desired 70+width.
So, adding line wrap is straightforward in Notepad++. With Word wrap selected, you won’t need to scroll across text documents anymore as all their lines will fit neatly within the Notepad++ window.
Let us know what you think about our article in the comments section below.

