Is NVME not Detected in BIOS? 3 Ways to Fix It Now

If your NVMe is not showing up in BIOS, it can be alarming, especially when you expect your system to recognize a new high-speed SSD. Problems like NVMe not appearing in my computer or an installed NVMe not showing up often stem from BIOS misconfigurations, hardware incompatibility, or missing initialization. This guide walks you through proven solutions.
What can I do if NVMe is not showing up in BIOS?
Table of contents
- What can I do if NVMe is not showing up in BIOS?
- 1. Configure M.2 SSD
- 2. Disable Secure Boot
- 3. Set PCIe setting to M.2
- 4. Update BIOS Firmware
- 5. Switch Storage Mode to AHCI / UEFI
- 6. Check Lane Sharing & SATA Conflicts
- 7. Try a Different M.2 Slot
- 8. Test the NVMe in Another System
- 9. Clear CMOS / Reset BIOS
- 10. Check Compatibility
- Are M.2 SSDs faster than SATA SSDs?
1. Configure M.2 SSD
 NOTE
NOTE
- To access BIOS, turn on your computer and press the F or DEL keys, depending on your motherboard manufacturer. This key can be different based on your motherboard.
- Next, head over to Storage Configuration.
- Under SATA Configuration, click on Configure SATA as.
- Then, choose IDE by pressing Enter.
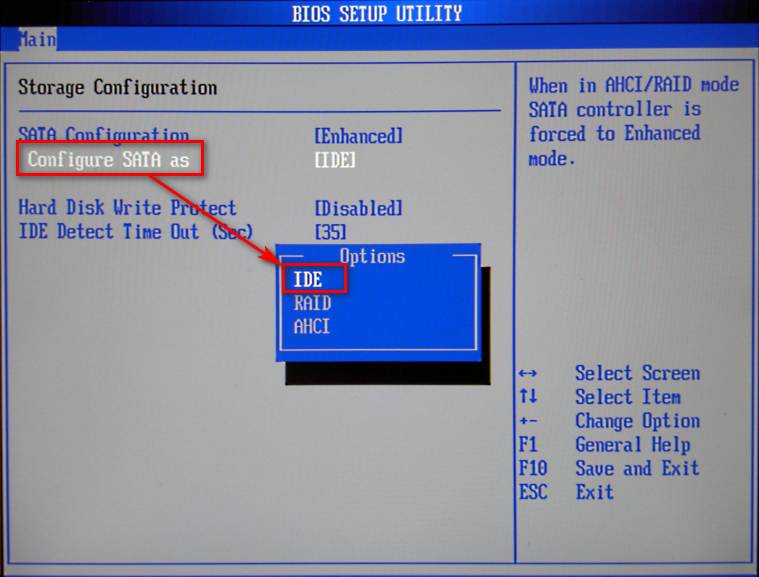
- Finally, press F10 to save your new BIOS settings and exit.
If you configure your SATA device to something other than IDE in BIOS, your NVME drive may not show up.
2. Disable Secure Boot
- First, reboot your computer and press the dedicated key for your motherboard to get into BIOS.
- Next, go to the Security tab and click on Secure Boot.
- Select Disabled from the menu.

- Then, head over to the Save & exit tab.
- Press Save Changes and select Yes afterward. Make sure not to choose Save Changes & Exit.
- Go to the Security tab again.
- Choose Delete all secure boot variables and select Yes.
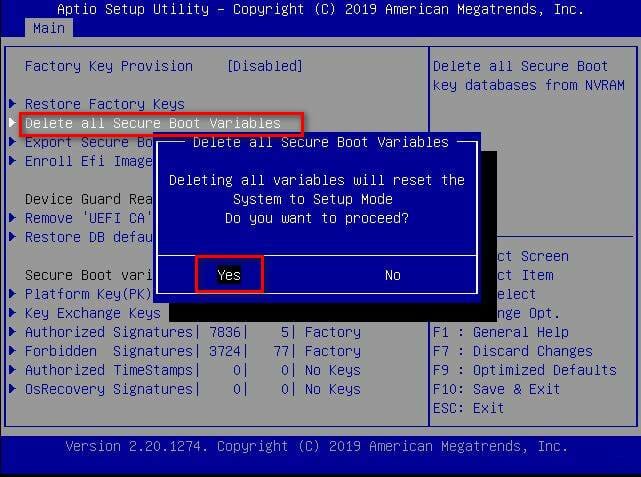
- Finally, select OK to reboot your computer.
3. Set PCIe setting to M.2
- Reboot your PC and press the designated key for your motherboard to enter BIOS.
- Select Advanced Settings. For some motherboards, you can also press F7 to access the menu.
- Then, under Onboard Devices Configuration, search for PCI Express slot Bandwidth.
- After that, set its value to M.2 mode if it is not already that.

- Press F10 to save the changes and exit.
Setting PCIe to M.2 is one of the simplest and most effective ways to resolve the NVMe not showing in the BIOS problem.
4. Update BIOS Firmware
- Download the latest BIOS version from your motherboard manufacturer’s support page.
- Outdated firmware may lack proper NVMe support.
- Follow the manufacturer’s instructions carefully (often through a USB stick and the built-in BIOS flash tool).
5. Switch Storage Mode to AHCI / UEFI
- In BIOS, go to Advanced → Storage Configuration.
- Change mode from IDE or RAID to AHCI (or UEFI if it’s in Legacy mode).
- Save and reboot — this helps the BIOS properly detect NVMe drives.
6. Check Lane Sharing & SATA Conflicts
- Some motherboards disable certain SATA ports when an NVMe drive uses their PCIe lanes.
- Disconnect all SATA drives temporarily and check if the NVMe appears.
- Then reconnect drives to different ports if needed.
7. Try a Different M.2 Slot
- Many boards have more than one M.2 slot, but only one may support NVMe at full PCIe speeds.
- Swap the SSD into the primary NVMe-supported slot (usually closest to the CPU).
8. Test the NVMe in Another System
- Insert the SSD into another PC or use an external NVMe-to-USB enclosure.
- If the drive works, your motherboard slot or settings are the issue.
- If it doesn’t, the SSD may be defective.
9. Clear CMOS / Reset BIOS
- Power down and remove the CMOS battery for 1–2 minutes, or use the reset jumper.
- Restart with default BIOS settings and reapply the NVMe configuration.
10. Check Compatibility
- Some older boards only support NVMe as a storage drive, not a boot drive, unless a BIOS update adds boot support.
- Verify in your motherboard manual whether NVMe boot is supported.
Are M.2 SSDs faster than SATA SSDs?
SATA SSDs use the AHCI (Advanced Host Controller Interface) protocol and have a faster data transfer speed, nearly 600MB/S. However, this is not the case with M.2 SSDs.
Those are keyed to avoid the insertion of a card connector into a non-compatible socket. They typically use three keys which are B, M, and B+M.
If these storages use a B key, are connected to a Socket 2, and support NVMe protocol, the M.2 drive is at least three times faster than a SATA SSD.
However, if it uses an M key, is connected to a Socket 3, and supports the NVMe protocol, the M.2 drive is at least seven times faster than a SATA SSD.
One thing worth mentioning is that if you want your modern devices to be recognized by your computer, you need to keep your BIOS updated. To understand M.2 better, check out this comprehensive guide on M.2 SSDs.
If you fixed NVMe hard drive not showing up in BIOS, but now your system does not recognize your M.2 SSD, make sure to update your M.2 driver.
Otherwise, you may be interested in downloading and installing the Samsung NVMe driver for Windows 11 so check out our detailed article on how to go about it.
We also have a great guide on how to format an NVMe SSD, so don’t miss it. In case you have additional problems, our guide on M.2 SSD not showing up in Windows can also help.
Let us know which method you used to fix NVMe not detected in BIOS in the comments section below.
Read our disclosure page to find out how can you help Windows Report sustain the editorial team. Read more


Improve this guide


User forum
3 messages