How to Disable Pepflashplayer.dll in Google Chrome
This file can consume a lot of resources of your PC
![]() 3 min. read
3 min. read
![]() Updated on
Updated on
Share this article
Improve this guide
Read our disclosure page to find out how can you help Windows Report sustain the editorial team. Read more
Dealing with the pesky pepflashplayer.dll in Google Chrome can be quite a hassle, especially when it causes performance issues or security concerns. If you’re looking for straightforward ways to disable this plugin, you’re in the right place. Here are some easy steps to get it done.
How do I disable Pepflashplayer.dll?
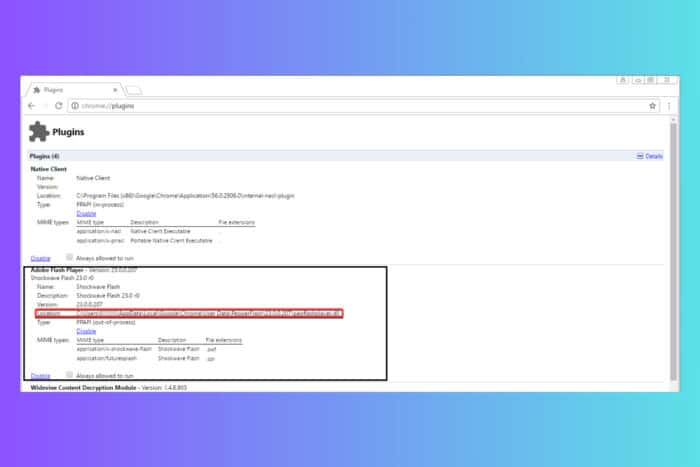
1. Disable Pepper Flash Player via Chrome Plugins
- Open Google Chrome.
- In the address bar, type chrome://plugins and hit Enter.
- Locate Adobe Flash Player (Pepper Flash) in the list.
- Click on the Disable link right below the plugin name.
This solution will help stop Pepper Flash from running in Chrome by disabling it directly through the browser settings.
2. Delete the PepperFlash folder
- Open Google Chrome and navigate to chrome://plugins.
- Disable the PepperFlash by clicking the Disable link.
- Locate the path of the PepFlashPlayer.dll file.
- Open File Explorer (Win + E) and navigate to the path identified.
- Delete the PepperFlash folder.
- Restart your computer.
By deleting the entire PepperFlash folder, you ensure that the plugin is completely removed from your system, preventing any further automatic activation.
3. Use Windows Security to deny permissions
- Open File Explorer (Win + E).
- Navigate to the following path or enter it in the address bar:
%userprofile%\AppData\Local\Google\Chrome\User Data\Default\Extensions - Right-click on the Extensions folder.
- Select Properties and then click on the Security tab.
- Click Edit to change permissions.
- Select your user account and check the Deny box for Write and Modify permissions.
- Click Apply and then OK to save the changes.
Setting the folder permissions to deny write and modify access will prevent Chrome from installing any new plugins automatically, including Pepper Flash.
4. Rename the PepFlashPlayer.dll file
- Navigate to the PepFlashPlayer.dll file location, usually found in
C:\Users\[YOUR_USER]\AppData\Local\Google\Chrome\User Data\PepperFlash\[version_number]\ - Right-click on PepFlashPlayer.dll and choose Rename.
- Add a suffix to the file name, e.g., PepFlashPlayer_old.dll.
Renaming the DLL file will effectively disable the Pepper Flash plugin since Chrome won’t be able to access the required file to run it.
5. Use Chrome Extension API
- Visit the Chrome Extensions API documentation.
- Write a Chrome extension script that uses the API to disable the Pepper Flash plugin.
- Package the extension and distribute it to your users for installation.
Creating a Chrome extension using the official API can deliver a programmatic solution to disable Pepper Flash without needing manual intervention from users.
By following these steps, you can effectively disable the pepflashplayer.dll in Google Chrome and improve your browsing experience. To prevent future issues, keep your browser and plugins updated regularly and consider using security extensions.
Some would want to remove the Flash Player completely from their PCs. However, there are not so many browsers that still support Flash Player.
You can also learn how to disable Google Lens during image search.
Did you manage to disable pepflashplayer.dll from Chrome? Let us know in the comments below.


User forum
0 messages