Full Fix: PureVPN not Working [Connection Errors & More]
Fix PureVPN client with our tested solutions and errors report
8 min. read
Updated on
Read our disclosure page to find out how can you help Windows Report sustain the editorial team Read more
Key notes
- PureVPN is known as a good choice to unblock Netflix and is one of the oldest providers in the market.
- Some users are experiencing errors with the client - connecting to server issues mainly.
- Most connectivity issues are merely temporary and usually fix themselves after a while.
- However, if you notice that the issue is persistent, our guide can help you fix it quickly.

PureVPN is one of the best VPNs you can get for your device. And, although it’s not exactly free, you can get a PureVPN free trial.
Some Windows 10 users have raised concerns as to what to do when PureVPN doesn’t work on the operating system.
This article looks at the possible reasons why PureVPN Windows 10 is not working, and the corresponding solutions to fix the problem.
Why is my PureVPN not working?
Firstly, you have multiple causes that generate working issues with this VPN client and it involves separate resolutions.
It’s possible that your VPN is not properly configured so the protocols are set incorrectly. Plus, you should double-check your VPN credentials to see if they are correct.
According to other users, there are various issues regarding PureVPN functionality and these are like this:
- PureVPN invalid credentials or account disabled
- PureVPN an error occurred in connection
- PureVPN unable to connect to remote server
- PureVPN unable to fetch your details – PureVPN api_login_18
- PureVPN error code 4001, 5012, 1
- PureVPN error 5040, 5059, 5006
- PureVPN not working on Android, Firestick, Windows 10
- PureVPN not connecting after update
- Connected to PureVPN but cannot browse the internet
Quick Tip:
As an alternative, this suggested VPN doesn’t have any issues connecting to their servers like PureVPN.
ExpressVPN has a long history of offering quality services such as unlimited bandwidth, VPN speed test, or streaming optimized servers in 94 different countries. Plus, you have private DNS security for each server.

ExpressVPN
Get this VPN with a hyper-fast connection as a great alternative to PureVPN.How to fix PureVPN Windows 10 not working?
Here are some possible reasons why PureVPN is not working on Windows 10:
PureVPN connection issues
1. Reinstall OpenVPN protocol
If you recently upgraded to Windows 10, you may encounter some minor connectivity issues with PureVPN.
If you installed PureVPN’s client, uninstall it, then restart your computer, and download and install PureVPN again.
Check your connectivity by trying to browse or download from the internet while connected, and while not connected to PureVPN.
NOTE: After reinstalling PureVPN, if you get the message to install OpenVPN, right-click on the PureVPN icon from the system tray and select reinstall OpenVPN.
If you still get issues, do the following:
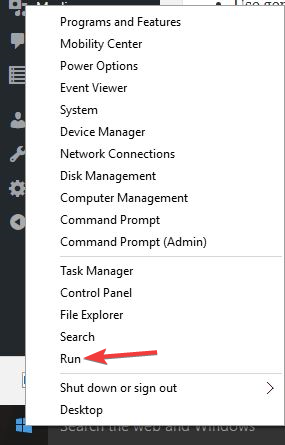
- Click Start and select Run
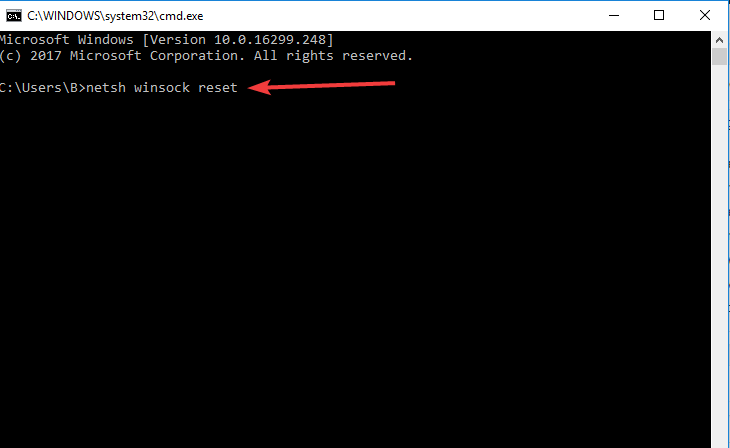
- Type cmd.exe and press enter
- Enter netsh winsock reset on the black screen
- Restart your PC
If that doesn’t work, run these commands in the same way as above:
- ipconfig /release
- ipconfig /renew
- netsh winsock reset catalog
- netsh int ip reset reset.log hit
2. Check all connection causes
Here’s what to do when you’re unable to connect PureVPN in Windows 10:
- Check that your user credentials are correct i.e. username and password
- Switch between different VPN protocols i.e. PPTP/ L2TP/ SSTP / IKEV2 / OpenVPN TCP & UDP
- Switch between different servers and/or locations.
- Security software and third-party apps can block the PPTP and L2TP protocols especially when your security is set at a level higher than normal. Disable these apps and try again. If it resolves your issue, allow PPTP, L2TP, and IPSec through your software security and then enable the firewall(s).
- In case you are connected to a WiFi router, check for PPTP, L2TP, and IPSec pass-through options under the router firewall/security tab and enable them. If you don’t have PPTP, L2TP, and IPSec pass-through options, disable the Router firewall and try again. If it resolves the connection issue, then allow PPTP, L2TP, and IPSec through your router firewall and then enable the firewall.
3. Change the DNS address/ proxy settings
Here’s how to resolve this issue:
Change your DNS – you can change your network adapter DNS to the following:
- Google DNS: 8.8.8.8 / 8.8.4.4
- Open DNS: 208.67.222.222 / 208.67.220.220
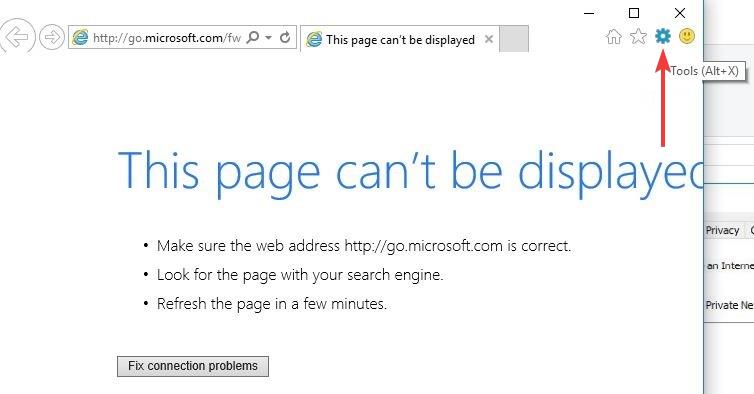
You can also change browser proxy settings based on your browser. If you’re using Internet Explorer, do the following:
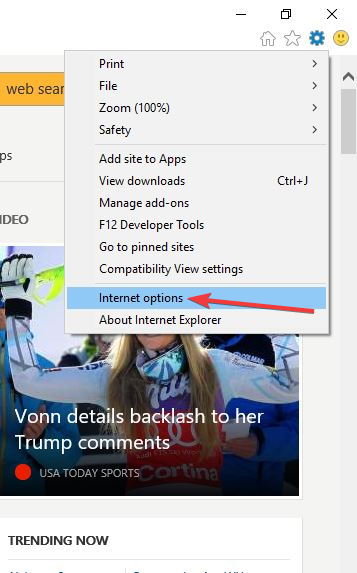
- From the Tools or gear menu
- Select Internet options.
- In the Connections tab, click LAN settings.
- Uncheck all of the displayed options except Automatically detect settings.
- Click OK
- Close your browser and open it again.
If PureVPN is not able to connect to remote server, the steps above should do the trick.
4. Change your network configuration
PureVPN may not work in Windows 10 because the operating system isn’t able to apply the network configuration of a previous Windows version to the current version 10.
Some users also reported that they had issues with the search bar, cryptic error messages, or Cortana not working. You can opt for a clean install, or do a reset of Windows.
PureVPN error codes
5. Error 809 – Windows
This error is usually displayed as “The network connection between your computer and the VPN server could not be established.” By default, Windows does not support IPSec NAT-T security associations to servers located behind a NAT device.
Because of the manner in which NAT devices translate network traffic, you may experience unexpected results when you put a server behind the NAT device and use IPSec NAT-T environment.
Here’s how to fix this:
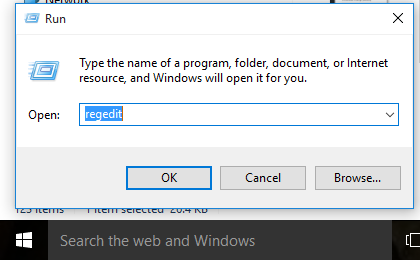
- Right-click Start and select Run
- Type regedit
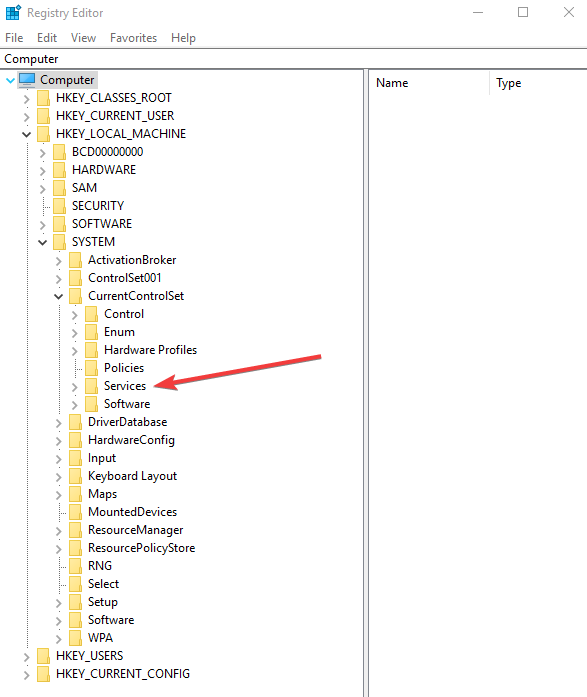
- Locate the entry: HKEY_LOCAL_MACHINESYSTEMCurrentControlSetServicesPolicyAgent
- Right-click and click New
- Click to create a new DWORD (32-bit) value.
- Add “AssumeUDPEncapsulationContextOnSendRule” and save.
- Modify the new entry and change Value Data from “0” to “2”.
- Restart your computer and test the connection
Note: If you still cannot connect, try it with OpenVPN TCP / UDP protocols.
6. Telnet Error
Telnet errors are caused during logon to the Telnet server. Here’s how to fix it:
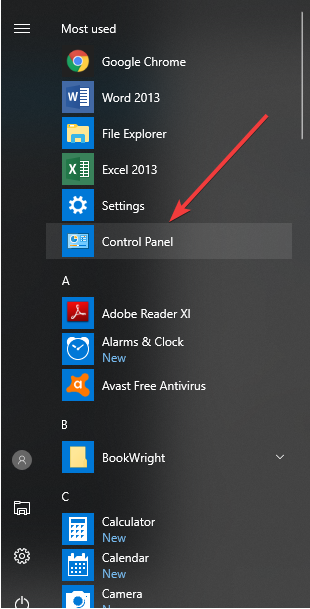
- Click Start
- Go to Control Panel
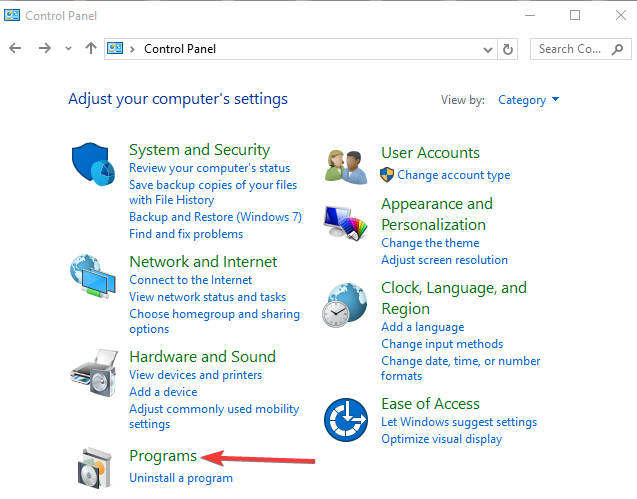
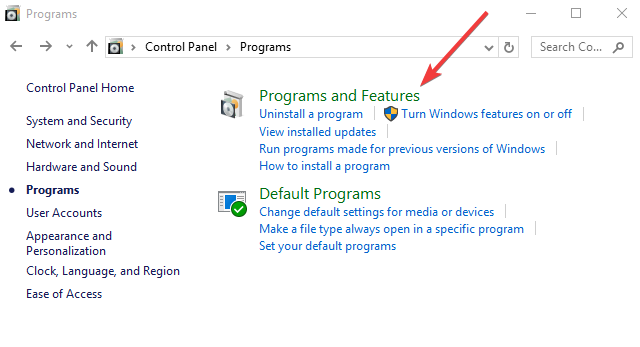
- Click Programs
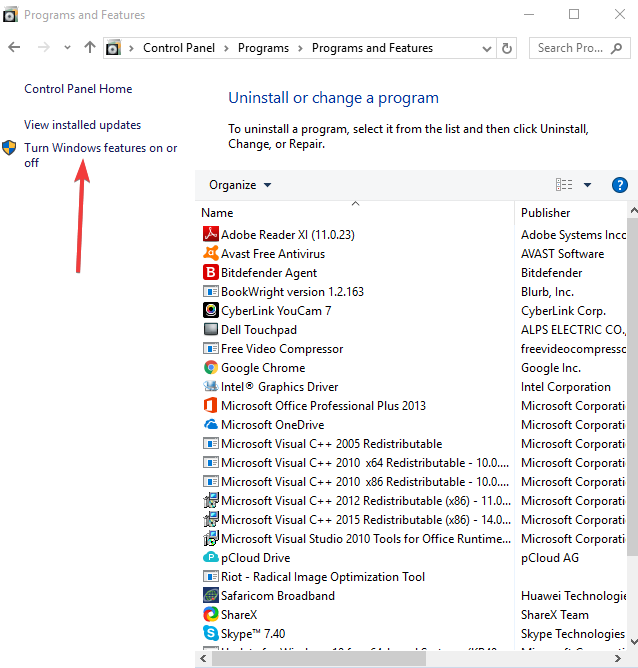
- Select Programs and Features
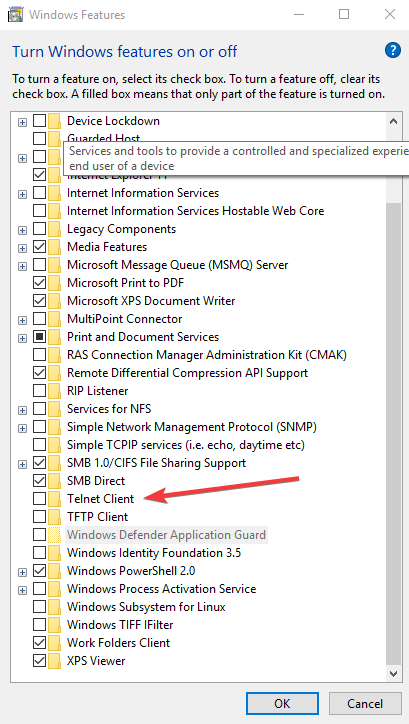
- Click Turn Windows features on or off
- In the Windows Features dialog box, check the Telnet Client check box
- Restart Windows & connect VPN
7. Error 720 – Windows
This is usually caused by corrupted WAN mini ports. If you get this while using PureVPN in Windows 10, switch between different servers. If this doesn’t help, do the following:
- Create a restore point by typing system restore on the search bar
- Exit PureVPN
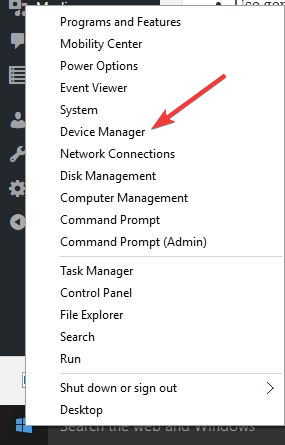
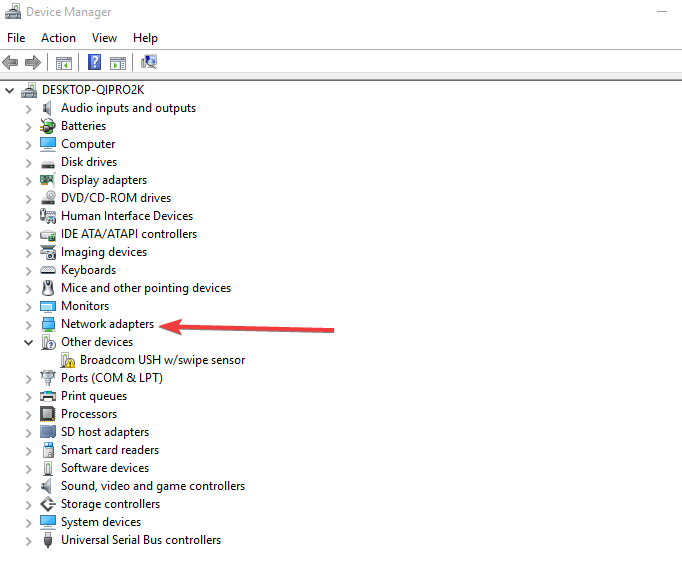
- Right-click Start and select Device Manager
- Open Network adapters
- Uninstall All WAN Miniport, VPN Client Adapter
- Click Scan of Hardware changes. It will populate with new WAN Miniport adapters
- Open the application as Run As Administrator
You should be able to connect with RAS protocols (PPTP/L2TP/SSTP/IKEV2) now. If not, reset the TCP/IP Protocol by doing the following:
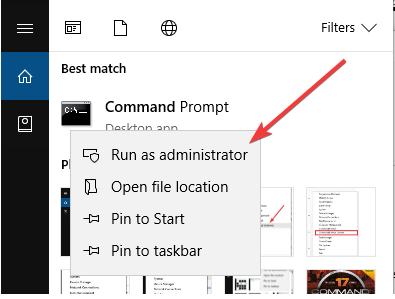
- Go to the search bar and type CMD
- Right-click on Command Prompt and select Run as administrator
- Type netsh int ip reset resetlog.txt
- Restart your computer and connect PureVPN again.
If problem persists, reset the network:
- Click Start and select control panel
- Click Programs and go to add/remove programs and then to Windows components and uncheck networking
- Reboot your computer.
- Repeat the same as above this time check networking
- Go to Run and type cmd, press enter.
- Type netsh int ip reset reset.log and press enter
- Type ipconfig /flushdns and press enter
8. Error 691
- Make sure the correct username and password are entered. Please check your email for the correct VPN credentials
- While typing credentials, ensure that the ‘Caps Lock’ button is turned off, type Username and Password manually, do not copy/paste
- Make sure your PureVPN account is not expired
9. Unable To Start OpenVPN Services
- Right-click on the PureVPN icon and select Run as Administrator to launch PureVPN Client
- Right-click on the PureVPN icon from System Tray and select Re-install OpenVPN.
- Once installation completes then re-launch application as Administrator and connect VPN.
10. Error 647
Your PureVPN account can be disabled because of excessive sessions, and payment verification due to incomplete or mismatched information.
Or, more than five devices are connected simultaneously. If this happens, check your inbox for instructions from PureVPN when your account is disabled, or contact their tech support for real-time assistance.
The Windows 10 VPN error 812 reads as: “812: The connection was prevented because of a policy configured on your RAS/VPN server. Specifically, the authentication method used by the server to verify your username and password may not match the authentication method configured in your connection profile. Please contact the Administrator of the RAS server and notify them of this error.”
It comes when the authentication protocol is set via the Network Policy and Access Services (NPS).
To resolve this, you could either switch between different protocols (PPTP/L2TP/SSTP and OpenVPN TCP/UDP) or switch between different servers.
11. Dot Ras Error
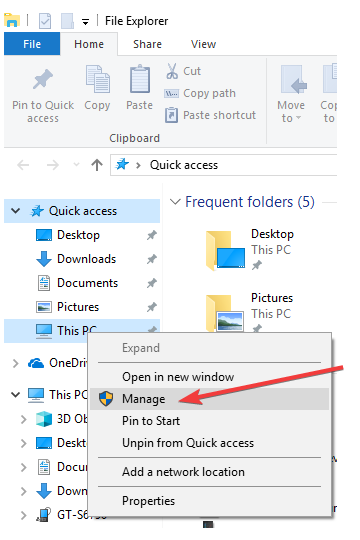
- Click Start and click File Explorer
- Right-click This PC and select Manage
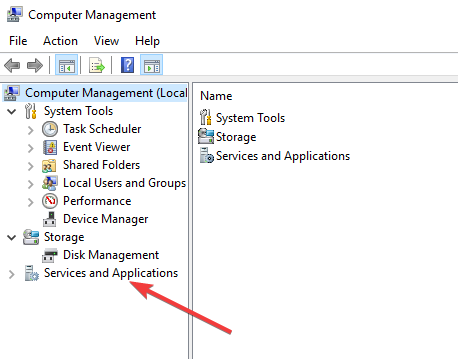
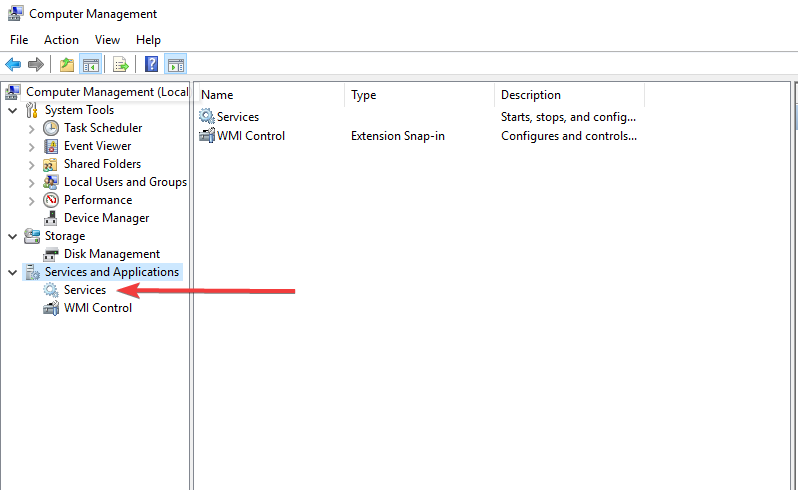
- Double-click Services and Applications
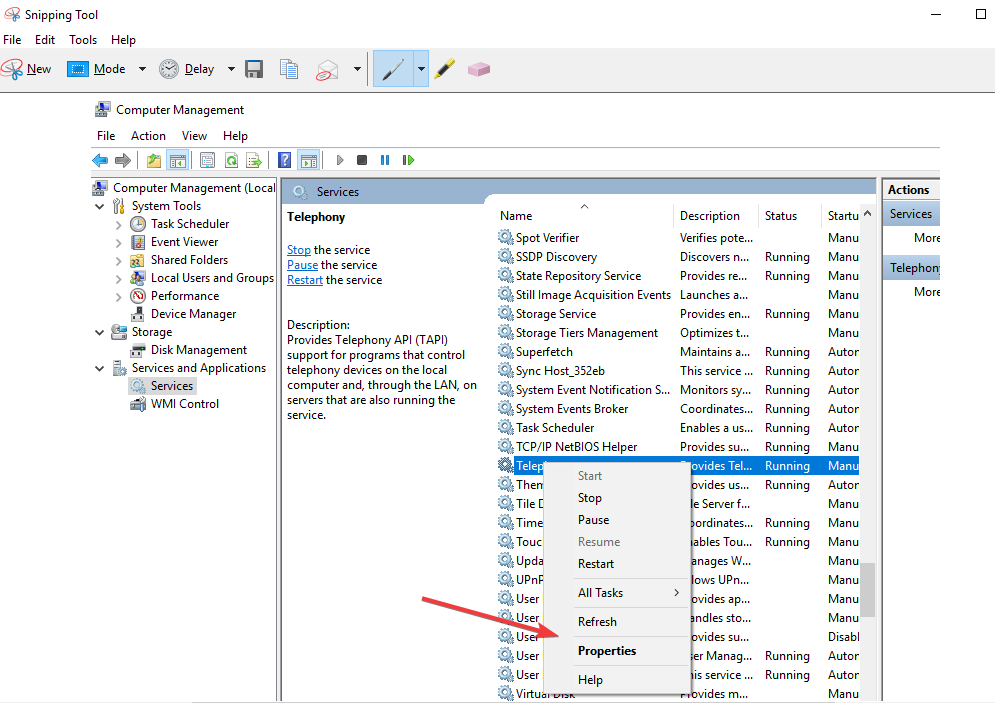
- Double-click Services
- Right-click Telephony, and select Properties
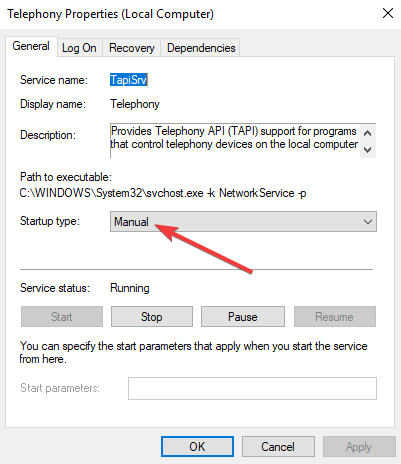
- Under the General tab, click Manual next to Startup type
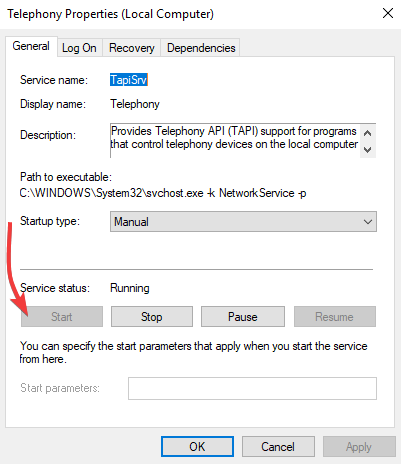
- Again on General tab, click Start under Service status, and then click OK
- Repeat steps 3 – 5 for the Remote Access Connection Manager service and for the Remote Access Auto Connection Manager service








User forum
0 messages