Raspberry Pi HDMI Not Working: Follow These 2 Simple Fixes
Check the best fixes you will find on the web
3 min. read
Updated on
Read our disclosure page to find out how can you help Windows Report sustain the editorial team. Read more
Key notes
- HDMI port errors are some of the most common issues when using a Raspberry Pi, no matter the model.
- Fortunately, they can be solved by either using only recommended cables or by making minor adjustments to the HDMI code line in the OS image.

The HDMI output port on the Raspberry Pi is compatible with the HDMI port of most modern TVs and computer monitors. But, many reported getting a No signal error or Missing HDMI output message on the monitor when connecting Rasberry Pi.
Raspberry Pi 4 works with either a micro HDMI-to-HDMI cable or a standard HDMI-to-HDMI cable plus a micro HDMI-to-HDMI adapter to connect to a screen. Raspberry Pi 1, 2, and 3 use a standard HDMI-to-HDMI cable.
So, let’s find out what you can do if the Rasberry Pi HDMI is not working.
Why is Rasberry Pi HDMI not working?
Here are a few reasons Rasberry Pi HMDI is not working, and you are facing display issues:
- Power issues: A common problem that results in the issue is insufficient power. Though it’s enough to run the Rasberry Pi, it won’t power the HMDI connection.
- Improper connection: In case the cable has not been plugged in properly at both ends, you may encounter issues with the HDMI connection.
- Problems with the HDMI adaptor: Several users pointed out that their HDMI adaptor triggered the problem.
How do I force my Raspberry Pi to HDMI?
Before trying the slightly complex solutions, here are a few quick ones that did the trick for many:
- Make sure the HDMI cable is properly plugged in at both ends. A simple trick is to remove the cable, blow air into the port, and then reconnect it.
- Verify whether the SD card is connected right. Though the lights may turn on, there still might be issues, and you will have to verify that manually.
- If you are using an HDMI adaptor, check if it works with other devices because often, the problem lies with it, and replacing the adaptor seems to be the only viable solution.
1. Force HDMI display
- Insert the SD card into another device and open the boot/config.txt file with a compatible reader (nano or vi).
- Look for the following two lines:
#hdmi_force_hotplug=1#hdmi_drive=2 - Remove the # at the beginning of each line.
- Save and remove the SD card.
- Mount the card in the Raspberry Pi, and the monitor should work.
If you’re using a classic monitor, not a TV monitor, you can leave out the line hdmi_drive=2.
Additionally, if the above steps didn’t work, repeat them, also removing the # from the following line: #hdmi_safe=1. This is only an alternative, as this might also affect the display quality.
This second solution can also be done directly on the Raspberry Pi, but you have to connect to the device via SSH. The modifications are the same.
2. Change the HDMI mode
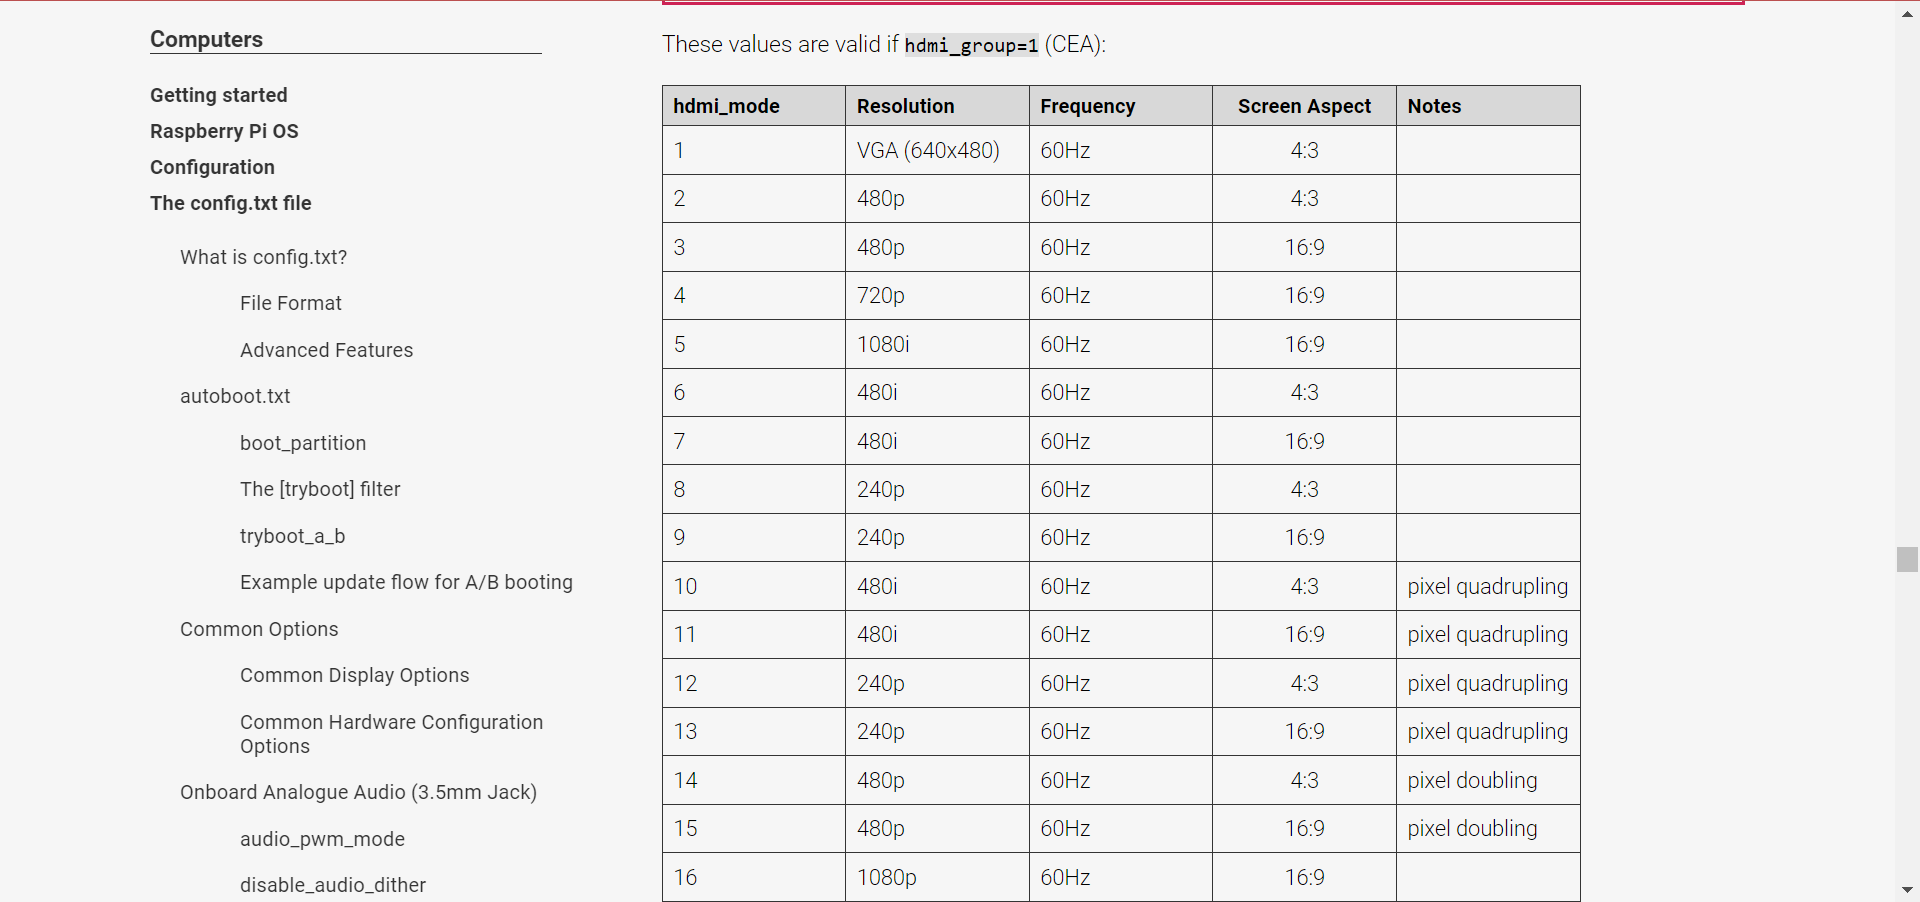
Several users also reported that an incorrect frequency could lead to Rasberry Pi HDMI not working. Choosing a value between 30-60 usually works. There’s a table available in the official Rasberry Pi documentation that helps choose the right HDMI mode.

For some users, choosing 16 worked, while others managed to get things up and running with 75. Check which works for you by editing the boot/config.txt file.
If nothing else works, flash the Raspbian OS on Raspberry PI, and it should fix the problem. Besides, take a look at the best Raspberry Pi emulators in case you want a simpler experience.
If you have any other queries or know of another solution that we may have missed, drop a comment in the section below.


User forum
1 messages