Razer Mouse Driver: Proper Installation Guide on Windows 10
Key notes
- Installing third-party drivers can be difficult, but if you follow the right process, it will work like a breeze.
- High-end Razer gadgets can occasionally mess up and seem impossible to install on your Windows 10 PC.
- This is because their category of products is already covered by pre-installed Windows generic drivers and this can cause conflict.
- Today we take a look at how to remove these generic drivers and install your Razer mouse drivers in three simple steps.

If you want to correctly install Razer mouse drivers on your Windows 10 PC, follow along. The job is not difficult at all, but there are some things you need to consider.
Windows 10 and third-party drivers (especially the obscure ones) are having issues since day one. Many users reported issues with printers and outdated (support-wise) hardware, but it seems that the problem applies to top-notch Razer mice which are fairly new and well-supported.
Namely, either the affected owners of a Razer mouse are unable to use it at all, or the driver breaks and renders the device unusable after every Windows 10 update.
Most frequent models that cause problems installing are Razer Mamba, Razer Deathrade and Razer Ripsaw. If you can’t install these Razer drivers, we are going to show you exactly how to do it.
Do Razer mice need drivers?
To make sure your Razer mouse runs properly, it’s recommended you install a driver. Windows has a generic driver pre-installed. This means that you should be able to use a mouse as soon as you connect it to your PC.
That being said, given the fact that Razer mice do generally have more features than a basic mouse has, it’s best you install their dedicated drivers.
How do I get Razer Drivers?
You have several options. You can install Razer Synapse 2.0 on your PC. It’s a configuration tool that helps you install, update, and maintain all Razer products.
You can also manually install the drivers from the Razer support site. Just find your model and follow the installer prompts. A simpler option would be to use a dedicated driver updater tool.
How do I update my Razer mouse driver?
The easiest way to update your Razer mouse driver is directly from the Synapse app. Just click on Check for Updates. If any are available, you can download them and the app will automatically install them.
You can also keep checking the support site for a new release. That however can be more time-consuming. If you don’t want to miss out on new versions, use Outbyte Driver Updater, it automatically adds all new drivers to its database.
Keep in mind that the automatic driver updates in Windows will only update the generic mouse driver. So it’s best you turn them off to avoid any conflict.
How to install Razer mouse drivers in Windows 10?
There are three simple steps to securely install your Razer mouse drivers to your Windows 10 PC. To make sure you do it properly, follow these guidelines:
1. Uninstall the generic driver
The first thing we’ll need to do is to remove the faulty generic driver which is automatically installed. Some users managed to make Razor work in a matter of seconds on various different PCs, but that one Windows 10-powered PC just can’t cut out.
In order to resolve this, removing the generic driver (including secondary drivers) is paramount. To make your job easy and quick, you can use software that automatically detects drivers and boost your computer.
This procedure is fairly simple, you’ll just need to get an alternative USB mouse to follow the steps below:
- Unplug the Razer mouse and Wi-Fi receiver.
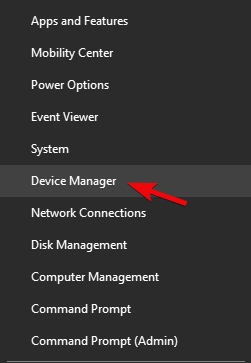
- Right-click Start and open Device Manager.
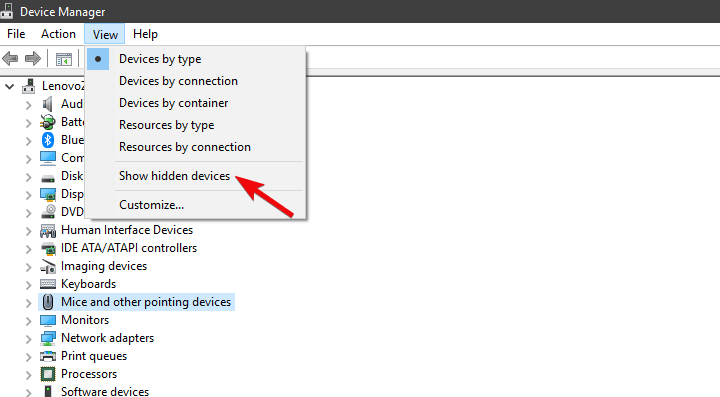
- From the Main Menu, select View > Show hidden devices.
- Expand Mice and other pointing devices.
- Right-click on your Razer mouse and uninstall it. Also, uninstall all hidden supporting drivers.
2. Download the proper driver
Now, once we have dealt with the inappropriate drivers, we can move on to obtaining the ones which should work without issues. The Razer Synapse 2.0 cloud-based configuration tool covers software support for all mice offered by the renowned OEM. And, which is more important for this scenario, it covers all versions of Windows 10. The only requirement is running 64-bit Windows 10.
Here’s how to download the proper Razer mice driver for Windows 10:
- Navigate to Razer support site, here.
- Download Razer Synapse 2.0 for Windows PC.

- Run the Synapse client and locate your exact mouse on the list.

- Install drivers and plug in the mouse.
Or you can locate the exact device and download the legacy driver. This, of course, still requires disabling the driver updates. On the contrary, Windows 10 will change them to the latest version and you’ll again bump into the same problems.
If the mentioned solution doesn’t work for you, we recommend you a third-party tool that you can use to automatically install the latest drivers on your Windows 10 computer. A professional driver updater tool is one of the most efficient options to take into consideration.
You need to know from the start that a professional tool makes updating drivers simple even for newbies. More precisely, the tool runs automatically to find outdated drivers in seconds.
In order to update any driver accordingly and without causing other system errors, it is more beneficial to use dedicated tools that can provide automatic support.
3. Disable the automatic driver updates
Finally, what only remains is to disable the automatic installation of drivers in Windows 10 through Windows Update. This is the most common cause of the issues with Razer mice on Windows 10.
Generic mice can work with the generic drivers imposed by the system upon the PnP. However, wireless and even wired but multifunctional precision gaming mice thrive only with appropriate drivers.
There are two ways to disable further updates of drivers. One completely kills drivers updates for all devices (not recommended) and the other allows you to pinpoint one driver which is out of the boundaries.
Here’s the first way:
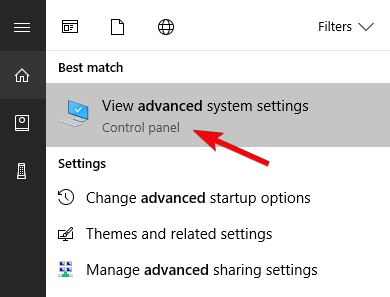
- In the Windows Search bar, type Advanced and choose View advanced system settings.
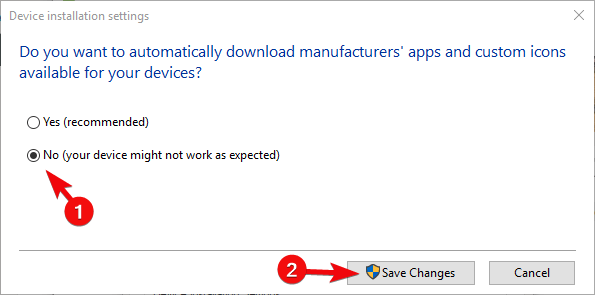
- Under the Hardware tab, choose Device Installation settings.

- Choose No and confirm changes.
And here’s the second:
- Download Show or hide updates troubleshooter, here.
- Run it and hide all Razer-related devices.
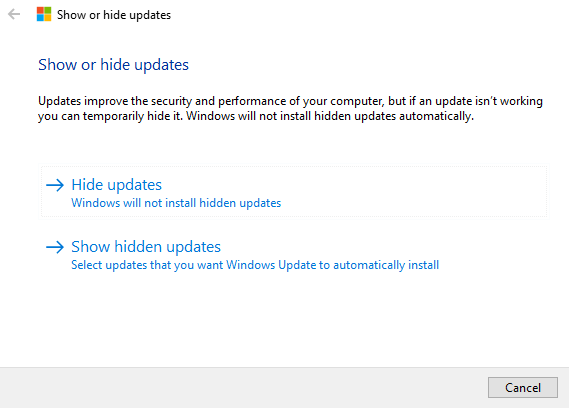
- Close the tool and you’re good to go.
That should do it. In case you have an alternative solution or questions regarding the workarounds we provided, make sure to tell us in the comments section below.
After installing, if you experience any difficulties in using the mouse, check our comprehensive guide that will help you fix the most common Razer mouse errors.
Don’t stop there! Tackle drivers issues with expert confidence thanks to our Driver Errors Troubleshooting Hub. Visit the Razer section as well to learn more about your favorite accessories.
Read our disclosure page to find out how can you help Windows Report sustain the editorial team. Read more


Improve this guide


User forum
1 messages