This Device Cannot be Used Error in ReadyBoost: 3 Quick Fixes
You don't need ReadyBoost if the system is installed on an SSD
![]() 3 min. read
3 min. read
![]() Published on
Published on
Share this article
Improve this guide
Read our disclosure page to find out how can you help Windows Report sustain the editorial team. Read more
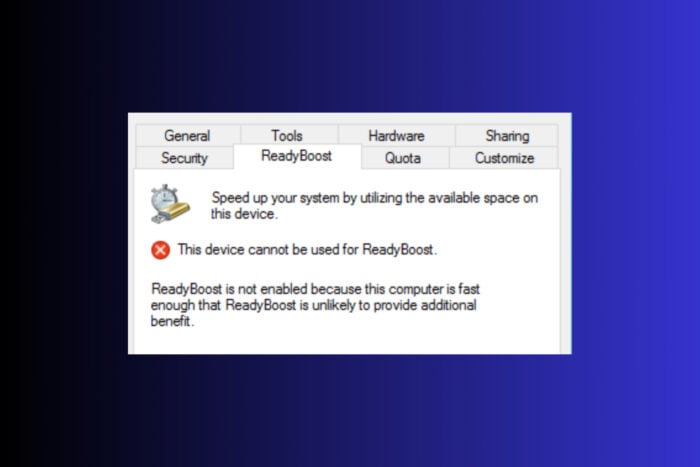
Running into the ReadyBoost This device cannot be used error can appear if your flash drive is not compatible with this feature or it’s corrupted. The error will also show up if your system is installed on an SSD. In this case, ReadyBoost will not make any difference. Also, your flash drive needs to have more than 2GB of storage space.
What do I do if This device cannot be used for ReadyBoost?
1. Format the flash drive to NTFS
- Plug the flash drive into one of your computer’s USB ports, or insert the SD card into the corresponding slot.
- Click the folder icon in the taskbar or press Win + E to start File Explorer.
- Right-click your flash drive under This PC and select Format.
- In the File System dropdown menu, select NTFS.

- Ensure the Quick Format box is checked, then click Start.
- Click OK to confirm and proceed.
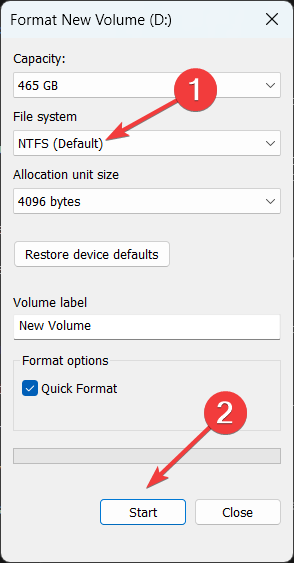
Formatting your flash drive to NTFS may resolve compatibility issues with ReadyBoost. This file system supports larger cache sizes, which can improve performance.
2. Delete external drive folders from Registry
- Press the Start button, type cmd and select Run as administrator from the results.
- Type or paste the following command and press Enter:
reg delete "HKLM\SOFTWARE\Microsoft\Windows NT\CurrentVersion\EMDMgmt" /v "GroupPolicyDisallowCaches" /f - Type the next command and press Enter:
reg delete "HKLM\SOFTWARE\Microsoft\Windows NT\CurrentVersion\EMDMgmt" /v "AllowNewCachesByDefault" /f - Restart your PC and see if your flash drive can now be used for ReadyBoost.
Removing these registry keys can allow ReadyBoost to reappear and function properly, bypassing any group policy restrictions that may be in place.
3. Ensure USB ports and BIOS settings are correct
- Try plugging the flash drive into different USB ports on your computer, especially the USB 2.0 ports.
- Restart your computer and press the appropriate key (F2, DEL, or ESC) to enter the BIOS settings.
- Use the arrow keys to find the USB configuration settings.
- Ensure USB2.0 is enabled. Save your changes and exit the BIOS.
Ensuring your USB ports are enabled and functioning properly can help overcome ReadyBoost issues related to port performance.
If you still get the This device cannot be used for ReadyBoost message, you either have an SSD, or the USB drive is corrupted or malfunctioning. If the drive is not working even after formatting it to NTFS, try another drive. If your OS is using a FAT32 file system, you will need to format the flash drive to FAT32 instead, but you will be limited to 4GB of storage space.
Also, if you have more than 8GB of RAM, even if you have the system installed on a HDD, using ReadyBoost will not make any difference.
That’s it! We hope that you can now boost your booting speed by using ReadyBoost using your flash drive or SD card. For more information, here’s our guide on how to use ReadyBoost on Windows 10.
Also, if the ReadyBoost tab is missing on Windows 11, click the highlighted guide to learn how to fix it.
If you have any questions or suggestions, feel free to use the comments section below and let us know.


User forum
0 messages