Record videos in Chrome with the Screencastify Chrome Screen Recorder
Screencast software enables you to record a desktop or full software windows, but what if you only need to record a browser tab? Then you should add Screencastify to Google Chrome.
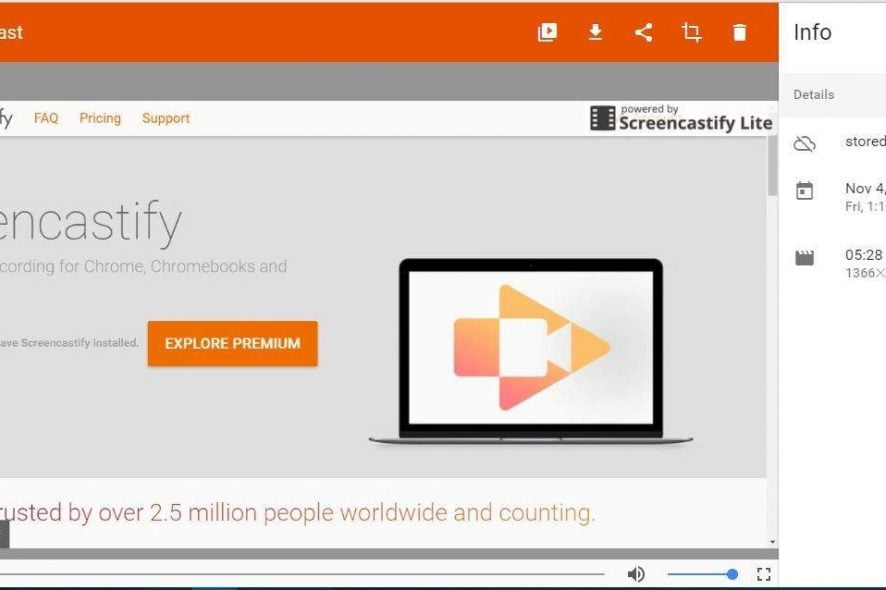
This is an extension with which you can record websites, on the desktop or capture video with a webcam. It’s a great add-on to record website pages with and a good alternative to some desktop screencast software.
There are two versions of Screencastify. The Lite version is freely available and can record 10-minute videos. Open this page to add Screencastify Lite to Google Chrome.
The Premium version retails at $24 per year and gives you unlimited recording time and includes an extra Crop/Trim video-editing option.
Recording Website Tabs with Screencastify
Once you’ve added the Screencastify extension to Chrome, you’ll find a Screencastify button on the toolbar as in the snapshot directly below.

- Click the extension’s button to open the Screencastify setup.
- Select Locally on this Device to save recordings to hard disk and press Next.
- Press Skip for the Google Account sign in.
- Next, press Setup Tab Recording and click Allow. A quick Screencastify video will then open.
- Now you can record a tab video by opening a website page in Google Chrome.
- Click the Screencastify button on the toolbar and select Tab to open the window directly below.

- Microphone and Tab Audio options are selected by default, so the video includes audio. Click the microphone icon to further configure the audio.
- Click the Advanced button to open further options. Then you can select alternative frame rates and resolutions for the video.
- Press the Record Tab button to start recording the tab video. Note that Screencastify only records the selected tab, so you can’t record multiple tabs with the extension.
- A toolbar opens at the bottom left corner of the browser when the video is recording. There, you can select a Pen option to draw on the website page with the cursor as shown directly below.

- Click the Eraser option to erase drawing from the page if needed.
- You can click the Focus Mouse option to highlight the cursor as in the snapshot below. The cursor is usually in the center of the circle but isn’t captured in screenshots.

- The Embed Camera option on the toolbar enables you to record a small webcam overlay at the bottom right of the browser within the tab video. So you can select that option to combine a webcam and website recording into one.

- Click the Screencastify toolbar button and select Show preview window to include a live preview of the recording at the bottom right corner of browser window. That preview window is also included on the taskbar.
- When you’re done recording, click the Screencastify button on the toolbar. Then select End Recording from the window.
- Now you can play the video on the Untitled Screencast tab.

- Click Untitled Screencast at the top left of the page to enter an alternative title for the video.
- Click the Save to Disk button to save the video to your default download folder. The videos save with a WebM/VP8 file format supported by most browser software.
- Press the Your Recordings button to open your recorded Screencastify videos as below.

- There click the dustbin icons and press Delete to erase clips.
Recording Desktop Videos in Screencastify
Recording the desktop is done in much the same way in Screencastify. You can select to record either the full desktop with taskbar included or a single application window. The desktop recordings do not include the annotation options you can include for website tab videos. This is how you can record the desktop with the extension.
- Click the Screencastify button on the toolbar and select Desktop.
- Next, press the Record Desktop button to open the window shown directly below.

- Now you can select Entire Screen or Application Windows to record all the desktop or just specific software. Note that application window recordings do not include any audio.
- If you select Application Windows, you’ll also need to choose a software window to record. Then press the Share button to start the recording.
- When you’ve finished the video, you can click the Stop Sharing button.
Recording Video with Camera
- Screencastify also enables you to record videos with webcams. To record video with webcam, you should first select Screencastify > Cam to open the options below.

- If you have multiple webcams, click the Camera drop-down menu to select one from there.
- Click the Show preview window mode check box to include a recording preview.
- Then press the Record Webcam button to start the recording as below.

- Press the End Recording button to stop recording.
Configuring the Extension
- Screencastify also includes some options that you can customize the extension with. Right-click the Screencastify button and select Options to open the window shown below.

- There you can select Google Drive to save recordings to cloud storage with Google Account.
- Click Configure Recording Shortcuts to open the window directly below. There you can customize the Screencastify hotkeys by selecting their text boxes and entering new keyboard shortcuts.

Overall, Screencastify is one of the best screen recording extensions for Google Chrome. With that add-on, you can record website pages with extra commentary. Its desktop and webcam recording options might also come in handy for video tutorials and other presentations.
And if you want more options to pick from, rest assured that our Recording videos on Chrome: A step-by-step guide is exactly what you’re looking for.
Read our disclosure page to find out how can you help Windows Report sustain the editorial team. Read more


Improve this guide


User forum
1 messages