Red Screen While Playing Games: 13 Troubleshooting Tips and Tricks
![]() 13 min. read
13 min. read
![]() Updated on
Updated on
Share this article
Improve this guide
Read our disclosure page to find out how can you help Windows Report sustain the editorial team. Read more
If you’ve ever experienced a red screen while playing games on Windows PCs, try the troubleshooting ideas mentioned here.
I’ve reproduced various scenarios of the red screen of death (RSOD) when playing PC games to figure out the best DIY fixes. Read on for tried and tested resolutions below!
Red Screen While Playing Games – What Is It?
RSOD is a rare critical error that could crash your Windows PC abruptly. It usually happens during demanding processing tasks like playing high-end video games.
You might experience a few freezing screens during game playback, as well as static noise. Then, a solid red screen will appear with text on it. You can often find the error-causing hardware or software in the error message. Sometimes, the red screen will be empty.
However, in 90% of cases, the static noise won’t go away until you reboot.
Furthermore, two common causes of RSOD are hardware and software issues. Overheating of GPU, CPU, mainboard, failing graphics cards, or an unstable PSU can trigger it. On the software side, incompatible game streaming apps, incompatible game apps, outdated graphics drivers, and more, are the usual culprits.
How To Fix Red Screen While Playing Games
Different triggers of RSOD require custom troubleshooting. Otherwise, you’ll waste time fixing the issue and buy new hardware which might not be necessary.
Find below a curated list of troubleshooting ideas matching the root cause of this problem.
Steam App-Specific Troubleshooting
If you primarily use Steam to get game apps or Steam Overlay for online gaming, try these troubleshooting ideas first. They should help when you see RSOD for many titles, including:
- No Rest for the Wicked
- Dying Light
- Cold Waters
- XCOM 2.
Update Steam
If you haven’t restarted the Steam app for a few days, you might lack the necessary updates. So, close the app and run it again. Steam will automatically perform an update check with the server. If there are any, it’ll ask your permission to download and install them.
Update Game App
If you’re getting the red screen while playing games from Steam, reboot the PC.
Then, open the Steam app and go to the Library tab. You should see all the games there. Click on a title and if there are any pending updates, you’ll see an Update button instead of the Install button.

Some game titles might start updating automatically when you go to the Library tab. You’ll see a small progress bar underneath its thumbnail or display image.
Launch the Game from Steam
When you install a game through Steam, you can launch it either using the desktop icon or from the Steam Library > game app thumbnail.
If you repeatedly face the RSOD issue with Steam games, don’t use the desktop EXE file to launch it. Instead, run the app from the Steam Library.

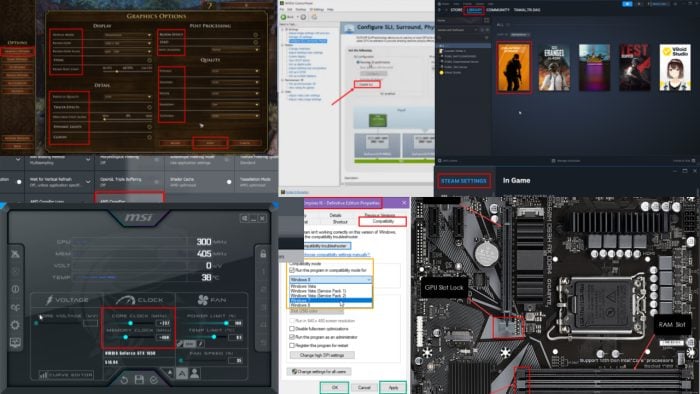
Disable Steam Overlay
You might use the Steam Overlay interface when playing games for features like a web browser, chat, the friends list, in-game DLC purchasing, and more.
However, new titles often need some time to become fully compatible with this in-game user interface. Some might even show an RSOD when there’s too much activity in the Steam Overlay.
Don’t start the game immediately after the RSOD. Instead, do the following:
- Run the Steam app.
- Click on the Steam icon in the top-left corner of the app.

- You should see the Account menu on the Steam Settings screen.
- Click on the In Game option in the left-side navigation.
- Switch off the toggle button for the Enable the Steam Overlay while in-game option.

- Restart Steam and launch the game app from it.
Run the PC Game in Windowed Mode
Some titles might not be compatible with running in the full-screen mode in your current PC setup. If that’s the case, you should:
- Run the Game app.
- Go to the Game Settings, Options, or Game Options window.
- Find the Graphics Settings or Display properties.
- There, switch the display mode to Windowed from Full Screen.

- Save the changes.
Restart the game and see if the RSOD comes back or not.
Switch to Compatibility Mode
Did you recently upgrade from Windows 7 to Windows 10 or Windows 10 to Windows 11 and see the RSOD error?
Often, dated game apps become incompatible as Microsoft publishes a new operating system. If you try to run them, you might get an RSOD.
Here’s how you can try and find out if the game app is compatible:
- Right-click on the game app’s icon (shortcut or executable file) on the PC Desktop (Home Screen).
- Select Properties from the menu.
- Click on the Compatibility tab.
- Check the box next to the Run this program in compatibility mode for: option.
- Select the desired version of Windows from the drop-down menu (e.g., Windows 7, Windows 8).
- Click Apply and then choose OK to save the changes.

- Run the game app from the Desktop again.
Once you set a compatibility mode for the game, Windows will always use the same configuration to launch and run it.
Reduce the In-game Graphics Settings
You’re probably using the default game graphics settings. This is usually the maximum quality setting which requires more CPU, GPU, and Memory resources. You could try to use a lower configuration to reduce the load on your hardware.
- Launch the game app and go to its Options or Settings section.
- Find the Graphics Configuration or Settings option.
- Now, adjust the following graphics elements:
- Display mode to windowed
- Resolution to minimal supported
- Reduce SSAA percentage or disable it
- Disable VSYNC
- Set the Frame Rate to the native FPS (60)
- Particle Quality should be low
- Disable Tracer Effects
- Turn off Dynamic Lighting
- Disable Clouds, Bloom Effect, Anti-Aliasing, etc.
- Reduce the quality of visuals for Foliage, Shaders, Water, Shadows, Textures, and more.

- Click the Apply button.
- Restart the game title.
Disable CrossFire for GPUs
Were you using AMD CrossFire or NVIDIA SLI to link multiple GPUs in the same PC during the RSOD error?
It’s highly likely that the game app doesn’t support CrossFire or SLI yet. For example, Plants vs. Zombies didn’t support this until the developer released a patch.
Disabling AMD CrossFire
- Open the AMD Radeon Software. This application may also be called AMD Adrenalin Edition or AMD Catalyst Control Center, depending on your version.
- Navigate to the Settings section. It’s either the cogwheel icon or the Global Settings tab.

- Go to the Graphics or Display section.
- Look for the Advanced settings. You might need to click an Additional settings button to reveal them.
- Find the AMD CrossFire section.
- Select Disable AMD CrossFire.

- Apply and Save the changes.
Disabling NVIDIA SLI
- Right-click on an empty space on your Desktop (Home Screen).
- From the context menu, select NVIDIA Control Panel.
- In the NVIDIA Control Panel window, navigate to the Configure SLI, Surround, PhysX settings. This option might be under the 3D Settings menu.

- Locate the SLI configuration option. It might be labeled as Set SLI configuration or similar.
- Choose Disable SLI.

- Click on Apply to save the changes.
Disable Stereoscopic 3D in NVIDIA GPUs
- Open the NIVIDA Control Panel.
- Click on the Stereoscopic 3D option in the left-side navigation panel.
- You should now see the Set Up Stereoscopic 3D menu on the right side.
- Uncheck the Enable stereoscopic 3D checkbox and click Apply.

Close the NVIDIA Control Panel, relaunch the game, and check if the RSOD issue persists.
Set GPU to Balanced Performance Mode
If you use an NVIDIA GPU and keep facing a red screen while playing games, try these steps:
- Launch the NIVIDA Control Panel user interface.
- Go to the 3D Settings section on the left.
- Click on the Adjust image settings… option.
- On the right side, you should see a preview screen where the NVIDIA logo is spinning.
- Click on the Use my preference emphasizing option.
- The slider below it will become active.
- Click on the arrow and move it to the middle of the slider.
- You should see the Balanced status.

- Click Apply at the bottom to save the changes.
Switch the Display Output Ports
Check the display output cable technology you’re using. You’ll find it at the back of the CPU case.
Find out if you’re using a VGA, DVI, Display Port, or HDMI port.
If you’re using a Display Port, change that to HDMI and try playing the game again.

Switch to DirectX 9.0
The reason behind the RSOD might be forced DirectX 12.0-based rendering instead of DirectX 9.0. Either the game app or the hardware doesn’t support forced DirectX 12.0. So, you need to change the game rendering technology to DirectX 9.0 by following any of these methods:
Using In-Game Options
- Launch the game and navigate to the Settings or Options menu.
- Look for the graphics or display settings.
- If the game app allows you to change the DirectX version, you should find customizable options for Graphics API, DirectX Version, 3D Shadder Version, etc.
- Once you’ve located the DirectX version setting, switch it from 12.0 to 9.0.
- Apply and Save the graphics settings.
- Restart the game.
Using the Game INI File
If the game doesn’t offer a visual interface to switch to DirectX 9.0, you can try editing its INI file. Here’s how:
- Go to the directory where you’ve installed the game.
- Click on the Windows Search field, type
.ini, and hit Enter. - The results should yield files, like gameappname.ini, Graphics.ini, Display.ini, Settings.ini, etc.

- If you don’t find any INI files there, go to the following Windows directory:
C:\Users\CtOS\AppData\Local. - This is essentially the path for third-party application data saved in the Windows installation folder > Users > your username > AppData > Local.
- Find a directory named after the game app in question.
- Enter the folder and look for the INI file.
- Copy the INI file you’re about to edit and save it in another directory as a backup.
- Right-click on the INI file and hover the mouse over the Open with… option.
- Choose Notepad in the overflow menu.

- Find any code line that matches these codes: D3D9Drv.D3D9RenderDevice, dx12, mssds3d12, D3DVersion=12, etc.
- To go to DirectX 9.0, change the codes to any of these: D3DDrv.D3DRenderDevice, dx9, mssds3d, D3DVersion=9, etc.

- Press Ctrl + S to save the code file.
- Close the INI file.
- Restart the game app.
Update the GPU Drivers
Ensure you’re using the latest GPU drivers by following any of these methods:
For AMD RADEON GPUs
- Go to the AMD Driver and Support portal.
- On the Search or Browse Drivers page, click on the Graphics component.
- Choose the appropriate Product Family, Product Line, and Product Model in the form.
- Click Submit to retrieve the matching driver file.

- On the Drivers and Software section, click on the driver file that matches your Windows OS and architecture.

- Install the software and restart the PC.
For NVIDIA GPUs
- Head to the NVIDIA Driver Downloads website.
- You can pick your graphics card model, operating system, and desired driver type (Game Ready or Studio) from the menus.
- Click Search to find compatible drivers matching your inputs.

- There might be an option to Automatically find drivers for your NVIDIA GPU. If you see it, use that instead and follow the on-screen instructions.
- Once you’ve found the right driver, click Download.
- Choose a convenient spot on your computer to save the downloaded file.
- Run the file to begin the driver installation.
- Lastly, reboot the PC so that the driver changes take effect globally.
Alternatively, you can update any drivers, regardless of the GPU manufacturer, with the help of professional tools like for example PC HelpSoft Driver Updater.
Ensure Enough Ventilation in the PC Case
Windows often shows a BSOD or RSOD for highly critical issues, like system overheating.
So, you should check that the CPU, RAM, GPU, SSD, and the Mainboard aren’t heating extensively. You can use the HWiNFO app to monitor the idle and in-game temperature of these crucial hardware components.

Find below the average optimal temperatures for various hardware:
| Hardware Component | Ideal Temperature |
| CPU | Below 75 ℃ (167 ℉) under load. |
| GPU | Below 85 ℃ (185 ℉) when in use. |
| Motherboard | Under 80 ℃ (176 ℉) under load. |
| SATA and NVMe SSDs | Below 70 ℃ (158 ℉) when in use. |
| Memory or RAM | Below 45 ℃ (113 ℉) under load and in standard operation. Under 40 ℃ (104 ℉) when in use and in overclocking operation. |
You might want to open the PC case cover and clean the heat sink fans using a soft paintbrush or compressed air can. Also, check if any heat sink fan isn’t working on your PC. If you find any, replace those to increase airflow in the system.
Disable GPU Overclocking
Your GPU might be approaching its replacement threshold. If you’re overclocking it, stop doing that now by following these steps:
- Install overclocking software or use existing OC tools.
- Launch the GPU boosting app.

- Set the Core Clock and Memory Clock values to 0+.
- Alternatively, click the Refresh button.
- Ensure that the Refresh button has set the Core Clock and Memory Clock to 0+.
- Click the Save button to apply the changes.

- Restart your PC to apply the changes globally.
If the game app runs smoothly after disabling overclocking, reduce its graphics settings to enhance its performance.
RSOD with GPU overclocking also indicates that it’s time to replace the dated graphics card with a new one for gaming.
Reseat PC Hardware
Is your PC not booting up to the Desktop or Home Screen after a sudden RSOD event? Give the following steps a try:
- Shut down the PC and disconnect all cables, like the display cable, USB cords, Wi-Fi, speaker connector, etc.
- Wear an antistatic wrist strap to discharge all static electricity from your body.
- Unscrew the lock of the PC case on the left and remove it.
- Use a compressed gas can to blow off dust inside the case.
- Alternatively, use a clean and soft paintbrush to clean the interior.
- Now, unscrew the lock of the GPU back panel.
- Pull the PCIe slot lock outwards to unlock the GPU.

- Delicately take the GPU card out from its slot after removing any cables.
- Locate the RAM chips near the CPU heat sink.
- Unlock the RAM slot lock caps and remove the memory modules safely.
- Now, insert only one RAM chip.
- Attempt to start the PC.
- If it boots up and goes to the Desktop, shut it down.
- Connect the rest of the RAM chips.
- Again, boot up the PC.
- If it works this time, shut down the PC and connect the GPU.
- Now, try to start the PC again.
If you can power on the PC with a GPU, apply the other troubleshooting methods mentioned earlier to reduce the graphics card’s resource load. Then, try to play the game again.
Though the error might worry you if you see it for the first time, it’s easily fixable. So far, you’ve learned all the proven methods to resolve the red screen while playing games. If you encounter a blue screen, I’ve got you covered as well.
We also have a guide on how to deal with red tint on a laptop screen, so don’t miss it.
Have you tried these troubleshooting tips? Feel free to share your experience and suggestions below!


User forum
0 messages