2 Ways to Remove Shortcut Arrows in Windows 11
Big on aesthetics? How about a cleaner UI minus the shortcut arrows
Key notes
- By default, Windows 11 has shortcut arrows enabled whenever you create a new one.
- Most users were of the opinion that these arrows need to go, so we dug up some manual and automatic ways to get rid of them.
- Read on to find these quick and easy ways to clean up your interface.

We’ve all moved important documents or apps to our desktops for quick access. While these shortcuts are a convenient way to access the programs and files you use often, they can be unsightly when accompanied by arrows.
If you like a neat and clean desktop and don’t need the visual reminder of your shortcuts, here’s a quick tutorial on how to get rid of them.
What are shortcut arrows?
Shortcut arrows are the small icons usually placed in the lower left corner of the app icon on your desktop.
Although similar to the actual files, shortcuts are not to be confused with the original files. Some key differences include:
- You can always create a custom icon, or revert to old icons if you don’t like the new look in Windows 11.
- The actual file remains in its location, and the name remains the same as the original file with a shortcut arrow overlay.
- Shortcuts do not contain any data, and their space on your desktop is almost insignificant.
- If you delete the original file, the shortcut will not work, but if you delete the shortcut, it won’t affect the original file in any way.
The arrow’s purpose is to indicate a link to the original file or folder on your computer. This can be an important source of information if you want to find out the exact location of certain files.
How can I remove the shortcut arrow from Windows 11 icons?
1. Edit the Windows Registry
- Back up your registry or create a restore point before making any changes.
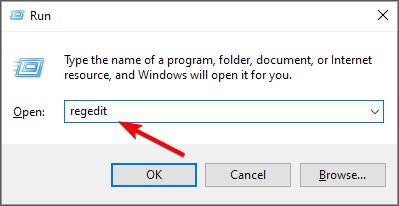
- Hit the Windows + R keys to open the Run command.
- Type regedit in the dialog box and hit Enter to open the Registry Editor.
- Navigate to the following location:
HKEY_LOCAL_MACHINE\SOFTWARE\Microsoft\Windows\CurrentVersion\Explorer - Create a new registry key by right-clicking on Explorer, select New Key and name it as Shell Icons.

- Click on the newly created folder, right-click on an empty space on the right, select New String Value then name is as 29.

- Double-click on the newly created string value, and in the Value data field, enter the following code and hit Enter:
%windir%\System32\shell32.dll,-50
- Close the Registry Editor and restart your PC. Your shortcut arrows should have disappeared.
2. Use a Registry hack
- Navigate to your browser and download the associated registry file to remove the shortcut arrows.
- Locate the zip file, extract the files, then copy the BlankIcon folder to the following folder.
C:\Windows
- Go back to the extracted files and double-click on the remove_shortcut_arrow_icon.reg file and click Yes on all prompts.
- Restart your PC, and the shortcut arrows should have disappeared.
Since not everyone likes going through multiple steps or editing the registry at all, a registry hack will come in handy in such situations. This is one of the many automatic hacks you can apply to hide your shortcut arrows.
How can I restore the Shortcut arrow?
If you ever change your mind, you can reverse-engineer the solutions above to restore your arrows. In editing the registry, you just have to delete the String 29 and restart your PC. For the registry hack, locate the BlankIcon folder and delete it.
In summary, desktop shortcut icons can indeed be removed. Even better, you can restore them if you want to. Just choose which aesthetic best goes with your style. For more Windows 11 customization ideas, check out our helpful guide.
And if you run into an issue where icons are not showing, visit our helpful guide to find out how to easily resolve it.
Which method do you think works best? Are there any other methods that you’d like to suggest as well? Share with us in the comments section below.
Read our disclosure page to find out how can you help Windows Report sustain the editorial team. Read more


Improve this guide


User forum
3 messages