How to remove Startup Programs in Windows 10 [Full Guide]
Key notes
- If booting your OS seems to last forever, you might want to take action.
- Start by managing your startup apps so that you only keep those you need. Here’s how to quickly remove programs from the Startup.
- Check out more handy fixes on our Windows 10 Guides.
- Don’t be shy to explore the Tutorials Hub as well for more tech tricks and tips.

Does it take a long time to start up your operating system? Maybe the boot process is lengthy because there are many applications that load at startup.
There are different tools to manage startup apps. It can be done via the Startup Manager, Task Manager, Explorer, or Registry editor. Below, you can find a few methods that will guide you through the process of adding or removing the startup apps.
You can, also, learn how to enable or disable different apps.
How to manage Startup Programs in Windows 10
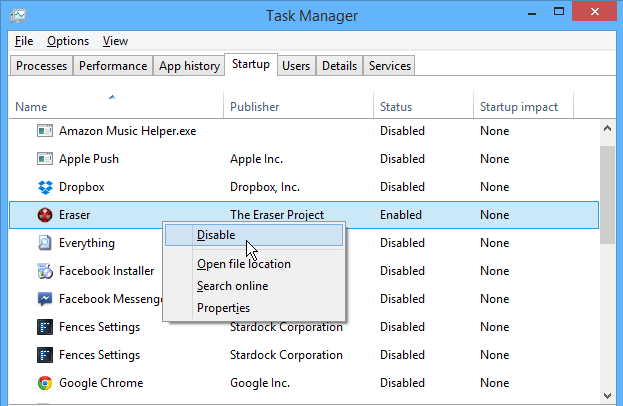
1. Press the key combination Win + R and enter the following command: taskmgr /0 /startup. This will open the Startup tab.
2. In the Startup tab, you can observe a list of applications that are starting when your PC boots.
3. Disable startup application: Right-click on the application you want and select from the menu the Disable feature. The application will no longer start with the OS.
4. Enable startup application: Right-click on the application you want and select from the menu the Enable feature. In this case, the application will start with the OS.
How to remove Startup Programs in Windows 10
You can easily remove startup programs in Windows 10 by using the built-in Startup Manager tool. This tool allows you to configure which programs and apps you want your PC to start upon booting. You can either enable or disable them in just a few clicks.
Use the File Explorer
- Press the Win + R key combination.
- Enter the following command: shell:Startup, and press the Enter key.
Note: If you want to add or remove startup apps for all users, you need to enter the following command: shell: Common Startup. - A Startup window will open. Find the application executable file that needs to load when Windows boots.
- Create a shortcut of this app. Copy it and paste it in the Startup window. This is the way for adding a startup application in Windows 10.
- To remove the application, delete the shortcut from the Startup folder.
Use the registry
- Press the Win + R key combination.
- Enter the following command: regedit without quotes and press the Enter key.
- Navigate to the following path or register key:
HKEY_CURRENT_USERSoftwareMicrosoftWindowsCurrentVersionRun - In the name column, you can find the application that starts automatically, when Windows boots.
- Remove the application from the Startup:
- Right-click on the application name and choose Delete feature.
- Adding the application in the Startup:
- Right-click in the Registry Editor window and select New -> String value feature.
- Add value name (the name of the application).
- Add value data: enter the full path to the executable (*.exe) of the application that you wish to run at the startup.
Use the Group Policy Editor
If you want to add applications to startup, you can do so using Group Policy Editor. We have to mention that this tool isn’t available in Home versions of Windows, but if you’re using Pro or Enterprise version, this tool should be available for you.
To add an application to startup using Group Policy Editor, do the following:
- Press Windows Key + R and enter gpedit.msc. Press Enter or click OK.
- When Group Policy Editor opens, in the left pane navigate to User Configuration > Windows Settings > Scripts (Logon/Logoff). Now in the right pane double click on Logon.
- Logon Properties window will appear. Click on the Add button.
- When Add a script window opens, click on the Browse button.
- Select the application you want to start. After doing that, click on OK.
- Now click on Apply and OK to save changes. After saving the changes, restart your PC and check if the application starts automatically with Windows.
This is a simple method, but in order to use it, you need to have Pro or Enterprise version of Windows. If you’re a Home user, you’ll have to look for a different solution.
Use the Task Scheduler
Windows comes with a useful tool called Task Scheduler. Using this tool you can set certain applications to start at a specific time, but you can also use it to add applications to startup.
The tool is relatively simple to use, and you can create startup applications by following these steps:
- Press Windows Key + R and enter taskschd.msc. Press Enter or click OK.
- When Task Scheduler starts, in the right pane click on Create Task.
- Create Task window will appear. Enter the name of your task and check Run with highest privileges option. In the Configure for field choose Windows 10.
- Go to the Triggers tab and click on the New button.
- When the New Trigger window opens, set Begin the task to At log on. If you want, you can set this task to run only for a specific user or for all users on the PC. If needed, you can even delay and repeat the task. After choosing your settings, click on OK.
- Navigate to the Actions tab and click on New.
- Set Action to Start a program and click on the Browse button.
- Choose the desired application and click on OK.
- Click OK again to save your task.
After doing that, the desired application will start automatically every time with Windows. Task Scheduler is a powerful tool and it allows you to configure your tasks any way you want.
This method is perfect for advanced users who want to have full control over their tasks and startup applications. Even if you’re a basic user, you should be able to add applications to startup by using this solution.
Use dedicated tools to manage Startup programs
If previous solutions seem a bit complicated for you, you might need something more user-friendly. Not long ago we covered the best apps to manage startup items, and while most of these apps allow you to disable or remove startup items, some of them have the ability to add new apps to the startup.
Most of these applications are free and relatively simple to use, so we strongly suggest that you check them out if you’re looking for a user-friendly way to add startup items.
Check programs’ configuration
The simplest way to add a program to startup (or remove startup programs) is to check its configuration. Most applications can start automatically with Windows, and in order to do that, you just have to check their settings.
Now you just have to find start with Windows or similar option and check it. After doing that, the application will automatically start as soon as Windows starts.
As you can see, this is a simple method but it requires you to check and change individual settings for all applications that you want to add to startup.
Keep in mind that some applications don’t even support the startup option, so this method won’t work for them.
Many of these tips can be applied if you want to disable startup programs on Windows 7, so don’t hesitate to try them.
There you go, some quick and simple methods that will allow you to manage the startup apps. How do you handle startup apps? Share your experience with us by leaving a comment below.
Read our disclosure page to find out how can you help Windows Report sustain the editorial team. Read more


Improve this guide


User forum
0 messages