2 Easy Methods to Enable Reserved Storage in Windows 10
Toggle Reserved Storage on or off in cmd
Key notes
- Updating Windows 10 requires sufficient disk space on your device.
- Windows can automatically reserve some space for updates, and this space is called Reserved Storage.
- You can manually enable it using Command Prompt or the Registry Editor.
- We will show you how to do this in our article.
Users can’t update Windows 10 when their hard drives lack sufficient storage space for the updates. As such, Windows 10 version 1903 will include new reserved storage when the 19H1 update rolls out.
That is storage that is automatically reserved to ensure there’s enough space for Windows updates. And you can later disable or enable Reserved Storage at your own volition.
Microsoft announced reserved storage within its Windows 10 Insider Preview Build 18312 blog post. The new 18312 preview build is the first to showcase reserved storage. However, Windows Insiders need to modify the registry to enable reserved storage.
The new feature is currently available for those users running build versions from18298 to the latest one This is how users can activate reserved storage in those Windows 10 preview build versions.
How to enable Reserved Storage in Windows 10?
1. Use the DISM command in Command Prompt
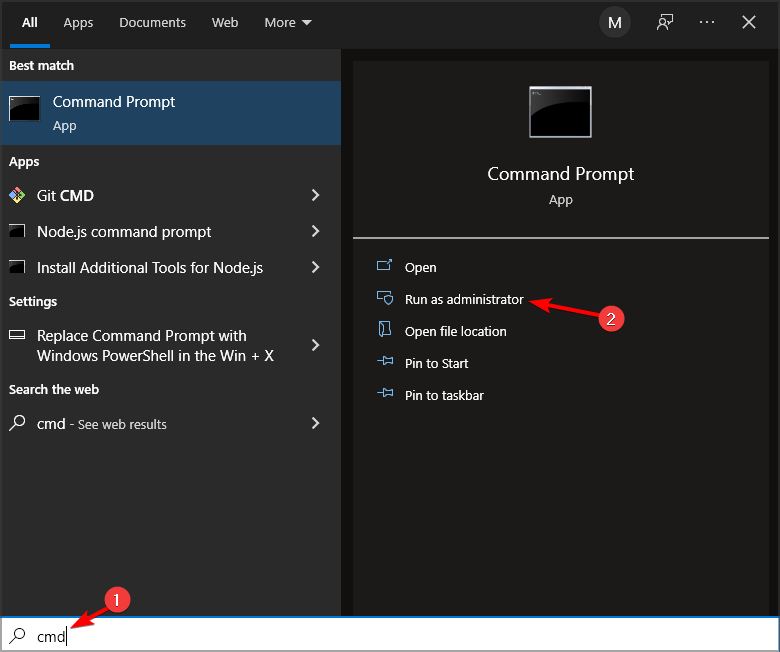
1. Press the Windows + X hotkey to open the WinX menu.
2. Select Command Prompt (Admin) from the list. Users need to be logged in with an admin account to enable reserved storage.
3. Input the following command: dism /Online /Set-ReservedStorageState /State:Enabled
4. Press Enter to run the command.
5. Reserved Storage is now enabled on your device.
Reserved Storage can be easily enabled through the usage of the built-in Command Prompt. The DISM command can toggle Reserved Storage on and off in just one line.
2. Use the Registry Editor
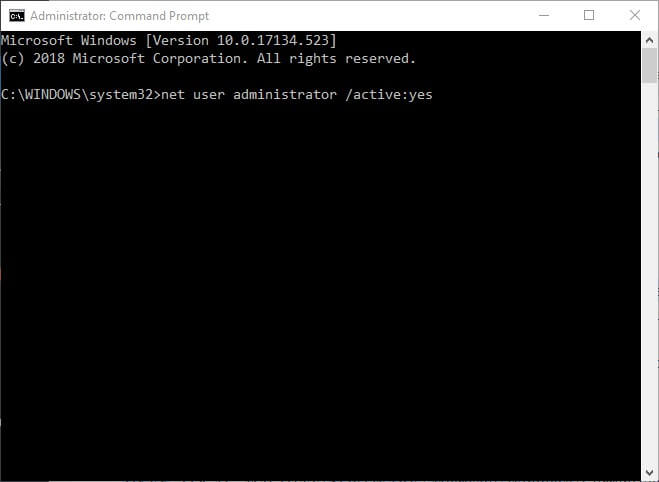
- Run cmd as an admin. Those users who aren’t logged in to administrator accounts can activate the built-in Windows 10 admin account by pressing the Windows key + X hotkey and selecting Command Prompt (Admin).
- Then input ‘net user administrator /active:yes’ in the Command Prompt and press Enter.
- Restart Windows 10, and select to log in with the new admin account.
- Launch Run with its Windows key + R keyboard shortcut.
- Enter ‘regedit’ in the Run accessory, and click the OK button.
- Then go to this registry path within the Registry Editor: HKEY_LOCAL_MACHINE\SOFTWARE\Microsoft\Windows\CurrentVersion\ReserveManager. Users can copy and paste that registry path into the Registry Editor’s address bar with the Ctrl + C and Ctrl + V hotkeys.
- Click the ReserveManager key on the left of the window.
- Then double-click the ShippedWithReserves DWORD.
- Enter ‘1’ in the Value data text box.
- Press the OK button to close the Edit DWORD window.
- Restart Windows after editing the registry.
- Thereafter, users can see what the reserved storage amounts within the Settings app. Click Cortana’s Type here to search button, and then enter the keyword ‘storage’ in the search box.
- Select Storage to open the Settings app.
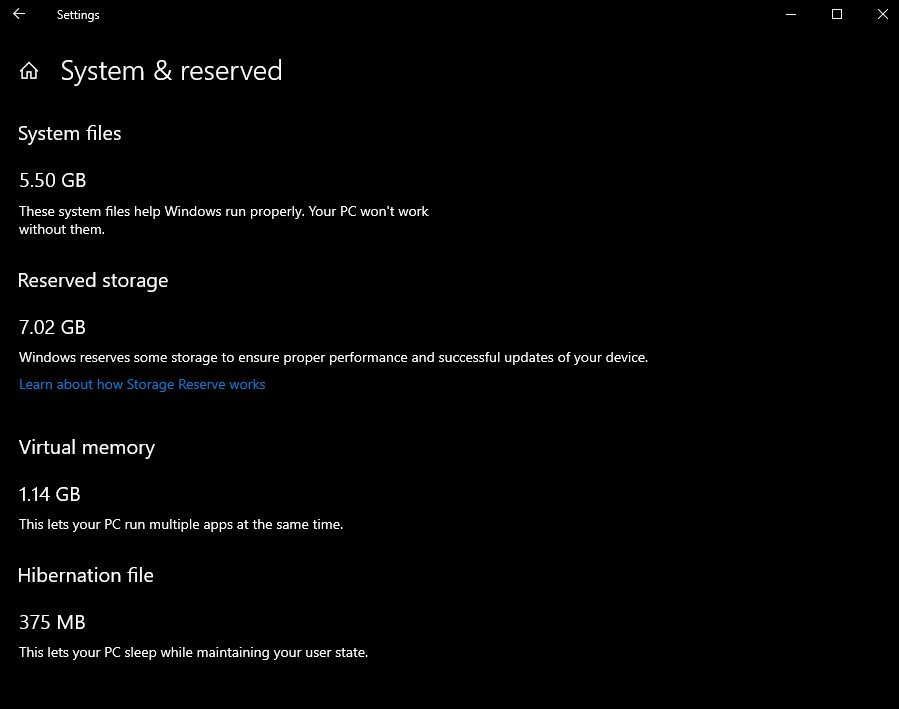
- Then click Show more categories, System & reserves and Reserved storage within the Settings app to open the reserved storage details shown in the snapshot directly below. That’s one way to enable Reserved Storage.
— RELATED: How to solve memory leaks in Windows 10
Uninstall Options Features to Reduce Reserved Storage
In the snapshot above, reserved storage amounts to about seven GB. The amount of reserved storage partly depends on the number of optional features Windows 10. Thus, removing optional features might reduce the reserved storage value. Users can uninstall optional features as follows.
- Open the Cortana search box.
- Enter ‘optional features’ in the search box.
- Then select Manage optional features to open the window shown directly below.
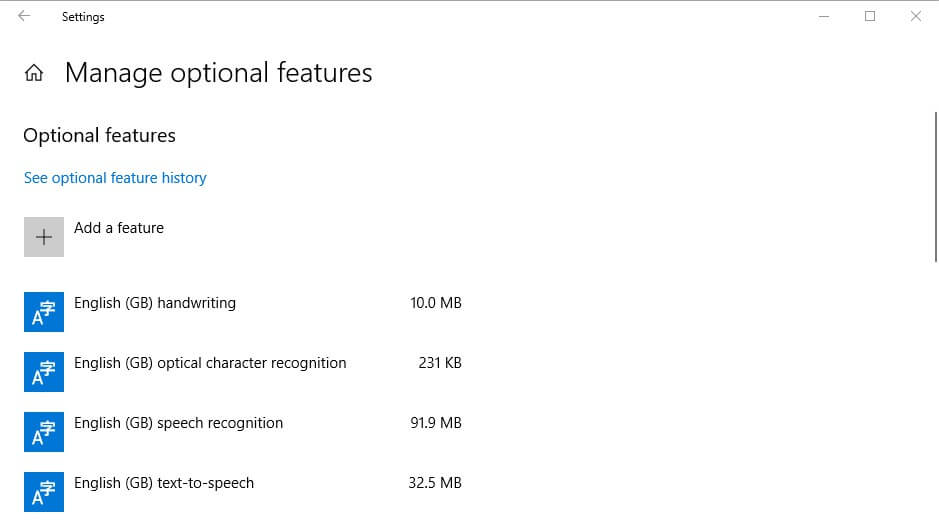
- Select a listed feature, and click the Uninstall button.
So reserved storage might come in handy for users with small hard drives. The 19H1 update will introduce reserved storage to most users when it rolls out during spring 2019. This read should help you disable, allocate space, or enable Reserved Storage.
RELATED STORIES TO CHECK OUT:
Read our disclosure page to find out how can you help Windows Report sustain the editorial team. Read more


Improve this guide


User forum
0 messages