How to Apply Shared Mailbox Retention Policy
Learn to manually configure your Office 365 settings
![]() 1 min. read
1 min. read
![]() Updated on
Updated on
Share this article

Improve this guide
Read our disclosure page to find out how can you help Windows Report sustain the editorial team Read more
Key notes
- If you're looking for ways to apply a Shared Mailbox Retention Policy in Office 365, you need to be an admin.
- Admins can create a Retention Policy assigned to mailboxes using a retention tag.
- Read on to find out exactly how to set a Retention Policy for Shared Mailbox on your own device.
In Office 365, admins can create an archiving and deletion policy that automatically moves items to a user’s archive mailbox or deletes items after they reach a certain age limit. This means creating a retention policy that’s assigned to mailboxes.
Are you looking for a way to apply a Retention Policy to Shared Mailbox? Let us guide you on how to perform the procedure.
Why should I set a Retention Policy in Office 365?
You might have tried to attach a personal retention tag to a shared mailbox that deletes all emails older than 30 days, let’s say.
The default 1-month delete tag from the O365 web portal doesn’t seem to function. It just states instead No retention policies have been applied to this mailbox. Parameter name: Mailbox.
That’s a clear sign that you’re supposed to apply this policy as quickly as possible. Read on to find out how to do it.
How can I apply the Retention Policy to Shared Mailbox?
The procedure of setting the Shared Mailbox Retention Policy basically involves applying the retention tag to a shared mailbox, along with setting retention URL, hold duration, etc., for shared mailboxes in bulk.
A retention tag applies retention settings to individual messages and folders in the user’s mailbox. The tag defines how long a message remains in the mailbox and what happens when the message reaches the specified retention age.
It’s up to you – do you want it moved to the user’s archive mailbox or simply deleted? Make up your mind about that and then you’re ready to apply the Retention Policy to Shared Mailbox.
1. First, make sure you’ve signed into your Windows device with your user ID. That’s the one associated with your Office 365 license.
2. Open your preferred browser.
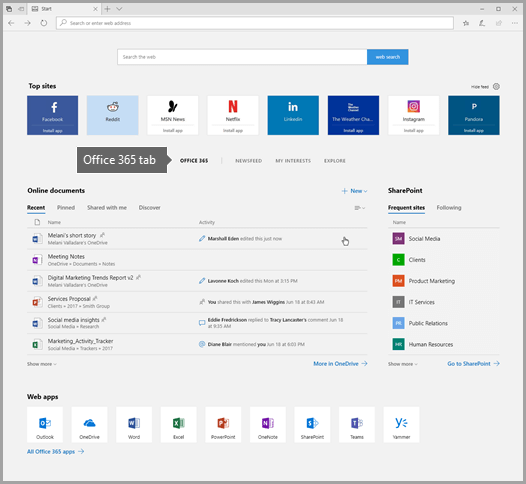
3. Navigate to the Office 365 web page. If you use Edge, you can see the tab for Office 365 as soon as you launch it. Click on it.
4. Select Management from the left navigation section.
5. Up next, click on Mailbox Management.
6. Now select Shared Mailbox Retention Policy.
7. Choose the O365 tenant to which you want to apply the settings.
8. Give all necessary inputs.
9. Click Enter name(s) to search for the desired objects.
10. You may also import details from a CSV file. For that, click Download Sample CSV to view the format, before import.
11. Now, select the objects for which you wish to apply this configuration.
12. Click Selected Objects count to preview selected objects.
13. Press Apply.
14. Finally, you can view the status of the operation.
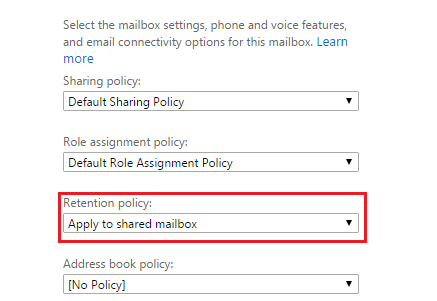
15. The retention policy usually takes effect after seven days by default. To verify that the new retention policy was indeed assigned to mailboxes, select a mailbox on the Mailboxes page, and then click Edit.
Then, on the mailbox properties page for the selected user, click on Mailbox features. The name of the new policy assigned to the mailbox should be now displayed in the Retention policy drop-down list.
We hope our article helped you set a Shared Mailbox Retention Policy on your device without any problems.
If you have any questions or concerns about the procedure, don’t hesitate to let us know in the comments section below.