How to Share a VPN Connection on Windows 10 [4 Methods]
Allow multiple devices access the same secure network by sharing your VPN connection
Key notes
- Setting up a VPN connection on your Windows 10 PC is a piece of cake, but sharing this connection can be tough.
- Depending on your computer's capabilities, you may need to purchase a dual Ethernet adapter.
- You can share a VPN connection on Windows 10 by installing it on your router so that all devices in the household can have it.
- Using a VPN with hotspot support is by far the easiest way you can share a VPN connection.


World-class 24/7 support with 82% for a 2 years plan and 2 months free
70% of our readers choose Private Internet Access
70% of our readers choose ExpressVPN
Amazing connection speed with 61% off and 4 months free for the 2-years plan.
Best security protocols with 83% off and 2 months free for a 2-year plan.
Having a VPN on your computer can be a great thing for your privacy and connection security.
But did you know that you can share your VPN connection with other PCs on the same network?
You probably had a hunch, since you landed on our guide.
We’re here not only to confirm that VPN connections are shareable but also to teach you how to do it with minimum effort on your Windows 10 laptop, desktop or tablet.
How can I share a VPN connection?
Install a VPN on your router

- Make sure your router supports VPN client mode
- Buy a premium VPN plan (we recommend Private Internet Access)
- Head over to PIA’s website
- Log in to your account
- Access the Downloads section

- Click the Go to OpenVPN Generator hyperlink

- Choose the newest OpenVPN version
- Select the Windows platform
- Click the region you prefer

- Choose the recommended UDP port
- Click the Generate button

- Log in to your router admin panel (the default address is https://192.168.0.1)
- Identify the VPN client area
- Upload the OVPN file you generated from your VPN’s website
- Connect your devices to your VPN-enabled router
- Enjoy sharing a VPN connection
Using a router is the most common way to share a VPN connection since you don’t have to keep configuring devices.
You just set it once and it should be good to go for a long time. Unless you decide to choose another region, that is.
Granted, there are a lot of router brands and models on the market, so the steps above are generic ones.
They might not be accurate for your router model, and you should only use them to nudge you in the right direction.
Private Internet Access
Looking for a great VPN to install on your router? Why not try PIA?Create a wireless hotspot on Windows 10

- Make sure that your PC has Wi-Fi capabilities
- Enable your Wi-Fi connection
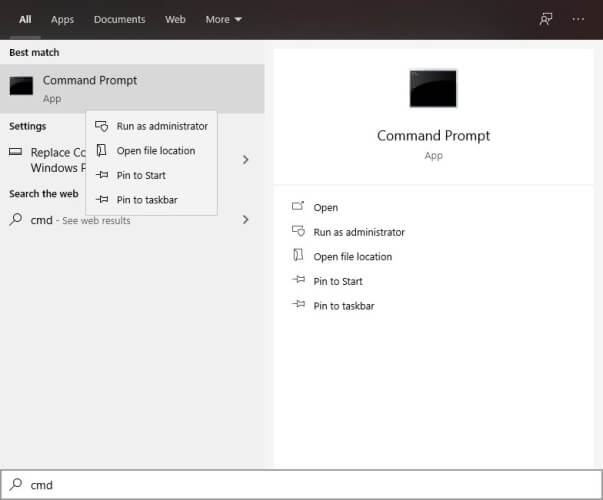
- Press the Win key on your keyboard
- Type CMD and right-click the Command Prompt
- Select Run as administrator
- Type netsh wlan show drivers and press Enter
- Check the output text
- Hosted network supported: Yes – it means that your PC can create a hosted network
- Hosted network supported: No – you can’t create a hosted network
- There is no wireless interface on the system – Quite self-explanatory
- Type this command in the Command Prompt:
netsh wlan set hostednetwork mode=allow ssid=YourConnectionName key=Password- Make sure to replace the YourConnection Name and Password parameters with your own custom ones
- Type netsh wlan start hostednetwork in the Command Prompt
- Launch your VPN client and connect to a secure server
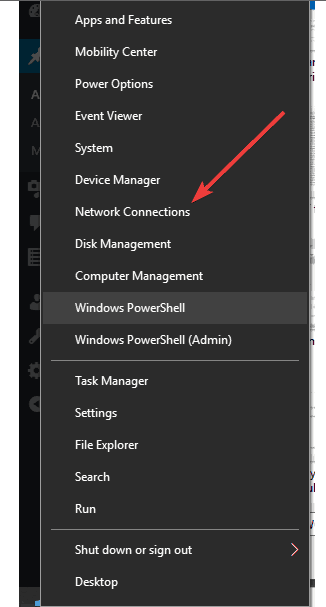
- Right-click your Start Menu
- Select Network Connections from the menu
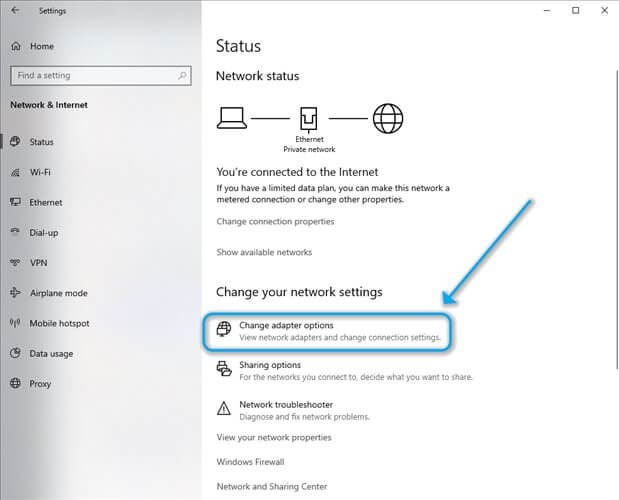
- Click the Change adapter settings button
- Right-click your VPN connection and select properties
- Head to the Sharing tab
- Enable the Allow other network users to connect through this computer’s Internet connection setting
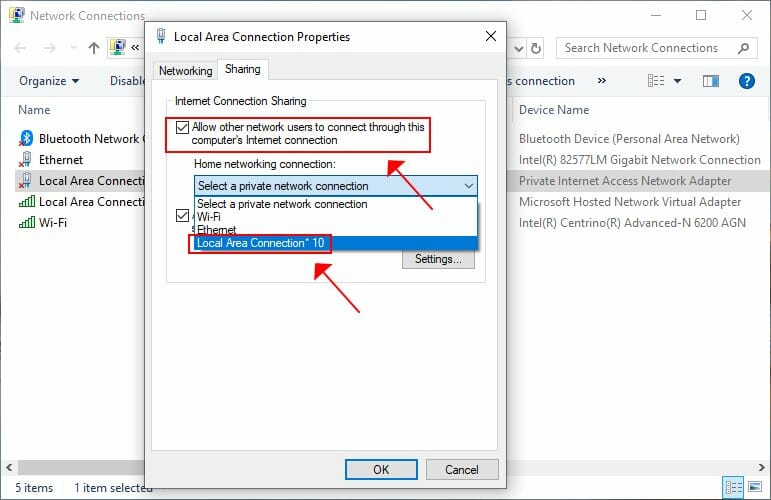
- Click the Home networking connection dropdown menu
- Select your wireless hosted network connection
- Restart your VPN connection (right-click + disable, then right-click + enable)
That’s all you need to do to host a shared VPN connection on your PC using Wi-Fi.
We agree that there are a lot of steps and this method might give you a headache.
That’s why we recommend using a hotspot creator tool to replace steps 3-9 of this method.
However, keep in mind that the rest of the steps remain the same.
Use Windows 10’s ICS (wired mode)

- Make sure your PC has double Ethernet support (or buy a dual-Ethernet adapter)
- Connect the other device to your PC using an Ethernet cable
- Launch your VPN client and connect to a server
- Right-click your Start menu and select Network Connections
- Click the Change adapter options button
- Right-click your active VPN connection and select Properties
- Head to the Sharing tab
- Click the Allow other network users to connect through this computer’s Internet connection checkbox
- Open the Home network connection dropdown menu
- Select your default Internet connection (the one that gives your PC Internet access)
- Click the OK button
- Right-click your default Ethernet connection
- Select Disable
- Right-click the same connection once more and select Enable
That’s all you need to do. This method is a bit more complicated, as it involves having a PC with dual Ethernet support.
Not to mention that it limits your VPN sharing capabilities to only one other device.
If you’re experiencing Ethernet issues on your Windows 10 computer, check out our easy troubleshooting guide.
Use a VPN with hotspot features

- Purchase a hotspot-ready VPN subscription plan (we recommend Windscribe)
- Download the VPN client and install it on your PC
- Launch the VPN client
- Configure your hotspot by entering an SSID (Wi-Fi display name) and password)
- Connect to a secure VPN server
- Turn on the Secure Hotspot feature
That’s about it. You can now connect to Windscribe’s secure hotspot using additional devices.
So technically, you’re sharing your VPN connection with other devices, and this is as easy as it gets.
However, you must keep in mind that most VPNs have a limited amount of supported devices.
On the other hand, certain VPNs such as Windscribe, allow you to connect an unlimited number of devices.
How to share a VPN connection from iPhone to PC
Sharing your iPhone’s VPN connection to your PC is an excellent way to provide your computer with secured internet access.
That way, you’ll share the VPN connection from your iPhone to your Windows PC without having to purchase a separate VPN account on your computer.
Just connect to a VPN server on your iPhone and follow the guide below:
- Find and open the Settings app on your device.

- Tap Personal Hotspot to enter it.

- Turn on the toggle next to Allow Others to Join.

- Select USB Only or Turn on WLAN and Bluetooth, depending on how you want to connect your iPhone to the PC.

- If you chose Turn on WLAN and Bluetooth, go to the network icon at the bottom right corner of your PC and select your iPhone’s hotspot. However, if you selected USB only, connect your iPhone to the PC with a USB cable.

Your PC should now have access to the web through your iPhone’s VPN connection.
Conclusion
All things considered, if you’ve ever considered sharing your VPN connection, there are several ways you can go about it.
However, as you could see from our guide above, some methods are more time-consuming than others.
We’ve found that using a VPN with hotspot support is the easiest method, followed closely by installing a VPN on your router.
By far, configuring your Windows 10 to share your VPN connection (both wired and wireless) might be a bit difficult to achieve, especially for novices.
Read our disclosure page to find out how can you help Windows Report sustain the editorial team. Read more


Improve this guide


User forum
2 messages