Skype Call Failed: 7 Simple Methods to Make it go Through
A comprehensive guide on fixing this problem within minutes
6 min. read
Updated on
Key notes
- Skype is one of the most popular instant messaging applications on the market.
- It is an app that allows voice and video calls between two or more people.
- If you cannot make calls on Skype, this article will provide several valuable solutions.
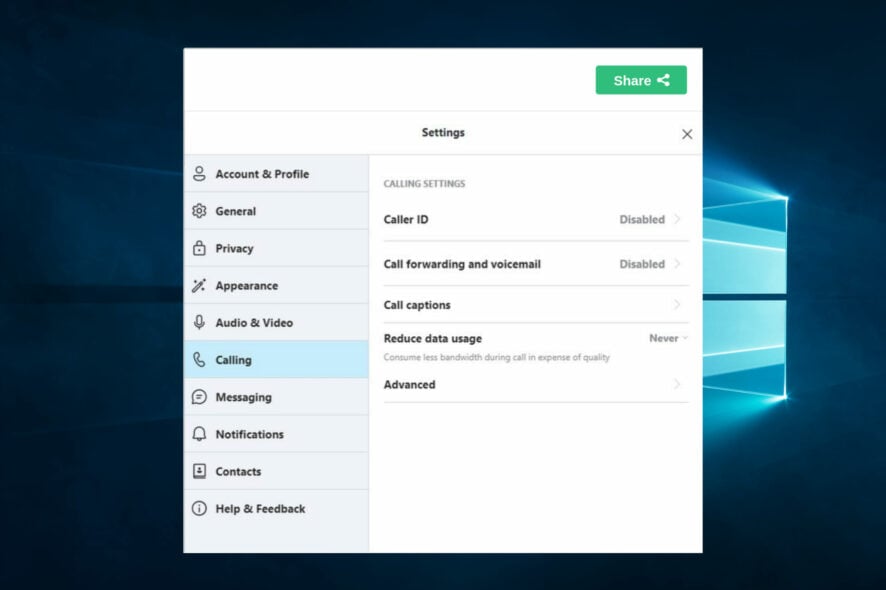
Has your Skype call failed? Sadly as frustrating as this may be, you are not the only one experiencing it.
Skype is a great app that offers useful services for those who want to chat with their friends, initiate video calls for free, debate projects with business partners in real-time, share files, and more. It can be easily used on any platform, and the app works without problems on any Windows device.
Recently, more and more users have been complaining about a new system issue caused by Skype. To be more accurate, the users say they cannot use Skype to call their friends or connect with others through a video call.
What does call failed means on Skype?
When a call fails on Skype, the call cannot be established, or the connection is lost during the call. There are several reasons why a call may fail on Skype, including:
- Poor internet connection – If you have a slow or unstable internet connection, it can cause problems with Skype calls, such as poor call quality, dropped calls, or call failure.
- Network issues – If there are issues with the network or the Skype servers, it can cause problems establishing or maintaining a call.
- Software or app issues – If there are bugs or glitches in the Skype software or app, it can cause problems with the call, such as freezing, crashing, or call failure.
- Incorrect login details – If you use incorrect login details, such as an incorrect username or password, it can cause problems with making or receiving calls.
- Blocked contacts – If you have blocked someone or they have blocked you, it can cause problems with making or receiving calls to that person.
- Outdated Skype version – If you are using an outdated version of Skype, it may not be compatible with the latest features or have bugs that can cause problems with the call.
- Hardware issues – If there are issues with your microphone, speakers, or camera, it can cause problems with the call, such as poor audio or video quality or call failure.
What can I do if my Skype calls keep failing?
- Delete shared.xml file
- Check if Skype is up to date
- Use System Restore
- Reinstall Skype
- Check your call forwarding settings
- Change your Internet Options
- Make sure that Quiet hours aren’t enabled
1. Delete the shared.xml file
1. First of all, ensure that the Skype app is closed on your device.
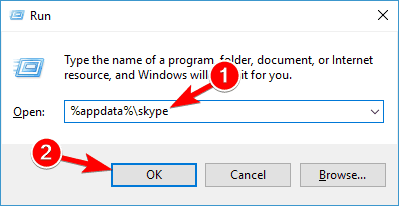
2. Press the Windows key + R keyboard keys at the same time to open the Run dialog.
3. In the Run box type: %appdata%skype.
4. Press Enter or click OK.
5. Search for the shared.xml file in the window that opened on your device. Do note that your file might be named shared if the file extensions feature is not enabled on your computer.
6. Right-click on it and select Delete from the list of options.
7. Once you delete the shared.xml file, try running Skype again and check if the issue still persists.
Another fix is to manually delete the shared.xml file on your device. It might be damaged or corrupted, thus creating the calls failing issue. After you delete it, Skype will automatically replace it. This will ensure a clean reset of your app, without you having to completely re-install it.
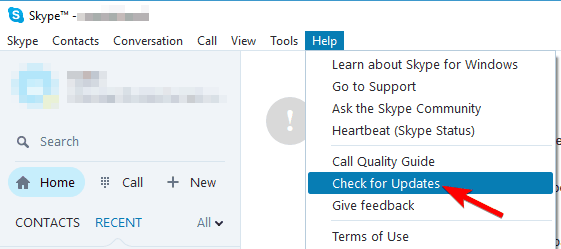
2. Check if Skype is up to date
Skype will now check for available updates and download them in the background. After you update Skype to the latest version, the issue should be resolved, and you can use Skype without any problems.
3. Use System Restore
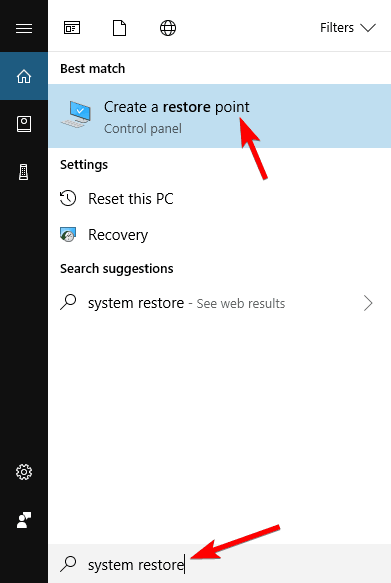
- Press Windows Key + S and enter system restore. Next, select Create a restore point from the menu.
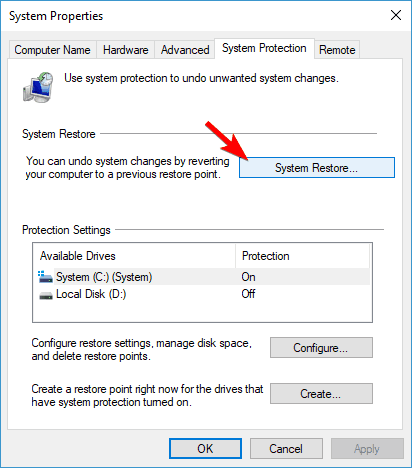
- The System Properties window will now appear. Next, click on the System Restore button.
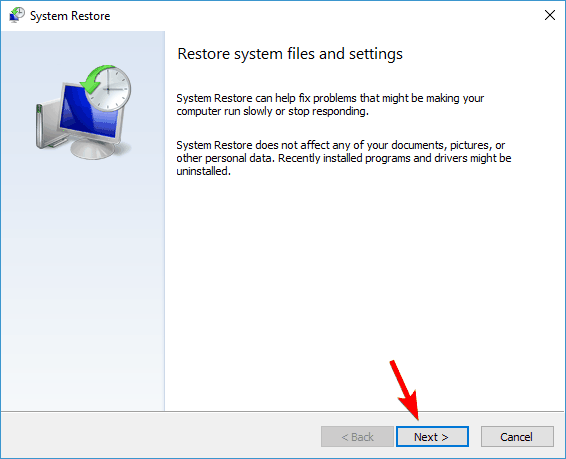
- When the System Restore window opens, click on Next.
- If available, check the Show more restore points option. Then, select the desired restore point and click on Next.

- Now follow the instructions on the screen to complete the restore process.
Once your PC is restored, your Skype calls should start working again. If you’re not a fan of System Restore, you can also restore your PC using a hard disk image.
4. Reinstall Skype
- Open the Settings app. You can do that quickly by pressing Windows Key + I shortcut.
- When the Settings app opens, navigate to the Apps section.

- A list of all installed applications will now appear. Select Skype from the list and click on Uninstall.

- Follow the instructions on the screen.
You can also uninstall Skype by doing the following:
- Press Windows Key + S and enter Control panel. Select Control Panel from the list of results.

- When Control Panel opens, select Programs and Features from the menu.

- A list of installed applications will now appear. Double-click on Skype to uninstall it.
- Follow the instructions on the screen to uninstall Skype.
If you have multiple versions of Skype available, uninstall them all and then download the desktop, also known as a classic version of Skype and install it. Once you reinstall Skype, the issue should be resolved entirely.
5. Check your call forwarding settings
- Navigate to the Skype call forwarding page.
- Log in with the correct credentials.
- Set call forwarding to 1.

Sometimes Skype calls don’t go through due to your call forwarding settings. If you use this feature, you might want to check your settings and see if everything is in order.
According to users, their call forwarding was set to 1 second by accident, and that caused this issue to appear.
To fix the problem, go to Skype’s website, log in with your user account, and set the call forwarding timer to any other value.
After doing that, the issue should be resolved entirely, and your calls should start working again.
Remember that the call forwarding feature is disabled by default, and if you never enabled or used this feature, this solution doesn’t apply to you.
6. Change your Internet Options
- Press Windows Key + S and enter internet options. Select Internet Options from the menu.

- Go to the Advanced tab. Ensure that the Use SSL 3.0, Use TLS 1.0, Use TLS 1.1 and Use TLS 1.2 options are checked. Now click on Apply and OK to save changes.

After doing that, your Skype calls should be able to connect without any problems.
7. Make sure that Quiet hours aren’t enabled
- Open the Action Center by clicking its icon in the bottom right corner. Alternatively, you can use Windows Key + A shortcut.

- Look for the Quiet hours option. If you don’t see it, click on Expand.

- Locate Quiet hours and make sure that this option is disabled.

Once you disable this feature, the problem with Skype should be resolved. Remember that this solution works only with the Universal version of Skype. If you’re using a desktop version, this solution won’t apply.
Also, if you’re making Skype international calls, ensure you have enough credits.
If your Action Center doesn’t open, read our dedicated article to find out how to fix it.
That’s it: if your Skype call fails, that is how you may quickly fix the problem on your PC.
Use the comments section below if you know other methods to apply for troubleshooting this issue, and we will update this guide accordingly.








User forum
0 messages