FULL FIX: Slow file transfer on Windows 10
7 min. read
Updated on
Read our disclosure page to find out how can you help Windows Report sustain the editorial team. Read more
Key notes
- Slow file transfer can be a big problem, especially when a matter of a few minutes takes forever.
- Whether you suspect the cause of the issue or not, you'll find a sure fix in this article.
- This comprehensive guide explains how to update your drivers, check your antivirus, run a troubleshooter, and more.
- Depending on the root of the problem, you may need to perform a clean boot or check your BIOS, continue reading to find out how.

We transfer various files on our PCs and oftentimes, slow transfers are possible. This can be especially annoying if you’re in a hurry.
As you might have noticed, slowdown happens whether you’re transferring files from a USB to a computer or when transferring between hard drives.
The most common causes are outdated drivers, missing Windows features, antivirus settings, or hardware issues.
So today, we’re going to show you how to fix this problem on your Windows 10 PC.
How do I fix slow file transfer on Windows 10?
- Install the latest drivers
- Run Hardware and Devices troubleshooter
- Reinstall Universal Serial Bus controller drivers
- Perform a Clean boot
- Check your antivirus
- Disable Remote Differential Compression
- Check the Optimize drives service
- Disable Windows Search service
- Check your BIOS
- Connect the hard drive to a different port
1. Install the latest drivers
If you’re experiencing slow file transfer, it’s possible that the cause is your drivers. Sometimes outdated drivers can cause various functionality issues.
So in order to fix the problem, you need to update your drivers.
Start by visiting your motherboard manufacturer’s website and downloading the latest chipset drivers for your device model.
If you don’t want to search for drivers manually, or if you simply can’t find a suitable driver, use Outbyte Driver Updater.
This is a third-party application, that you can use to automatically update all your drivers with just a couple of clicks.
Download the tool using the button below, allow it to scan your device, and check the recommended actions. You can update either all outdated drivers at once or one by one.

Outbyte Driver Updater
Visibly improve the file transfer speed on your device by keeping your drivers up to date with this efficient tool.2. Run Hardware and Devices troubleshooter
- Open the Settings app by pressing Windows Key + I on your keyboard.
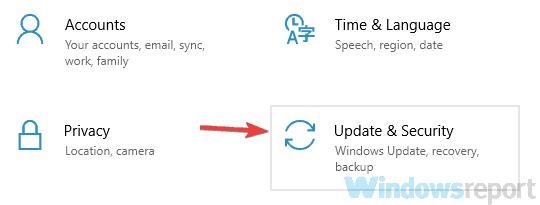
- Go to the Update & Security section.
- Choose Troubleshoot from the menu.
- Now pick Hardware and Devices from the list and click the Run the troubleshooter button.
- Follow the instructions on the screen to complete the troubleshooter.
Once the troubleshooter is finished, check if the problem is still there. If the issue is still present, move to the next solution.
3. Reinstall Universal Serial Bus controller drivers
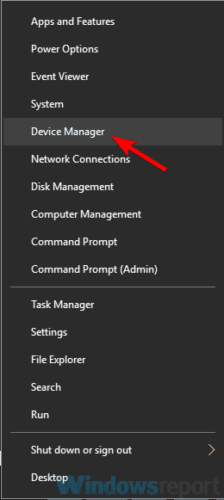
- Open the Device Manager by pressing Windows Key + X.
- Locate the Universal Serial Bus controllers section and expand it.
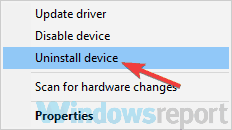
- Right-click the first item on the list and choose Uninstall device.
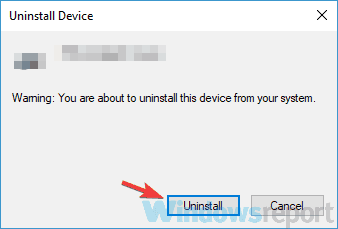
- When the confirmation dialog appears, click Uninstall.
- Repeat these steps for all devices under the Universal Serial Bus controller section.
- After you remove all drivers, restart your PC.
Once your PC restarts, Windows will automatically install the missing drivers and the problem should be resolved. Many users reported that this solution worked for them, so be sure to try it out.
4. Perform a Clean boot
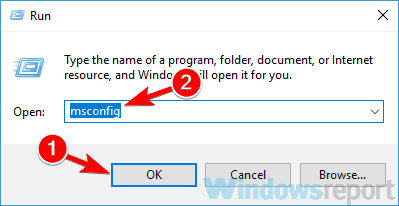
- Press Windows Key + R to open the Run dialog. Type msconfig and click OK or press Enter.
- When the System Configuration window appears, navigate to the Services tab.
- Check Hide all Microsoft services option and click the Disable all button.
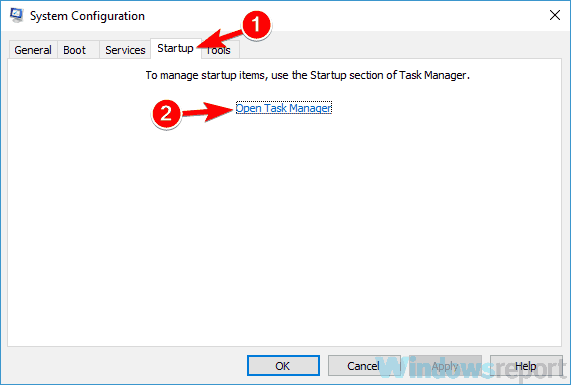
- Go to the Startup tab and click Open Task Manager.
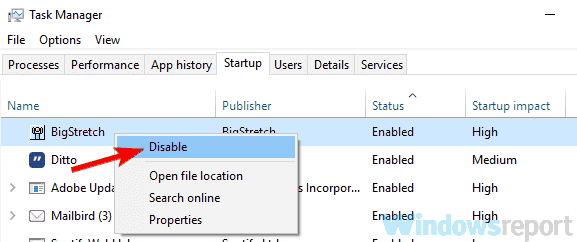
- Task Manager will now appear with the list of startup applications. Right-click the first entry on the list and select Disable from the menu. Do this for all entries on the list.
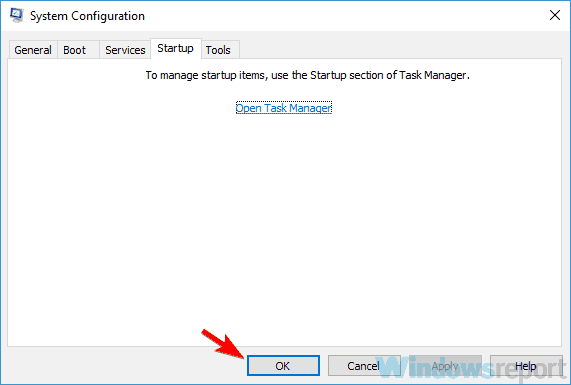
- Go back to the System Configuration window. Now you just have to click Apply and OK to and restart your PC.
After doing that, check if the problem is still there. If the issue doesn’t appear anymore the problem definitely related to one of the disabled applications or services.
To find the exact cause, enable disabled applications and services one by one or in groups until you find the cause of the problem.
5. Check your antivirus
According to users, sometimes antivirus software can lead to slow file transfer speeds on your PC.
Third-party antiviruses can sometimes be quite invasive, but you can just disable some antivirus features. Alternatively, you can try disabling your antivirus altogether.
Removing the antivirus is another option, although not recommended. Your best option is to get an antivirus that won’t interfere with your system.
The antivirus market has a lot of good and stable options that will protect your system against all threats without creating errors, false positives, or interfering with other apps.
We recommend you get antivirus software with low CPU usage and a small footprint because these are proven to perform well on all sorts of devices without having any negative impact on response rates.
6. Disable Remote Differential Compression
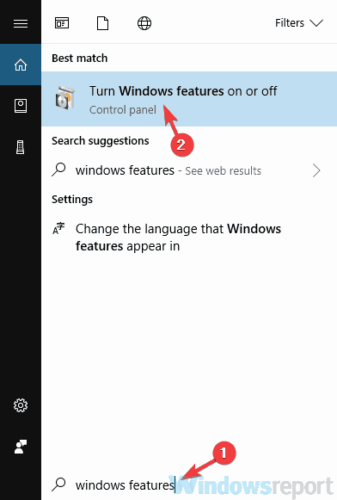
- Press Windows Key + S and enter windows features. Select Turn Windows features on or off.
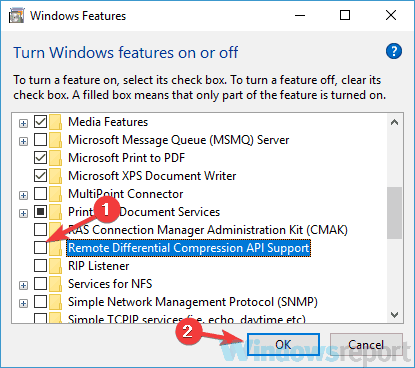
- Disable Remote Differential Compression and click OK.
- Restart your PC.
After your PC restarts, check if the problem is still there. Keep in mind that you need to repeat this on all PCs on your network in order to permanently fix the problem.
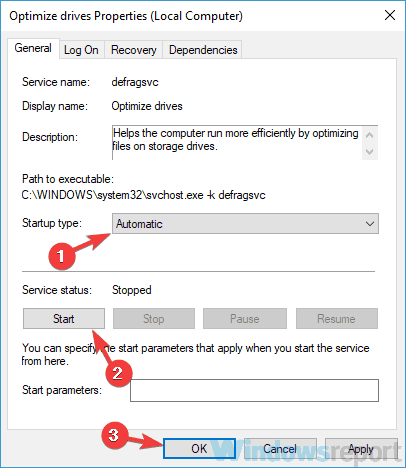
7. Check the Optimize drives service
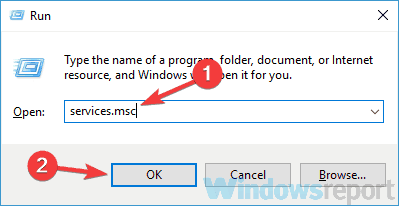
- Press Windows Key + R and enter services.msc. Press Enter or click OK.
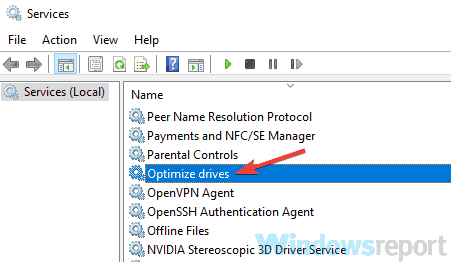
- Locate Optimize drives and double-click it to check its properties.
- Set the Startup type to Automatic.
- Now click the Start button to start the service. Once the service starts, click Apply and OK to save changes.
After this service is up and running, the problem with slow file transfer speed should be completely fixed.
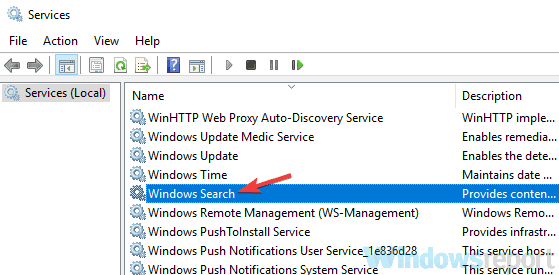
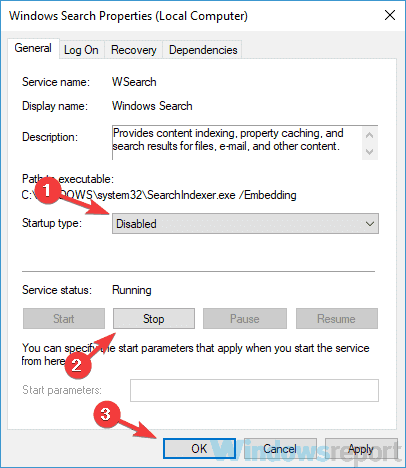
8. Disable Windows Search service
- Open the Services window.
- Locate Windows Search service and double-click it to reveal its properties.
- Set Startup type to Disabled.
- Now click the Stop button to stop the service. Lastly, click Apply and OK to save changes.
Restart your PC and check if the problem is resolved. If any new issues occur after disabling this service, be sure to enable the service once again.
9. Check your BIOS
If you’re encountering slow file transfer speeds on your PC, the problem might be your BIOS configuration.
Several users reported that their hard drives were configured as IDE drives in BIOS, and that caused the issue.
In case you don’t know, IDE is an older standard, and by using it with newer hardware you might encounter various problems. However, you can fix the issue simply by changing the hardware configuration from IDE to AHCI in BIOS.
To see how to do that, we advise you to check your motherboard manual for detailed information.
10. Connect the hard drive to a different port
If other solutions didn’t work for you, perhaps this is a good time to check your hardware.
Several users reported that a SATA port can sometimes slow down transfer speeds. So simply connect your hard drive to a different SATA port on your motherboard.
After doing that, check if the problem is still there.
Slow file transfer speeds can be quite annoying, but we hope that you managed to solve this issue by using one of our solutions.
If you need further help with Windows 10 issues, you’ll find more easy-to-follow tutorials in the Windows 10 Troubleshooting Hub.
If you’re interested in file management tools, visit the Software Hub for useful recommendations.




User forum
0 messages