How to set up and connect to Synology VPN on Windows 10
![]() 8 min. read
8 min. read
![]() Updated on
Updated on
Share this article

Improve this guide
Read our disclosure page to find out how can you help Windows Report sustain the editorial team Read more
Key notes
- If you have a Synology NAS device, you can turn it into a VPN server to allow other users to connect remotely and share files securely.
- It's a time-consuming process, but it's not difficult if you accurately follow our complete step-by-step guide.
- The biggest decision is choosing the VPN protocol for the Synology NAS server: PPTP, L2TP/IPsec, or OpenVPN.
- We're showing you exactly how to configure Synology VPN settings and how to connect.

A NAS is a data storage server that you can connect to your home or office network.
You can use it to save all essential data in a single place, including photos and videos, without having to rely on cloud storage.
Anyone can access these files through the Internet using a web browser or mobile app: you, your family, or your team members.
If you have a Synology NAS, it means that you can turn it into a VPN server on your Windows 10 PC.
This way, users can remotely connect to the NAS device and perform file transfers, safe from hacker interceptions.
Check out our complete step-by-step guide below to find out how to easily set up and connect to Synology VPN on Windows 10.


Before getting started
When setting up the Synology VPN server, you have to choose a VPN protocol from PPTP, L2TP/IPsec, and OpenVPN.
Keep in mind that the VPN clients must apply identical configurations to their devices in order to establish a successful connection.
Furthermore, any modifications made to the VPN configuration must be also updated in the VPN clients.
That means you should take into account the devices and operating systems used by the VPN clients.
At the same time, you need to ensure anti-hacker VPN protection, so you can’t set the bar low for security.
Which VPN protocol should I use?

Most platforms and operating systems have native support for PPTP, so it’s really easy to set it up without installing additional software.
However, PPTP has weak security and is mostly considered obsolete because of this. Also, some old routers block the GRE protocol (IP protocol 47), which is required for VPN connections over PPTP.
L2TP/IPsec provides better security than PPTP and has good compatibility with most devices, including Windows, Mac, Linux, and mobile.
It requires DSM 4.3 or newer. If you make any changes to the L2TP/IPsec VPN server, this can be easily applied at the VPN clients, too.
OpenVPN offers the best security among the three, but it’s not built into operating systems. That means that VPN users must install an OpenVPN client (free to use).
On top of that, you need to export the OpenVPN configuration every time you make changes and share it with the VPN clients. Plus, OpenVPN server mode doesn’t support bridge mode for site-to-site connections.
We suggest using OpenVPN for best security or L2TP/IPsec for good security and native integration.
How do I set up a Synology NAS VPN server on Windows 10?
For PPTP
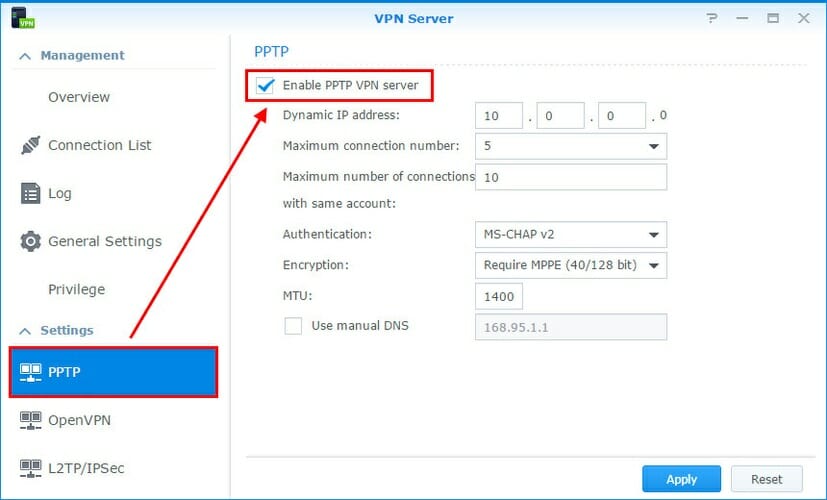
- Click VPN Server on your Synology NAS
- Select PPTP on the left side
- Check the Enable PPTP VPN server box
- Set the Dynamic IP address*
- At Maximum connection number, you can limit the number of simultaneous VPN client connections
- The Maximum number of connections with same account field is similar to the one before, but it refers to users logged in under the same VPN account
- Set Authentication to MS-CHAP v2 to encrypt the VPN client passwords
- Set Encryption to Require MPPE
- Leave MTU to default (1400)
- Leave Use manual DNS unchecked to push the Synology NAS DNS server to the VPN clients
- Click Apply
For L2TP/IPsec

- Open VPN Server and go to L2TP/IPsec on the left side
- Check the Enable L2TP/IPsec VPN server box
- Enter the Dynamic IP address*
- Set Maximum connection number to the total simultaneous VPN client connections you allow
- Set Authentication to MS-CHAP v2
- Leave MTU to default (1400)
- Leave Use manual DNS unchecked to push the Synology NAS DNS server to the VPN clients
- At IKE authentication, enter and confirm the pre-shared key.
- Click Apply
For OpenVPN
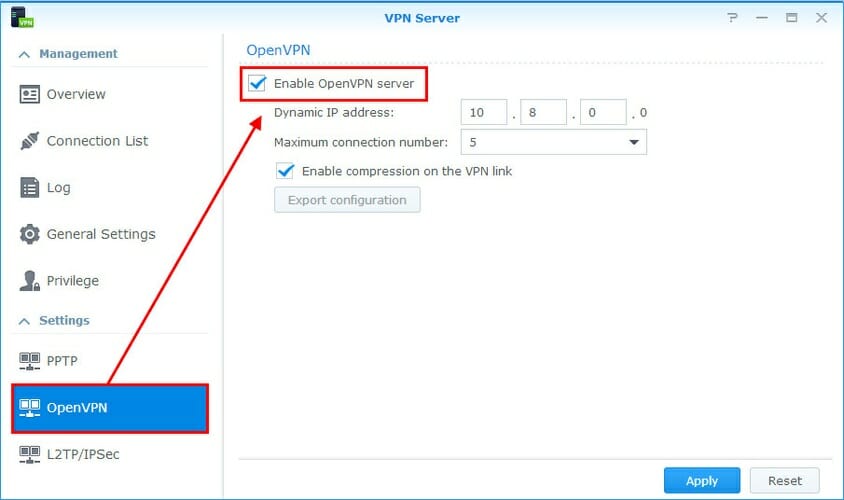
- Launch VPN Server and select OpenVPN on the left side
- Check the Enable OpenVPN server
- Set the Dynamic IP address*
- Limit the Maximum connection number
- At Enable compression on the VPN link
- Tick it if you want to apply data compression and speed up file transfers
- Leave it unchecked if you don’t want it to consume additional system resources (lower speed).
- Enable Allow clients to access server’s LAN
- Tick Enable IPv6 server mode only if you want VPN clients to connect using IPv6 instead of IPv4
- Click Apply
*The dynamic IP address is taken into account by the VPN server when it assigns the virtual IP addresses to all connected clients. It should not be identical to any local IP addresses used by your devices in LAN. You can use the arp -a command in CMD to view all local IP addresses.
Many routers have VPN server support for PPTP and L2TP/IPsec.
To avoid conflicts caused by occupied ports, make sure that the VPN server isn’t enabled on your router if you want to set up a Synology VPN server over PPTP or L2TP/IPsec.
Furthermore, you should use a router that allows VPN pass-through.
How do I connect to Synology VPN on Windows 10?
For PPTP
Here’s how to add a VPN connection, edit VPN properties, and connect to the Synology VPN when using the PPTP protocol.
- Create a VPN connection

- Click the Windows 10 Start button, type VPN settings, press Enter
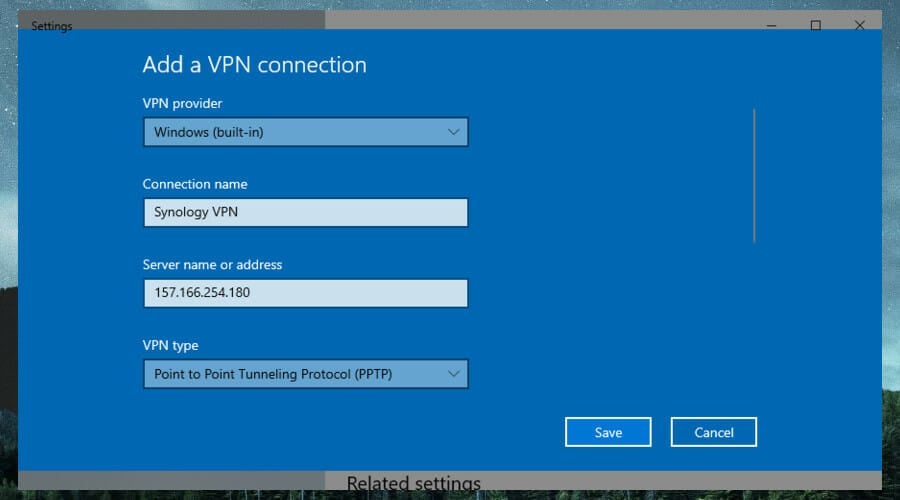
- Click Add a VPN connection
- Set VPN provider to Windows (built-in)
- At Connection name, set a preferred display name.
- At Server name or address, type the public IP address of the Synology NAS
- Set VPN type to Point to Point Tunneling Protocol (PPTP)
- Specify your User name and Password required for login
- Click Save
- Change VPN properties
- Right-click Start and go to Network Connections
- Click Change adapter options
- Righ-click the new VPN connection and go to Properties
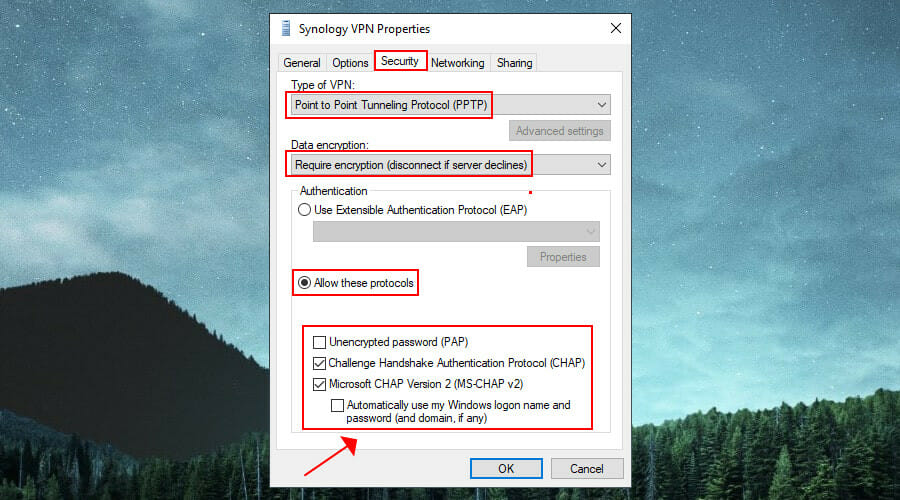
- Go to the Security tab
- Set Data encryption to Require encryption (disconnect if server declines)
- Select Allow these protocols
- Enable Challenge Handshake Authentication Protocol (CHAP)
- Enable Microsoft CHAP Version 2 (MS-CHAP v2)
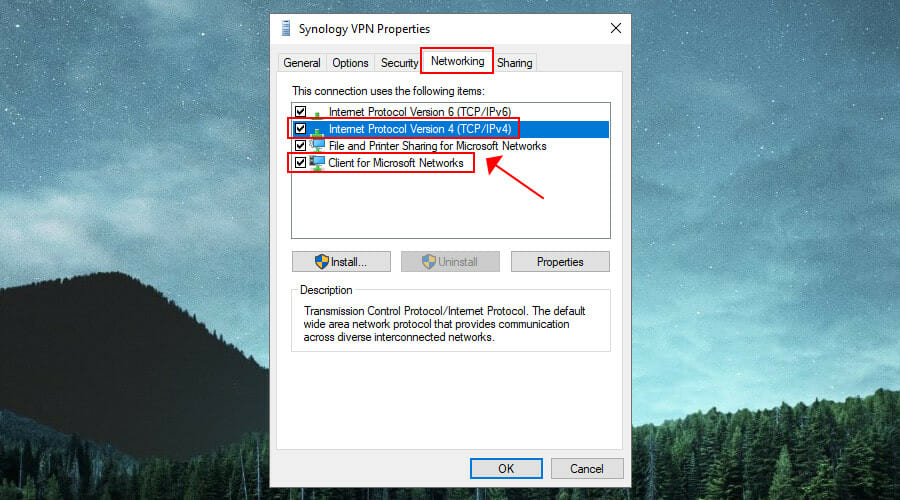
- Switch to the Networking tab
- Enable Internet Protocol Version 4 (TCP/IPv4)
- Enable Client for Microsoft Networks
- Click OK
- Connect to the VPN
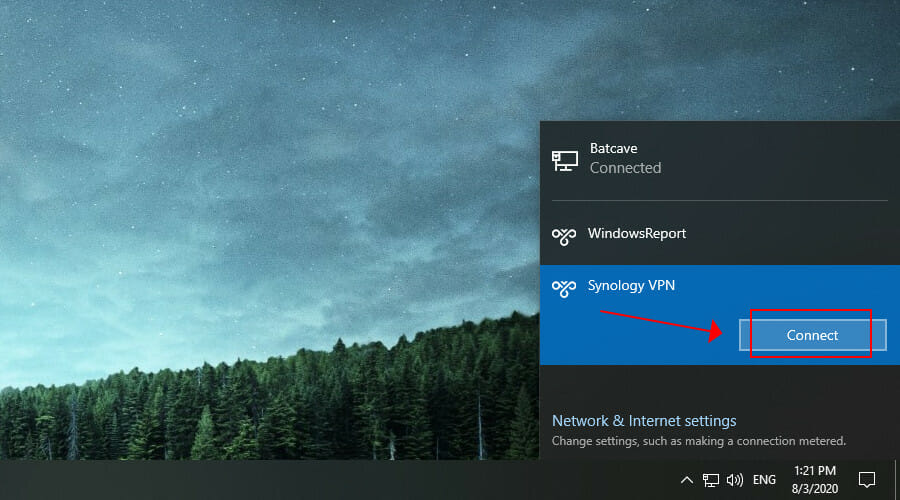
- Click the network icon in the systray
- Select the VPN connection
- Press Connect
For L2TP/IPsec
When it comes to the L2TP/IPsec protocol, start by making a minor registry tweak
Then, you can add your VPN connection, edit L2TP/IPsec settings, and connect to the Synology VPN.
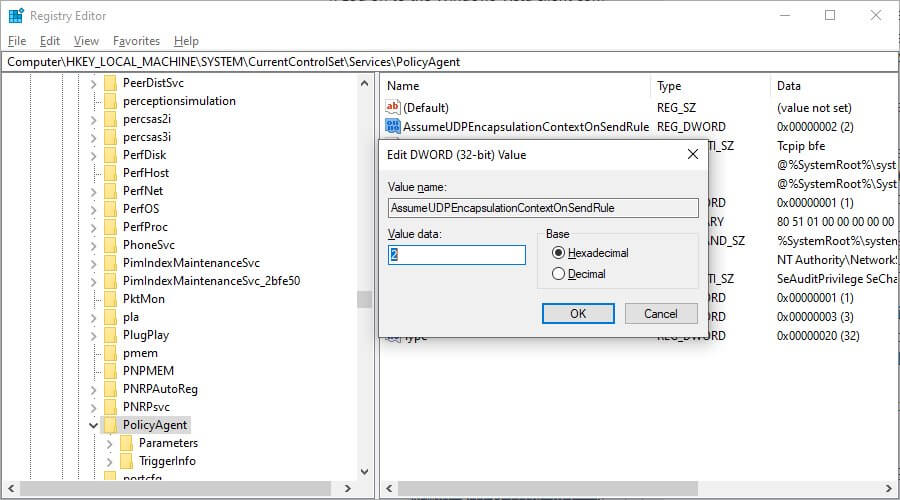
- Start with a registry tweak*
- Press Ctrl+R, write regedit, hold down Shift, and press OK
- Click Yes if prompted by UAC (User Account Control)
- Delete the text shown in the address bar
- Paste the following code and press Enter:
HKEY_LOCAL_MACHINESYSTEMCurrentControlSetServicesPolicyAgent - You should now be in the PolicyAgent folder
- Open the Edit menu > New submenu and click DWORD (32-bit) Value
- Paste AssumeUDPEncapsulationContextOnSendRule as the value name
- Right-click AssumeUDPEncapsulationContextOnSendRule and select Modify
- Set Value data to 2
- Set Base to Hexadecimal
- Click OK
- Restart your computer
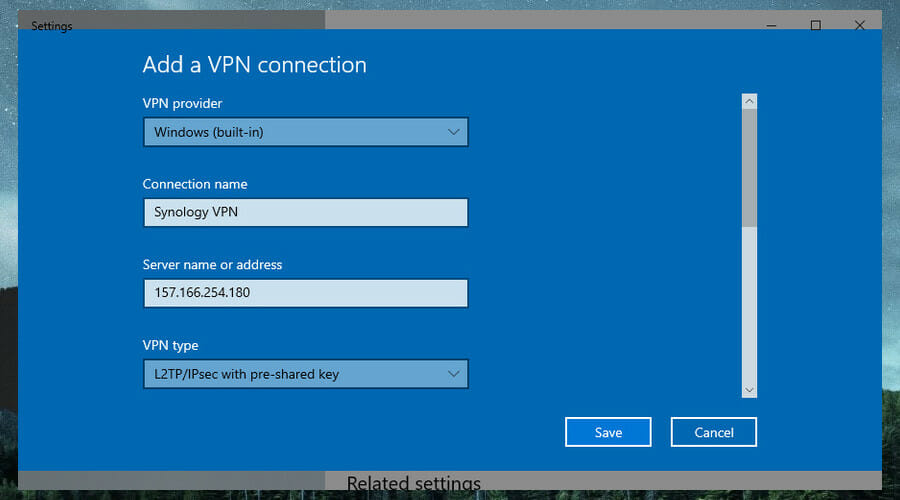
- Create a VPN connection
- Click the Start button, click VPN settings, press Enter
- Click Add a VPN connection
- Set VPN provider to Windows (built-in)
- Set Connection name to any VPN display name you prefer
- At Server name or address, type the public IP address of the Synology NAS
- Set VPN type to L2TP/IPsec with pre-shared key
- Enter the Pre-shared key
- Specify your User name and Password
- Click Save
- Change VPN properties
- Right-click the Start button and go to Network Connections
- Click Change adapter options
- Right-click your VPN connection and go to Properties
- Switch to the Security tab
- Set Data encryption to Require encryption (disconnect if server declines)
- Select Allow these protocols
- Check Challenge Handshake Authentication Protocol (CHAP)
- Check Microsoft CHAP Version 2 (MS-CHAP v2)
- Go to the Networking tab
- Check Internet Protocol Version 4 (TCP/IPv4)
- Check Client for Microsoft Networks
- Click OK
- Connect to the VPN
- Click the network icon in the system notifications area
- Choose the VPN connection and click Connect

*This part is required for Windows 7 and newer to avoid receiving a VPN connection error. It’s an easy registry hack to make Windows 10 connect to L2TP VPN. A faster way to achieve the same results is by adding a single line of code in CMD (click the link to see how).
For OpenVPN
The OpenVPN option is the most complicated because you have to install an OpenVPN client (no operating system has native support for OpenVPN).
Before doing that, you have to get the OpenVPN configuration settings ready. Once everything is set up, you can connect to the Synology OpenVPN server.
- Prepare the OpenVPN configuration
- On the Synology VPN server, select OpenVPN from the left side
- Click Export configuration
- Copy the ZIP archive to the VPN client PC
- Unzip the archive and open the openvpn.ovpn file with any text editor
- Replace YOUR_SERVER_IP with the public IP address of the Synology NAS
- Set up the OpenVPN client
- Download OpenVPN GUI and install it on your PC
- Go to the config subfolder of the OpenVPN directory. The default location is:
C:Program FilesOpenVPNconfig - Copy the Synology OpenVPN configuration files (ca.crt and openvpn.ovpn) to this location
- Connect to the OpenVPN server
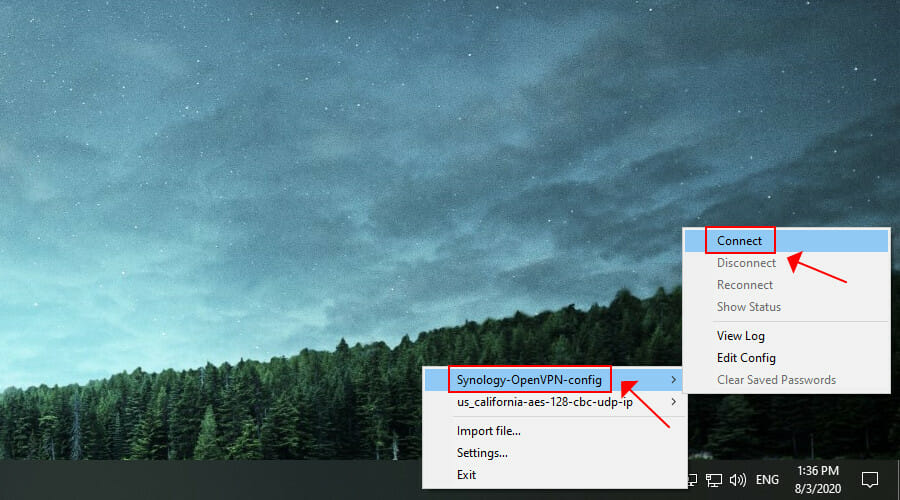
- Launch OpenVPN GUI as admin
- Right-click the OpenVPN GUI icon in the systray
- Select the Synology OpenVPN profile and click Connect
Synology VPN troubleshooting
To avoid VPN connection issues, it’s a good idea to check port forwarding and if the required ports are opened in the firewall on the Synology NAS and router, for both the VPN server and clients.
- PPTP requires port 1723 over TCP
- L2TP/IPsec needs ports 1701, 500, and 4500 over UDP
- OpenVPN needs port 1194 over UDP
Conclusion
To sum up, you can turn your Synology NAS into a VPN server and then connect to it from any part of the world to access files.
It’s a time-consuming process, but it’s not difficult at all if you follow the instructions accurately.
You just need to set up the right VPN protocol for your home or office. No matter what you choose, you can change the VPN settings anytime to try something else.