How to Create and Use Microsoft Teams Avatars?
Say no to the webcam, let your 3D avatar represent you!
6 min. read
Updated on
Read our disclosure page to find out how can you help Windows Report sustain the editorial team. Read more
Key notes
- The 3D avatar feature was announced in a private preview in October last year and was released this May.
- Keep reading to learn how to create and use Teams avatar!
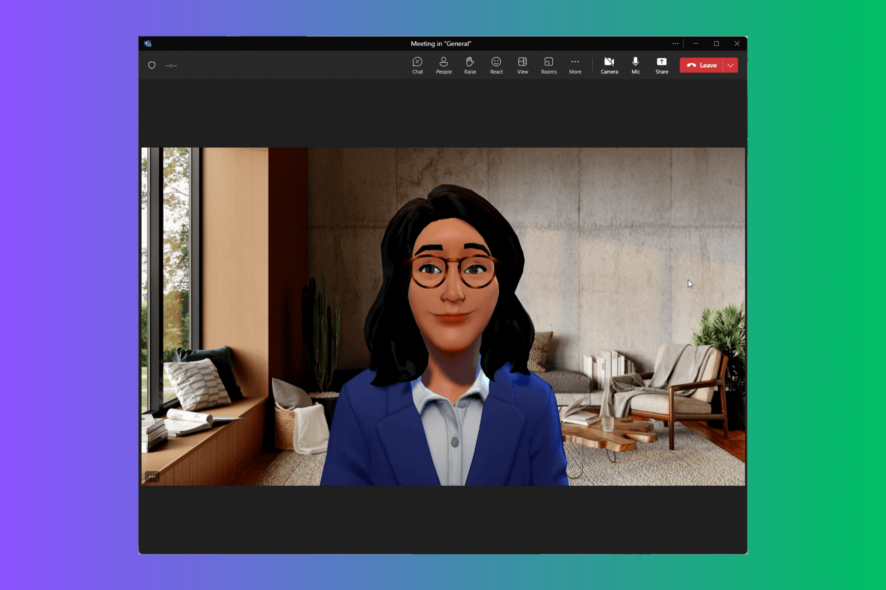
If you don’t feel like showing your face on camera at a Teams meeting, you can have a modern 3D virtual avatar do the job for you.
In this guide, we will discuss the step-by-step instructions to design and use Microsoft Teams Avatars using the avatar creator.
Benefits of Using Avatars on Teams
- Provides a visual representation of users, which makes it easier to identify who is speaking or contributing to the meeting.
- Lowers your anxiety and relieves you from the pressure.
- Maintains a level of privacy by allowing team members to use representations.
- Add a human touch to digital interactions, which creates an engaging and cohesive team environment.
How do I set up my own avatar on Microsoft Teams?
Before proceeding with any steps to create a Microsoft Teams avatar, go through the following preliminary checks:
- Ensure you have access to an active & valid Teams work or school account, and you must be at least 18 years old to use Avatars for Teams.
- A PC with a two-core CPU with 6GB RAM.
- Permission to edit your profile settings within Microsoft Teams (if it is an organization account)
- Need to be a part of the Technology Adoption Program (Mesh TAP).
- Must have Microsoft 365 Enterprise E3, Teams Essentials, Microsoft 365 Enterprise E5, Microsoft 365 Business Basic, Microsoft 365 Business Standard, or Microsoft 365 Business Premium licenses.
1. Download the Avatars app
 NOTE
NOTE
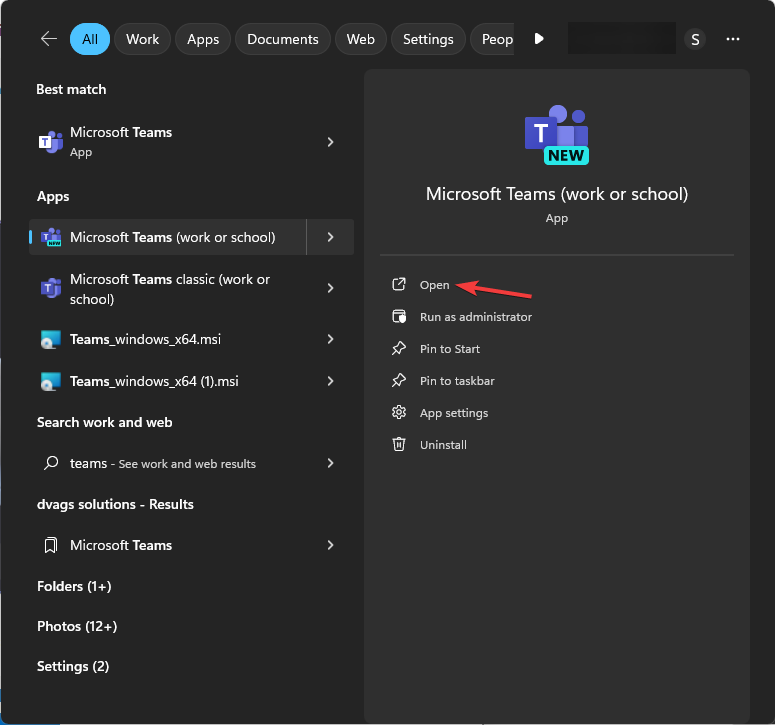
- Press the Windows key, type teams, and click Open to access Teams client.
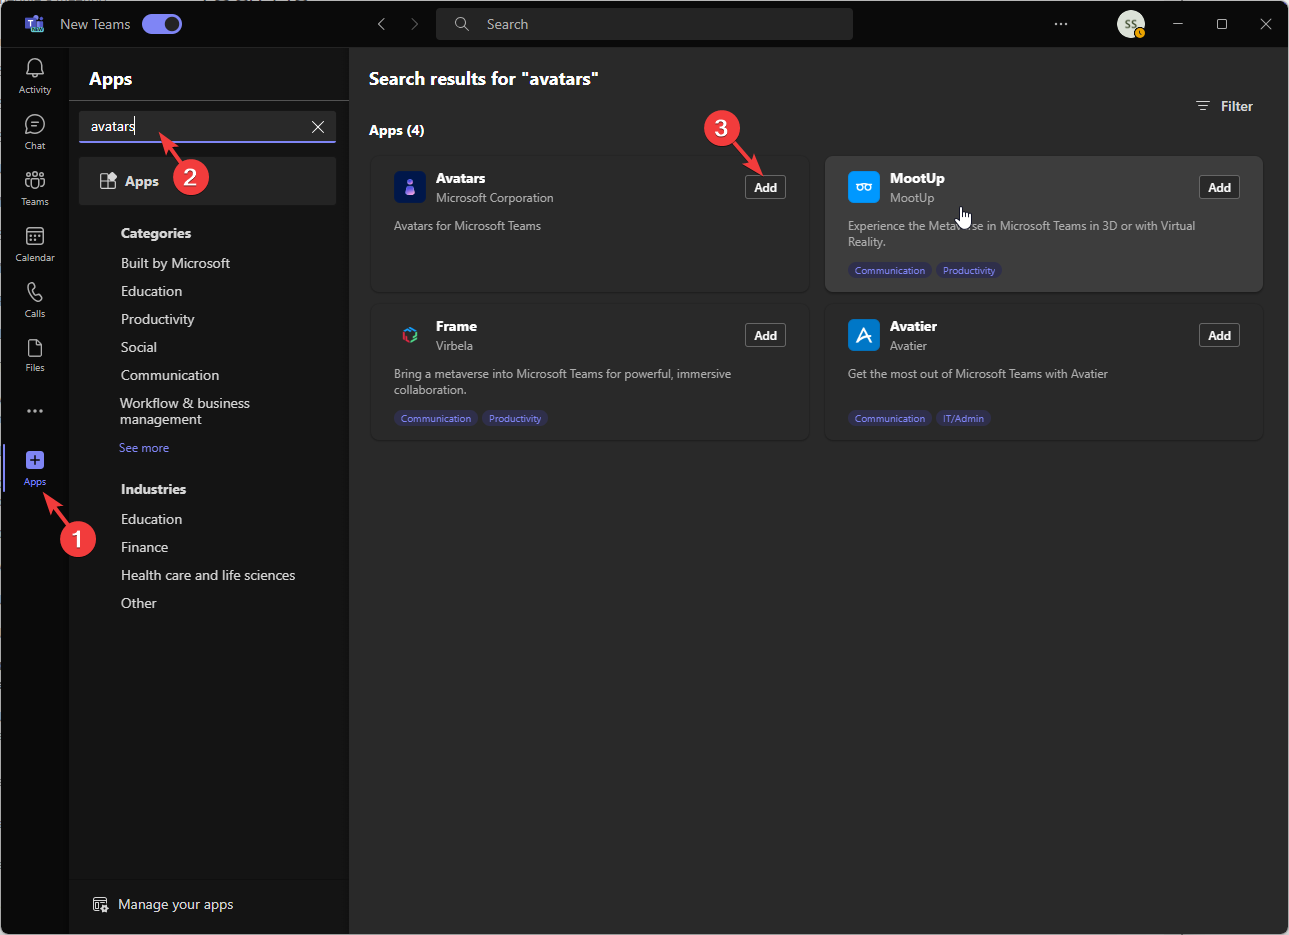
- Select Apps from the left pane of Teams, and in the search box, type Avatars, then click Add.
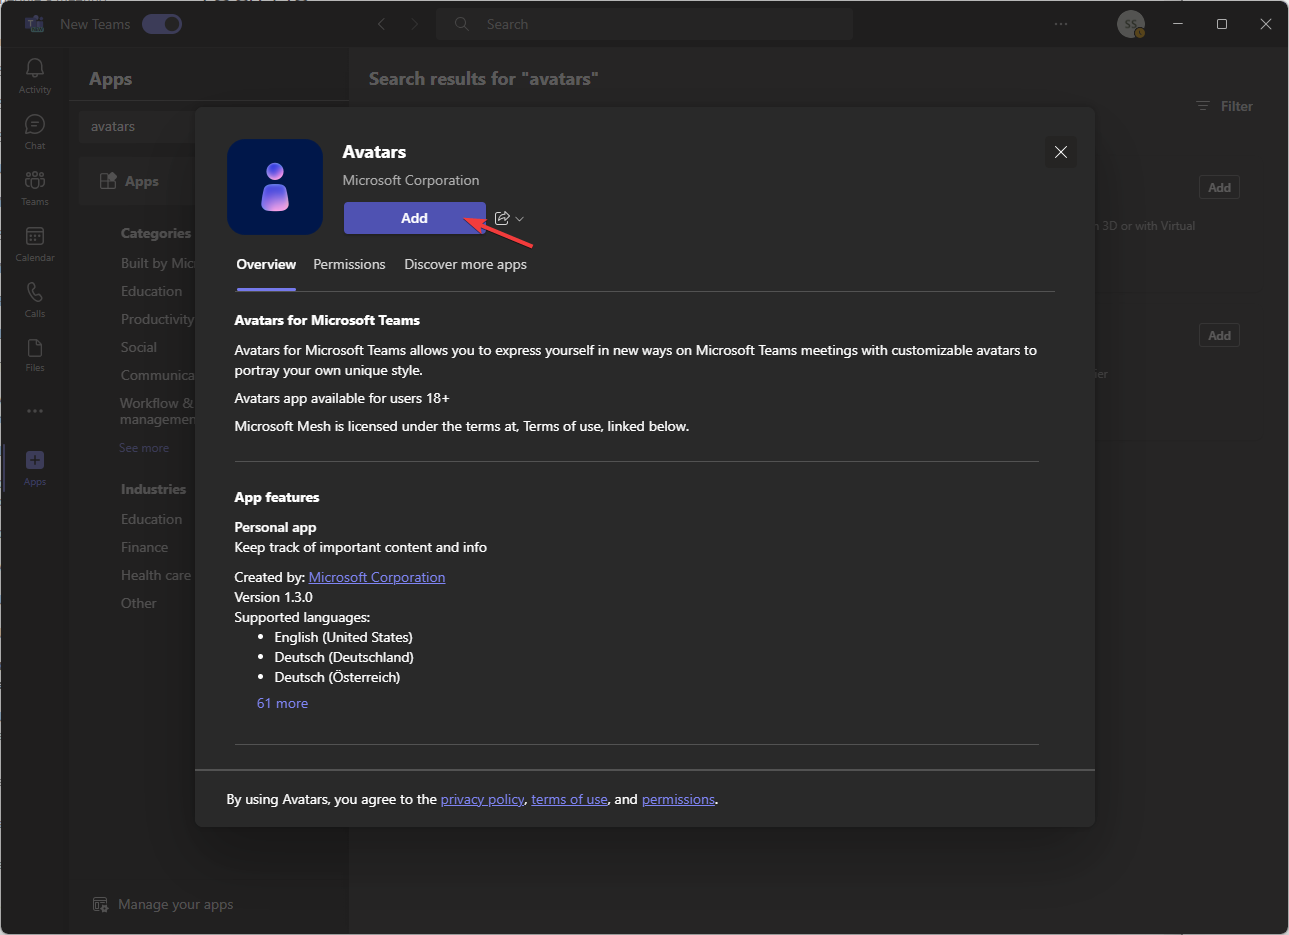
- Click Add.
- If you don’t see it in search results, click Manage your apps from the bottom left corner and locate Avatars.
2. Create a new avatar
- Once the Avatars app is added, click Apps and search for it to open.
- Click Get started.
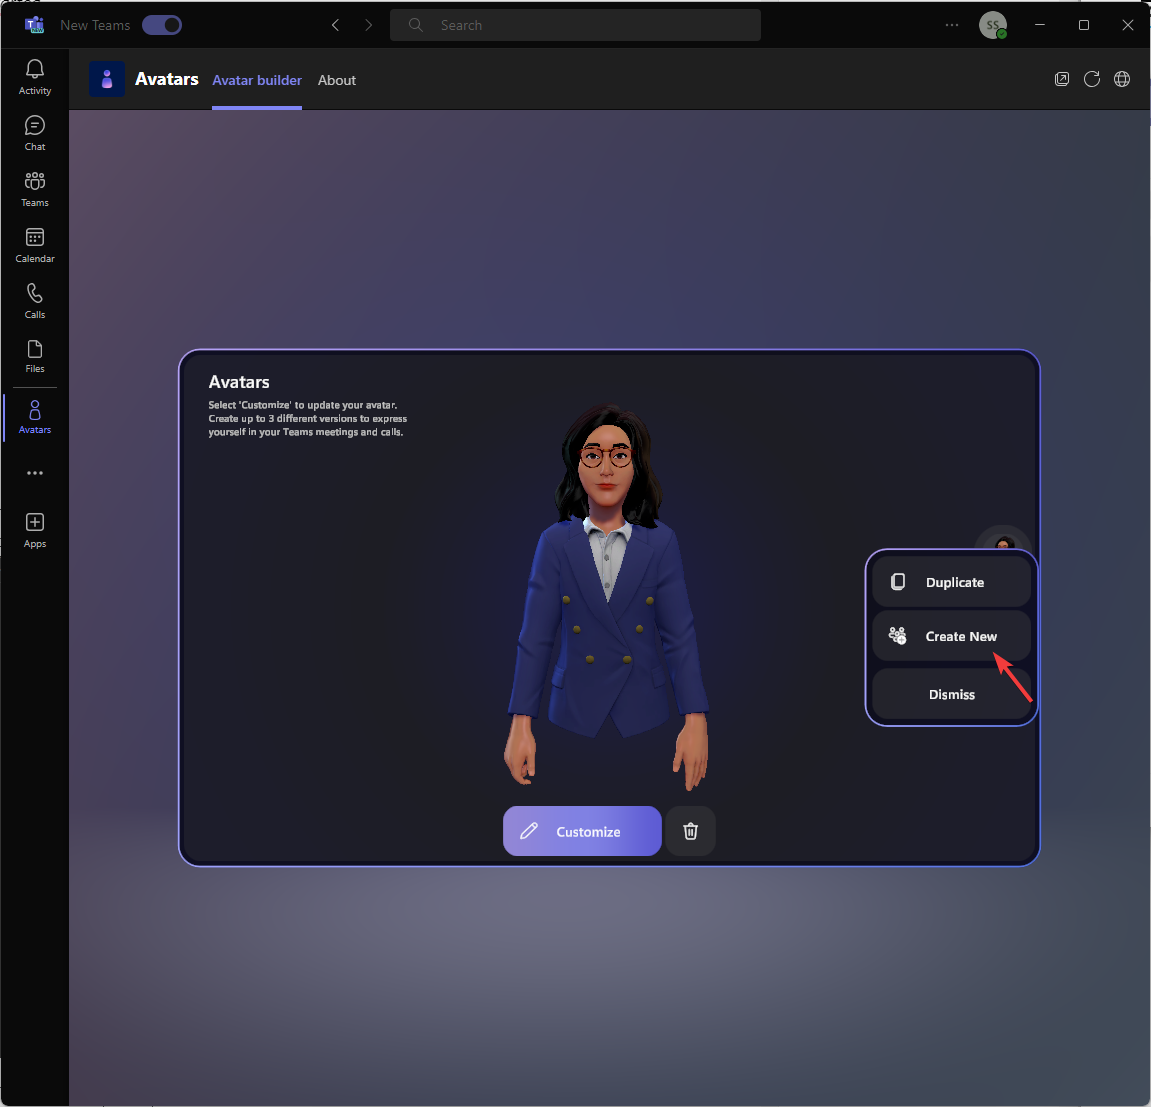
- Select the + icon and click Create new to start the process.
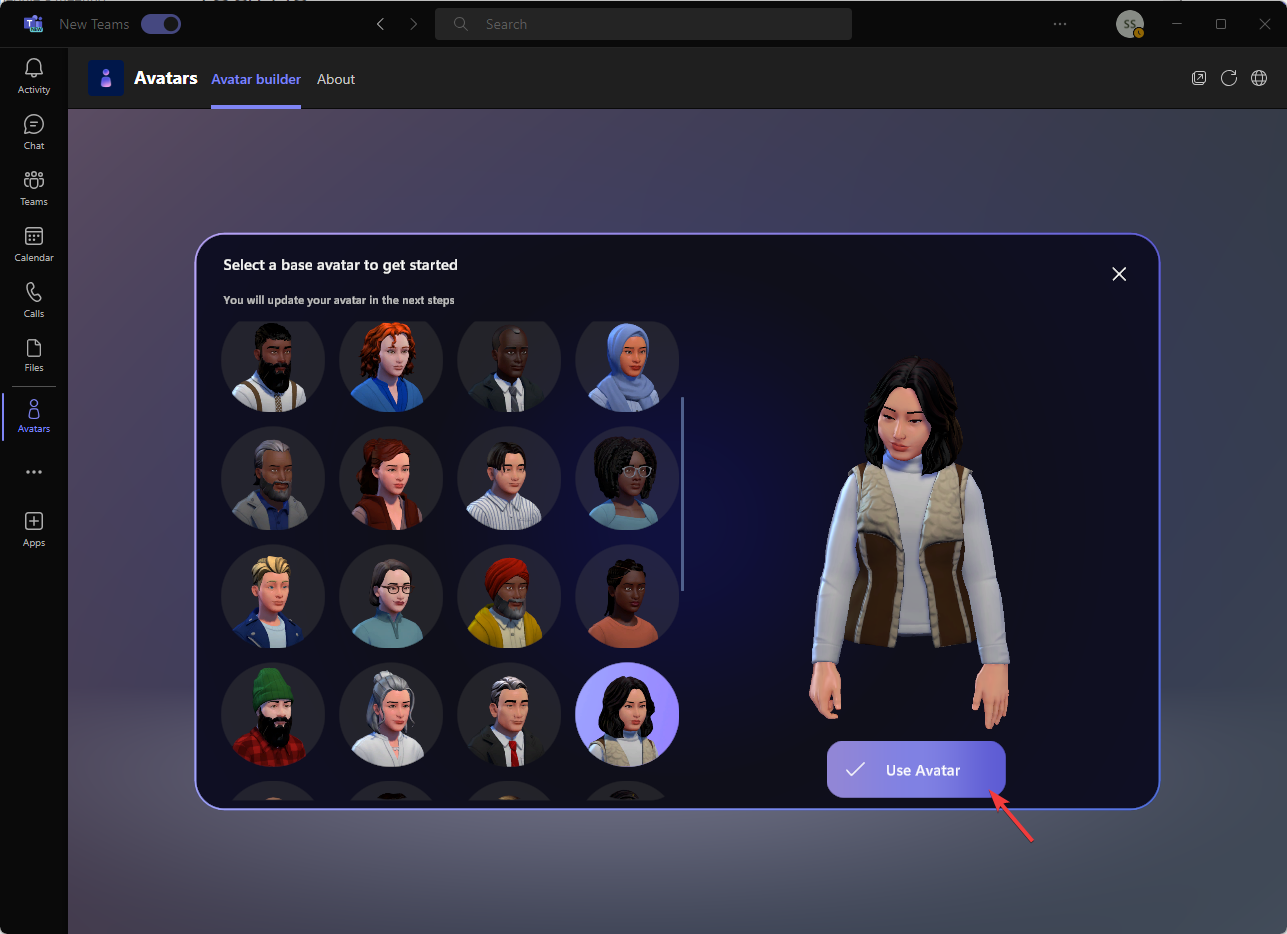
- Select the base avatar that looks most like you to start, and click the Use Avatar button.
3. Customizing your avatar with Mesh Avatars
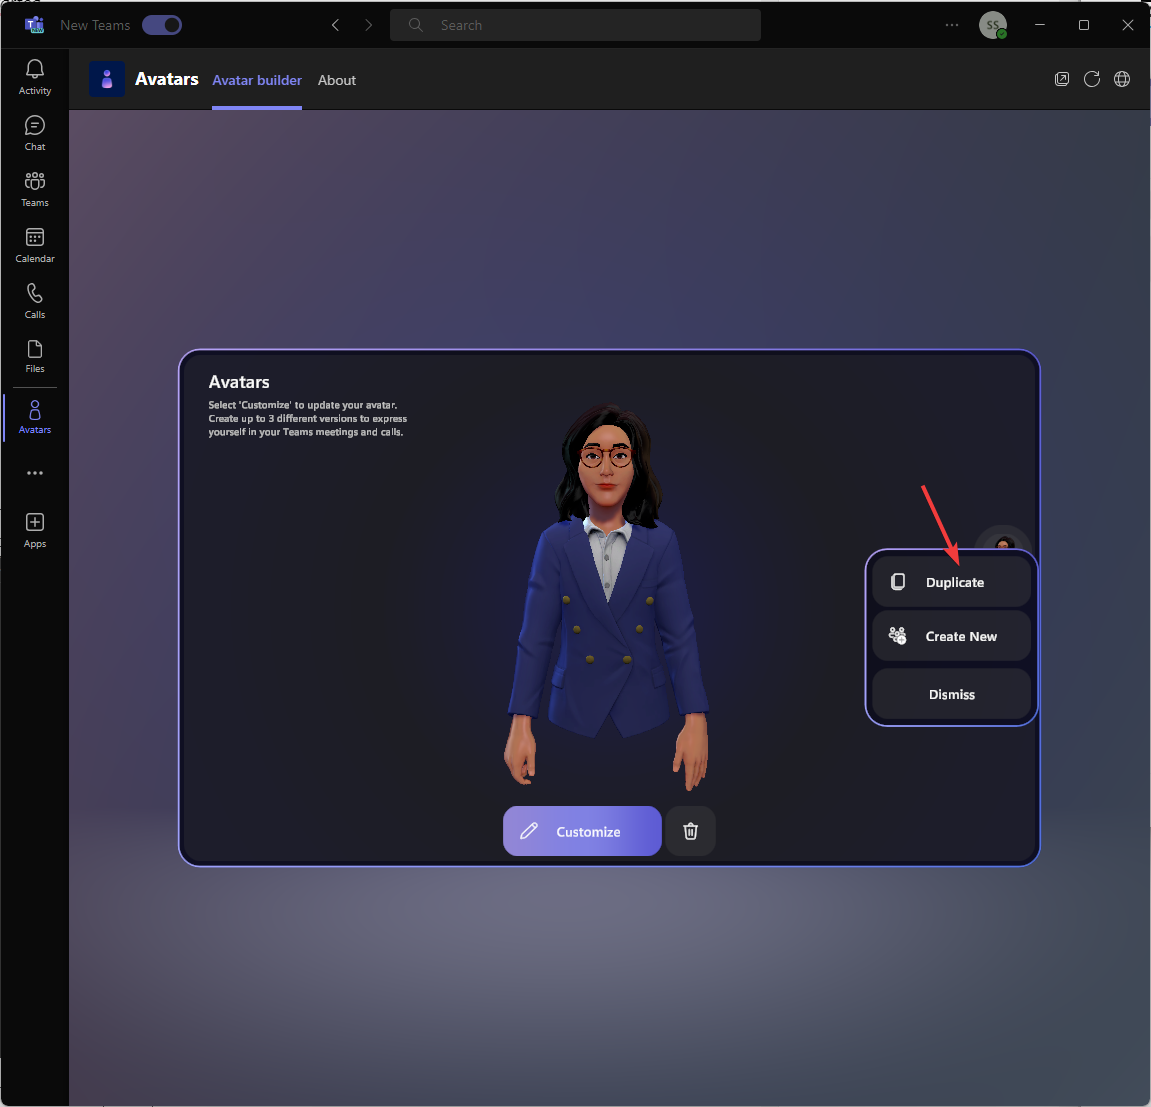
- You can click + and select Duplicate to make a copy of the base avatar, as you can create up to three distinct avatars for different occasions (causal, day-to-day, professional meetings).
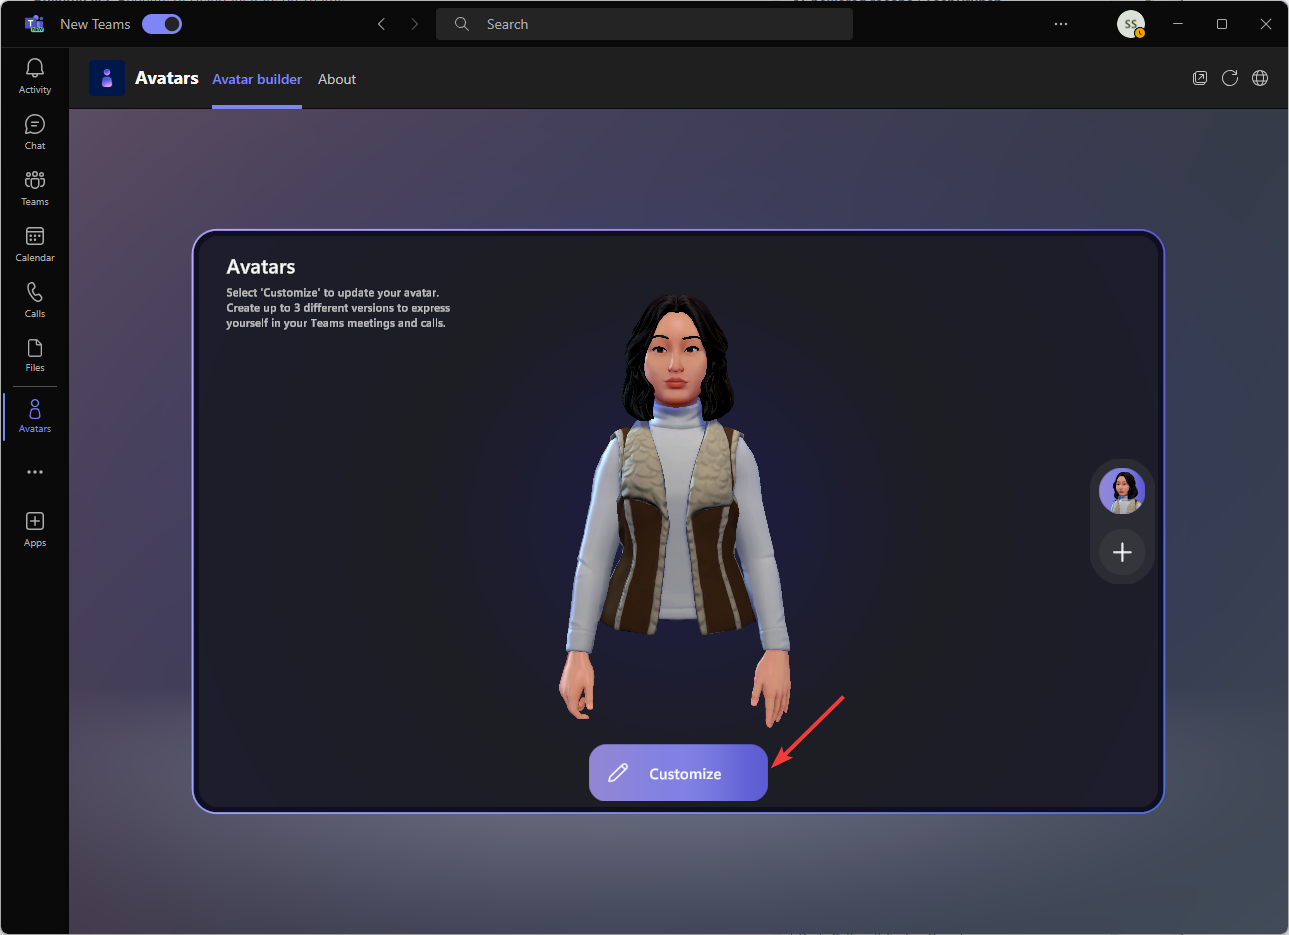
- Once done, click Customize to edit the base avatar.
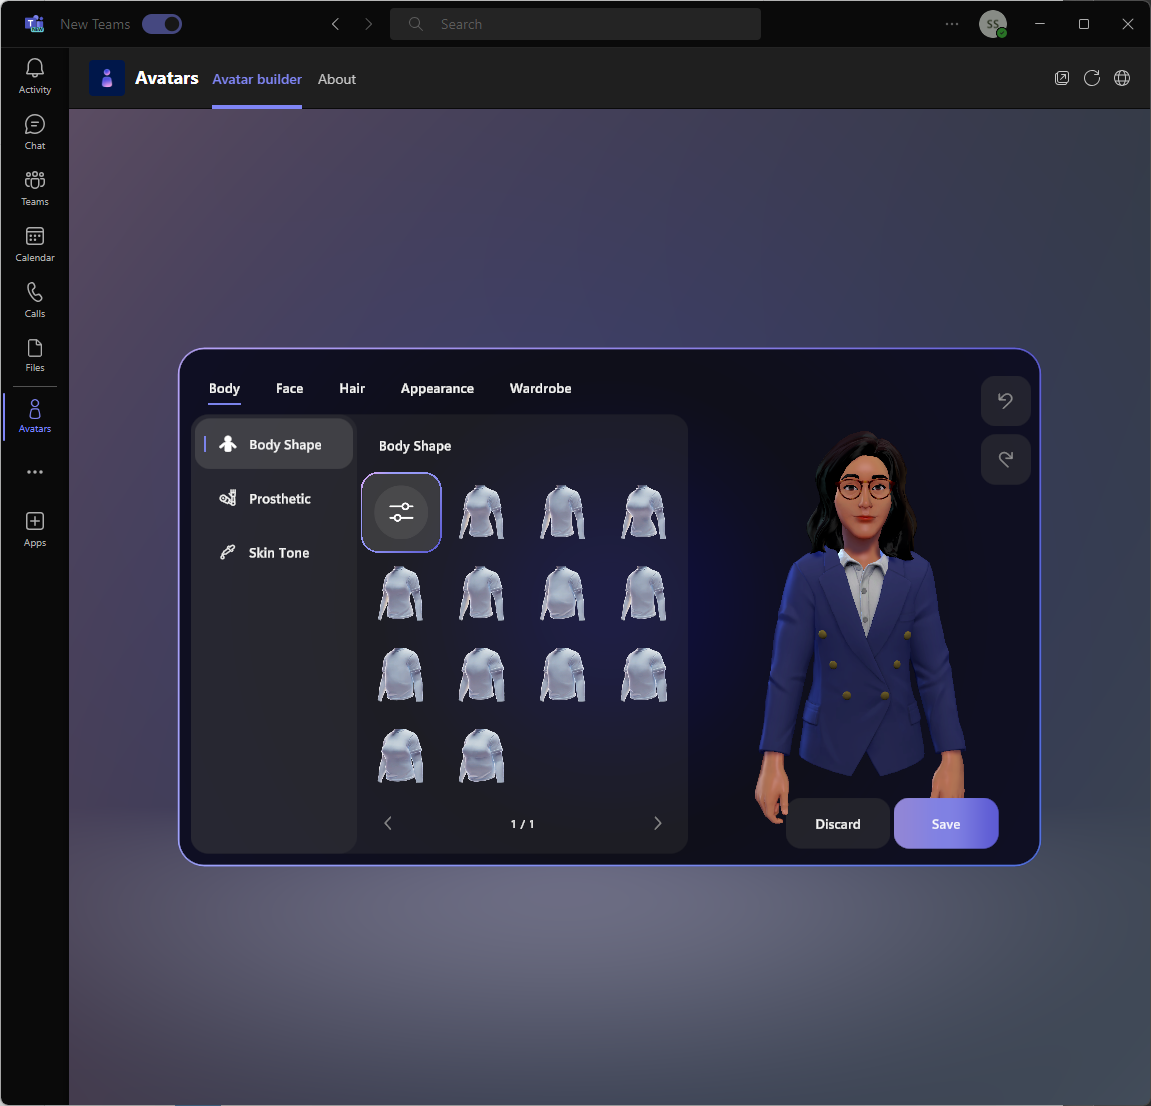
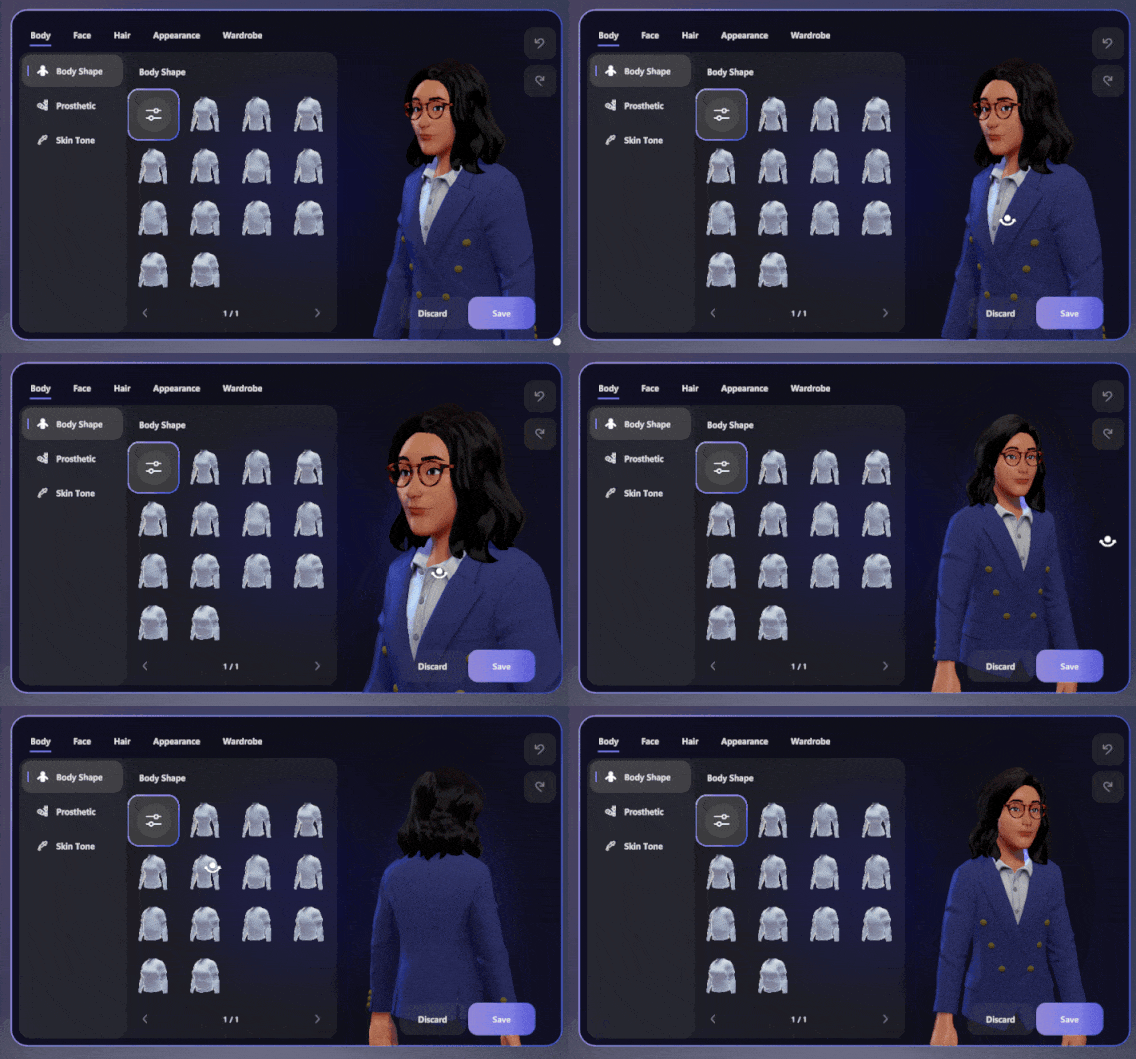
- Click Avatar builder, select Body, then go to Body Shape, Prosthetic, and Skin Tone, and adjust the body shape, skin tone, and prosthetic (if applicable).
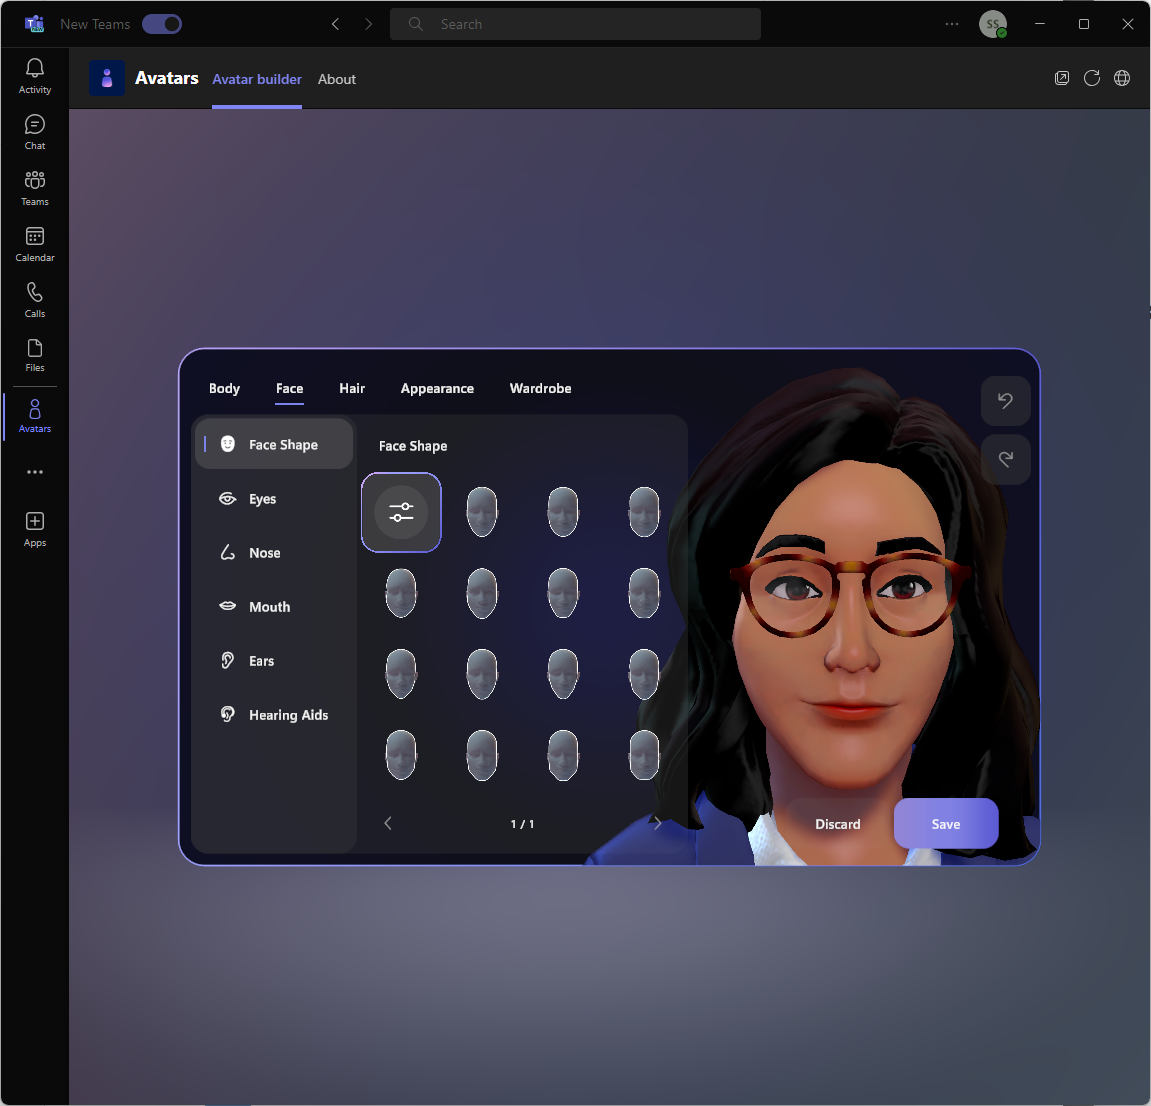
- Next, go to Face, then go to Face Shape, Eyes, Nose, Mouth, Ears, and Hearing Aids, and select the appropriate options.
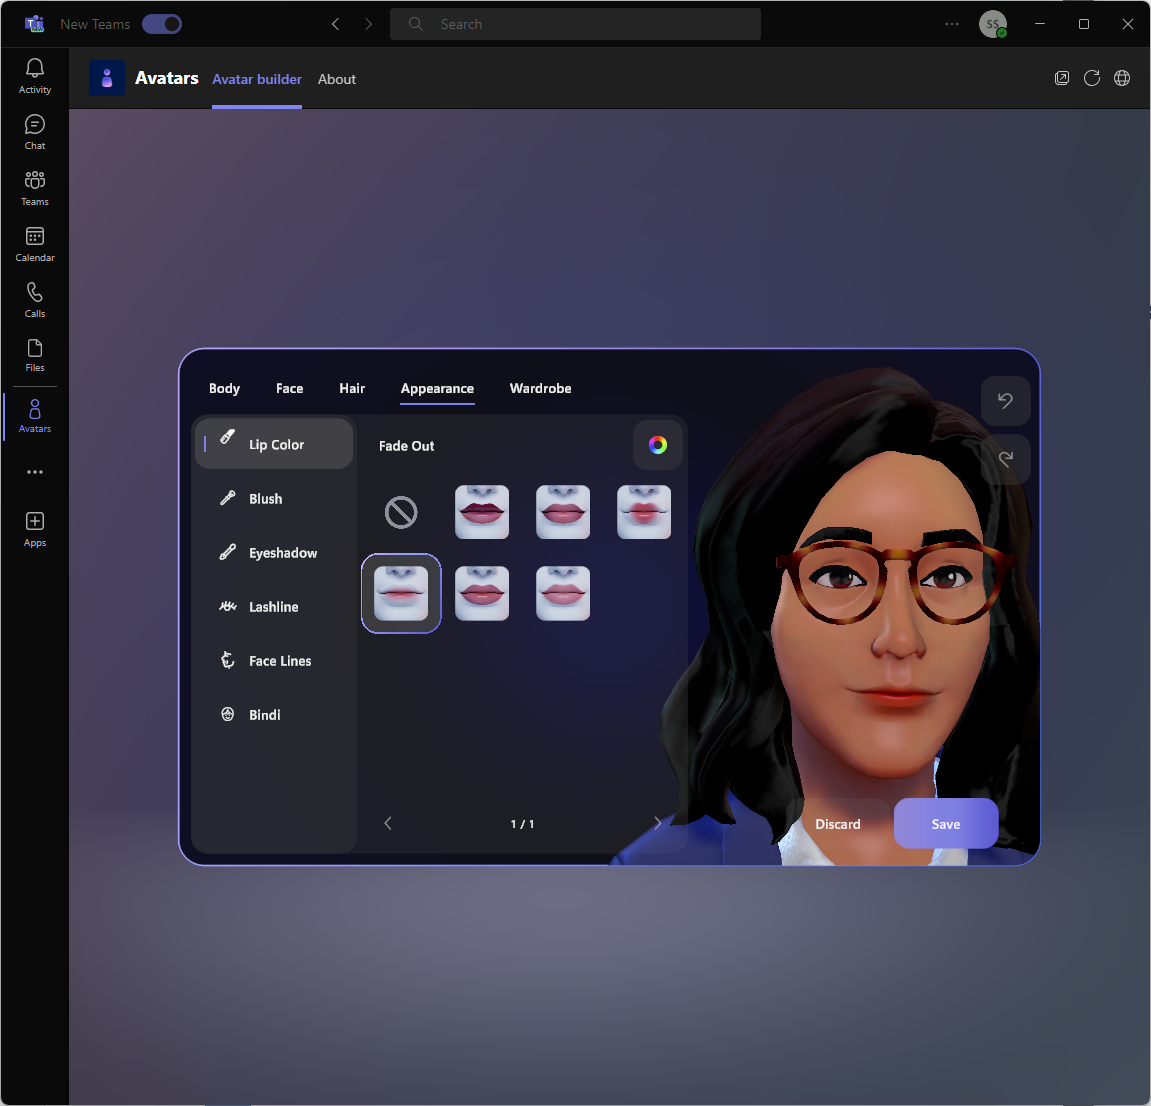
- Switch to Hair to choose Hair Style, Facial Hair, & Eyebrow, then switch to the Appearance tab, to select Lip Color, Blush, Eyeshadow, Lashline, Face Lines, & Bindi.
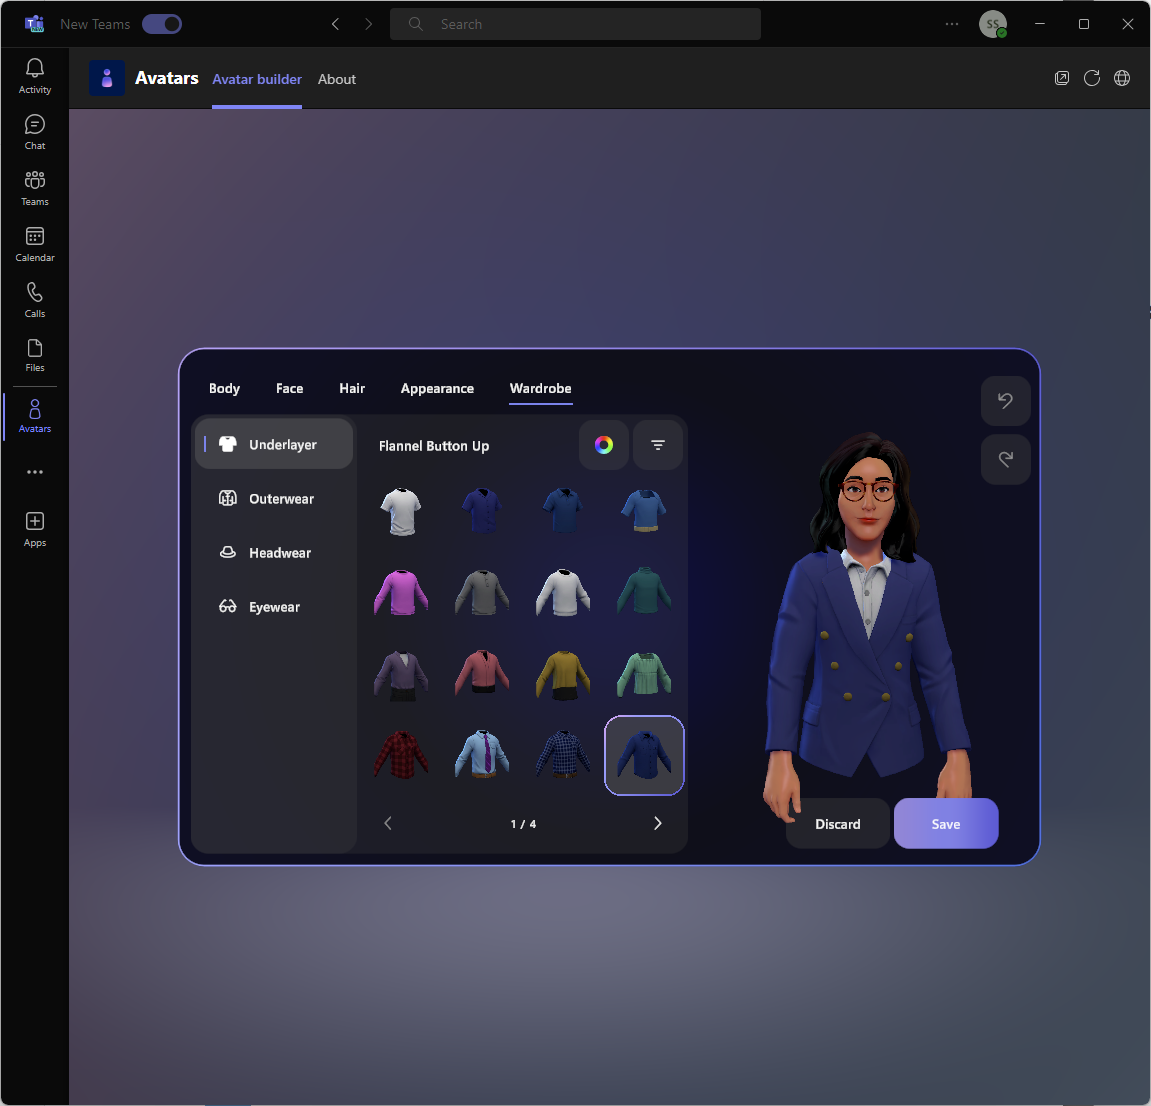
- Go to Wardrobe, select Underlayer, Outerwear, Headwear, and Eyewear to complete the look.
- Now, use your mouse’s scroll wheel to zoom in or out to preview the avatar. You can also hold down your left mouse button and drag your mouse to rotate the avatar to look at it from different angles.
- Once satisfied, click Save.
Every option comes with three customization options, Toggle, Filter, and Rainbow wheel; the Toggle button in the Body and Face section allows you for smaller tweaks like your waist or your head width.
However, the Rainbow wheel in the Hair, Appearance, and Wardrobe section allows you to change the color of certain characteristics like your hair and shirt.
The Filter feature in the Hair and Wardrobe section helps you find what you are looking for more efficiently.
4. Utilizing your avatar in meetings and other interactions
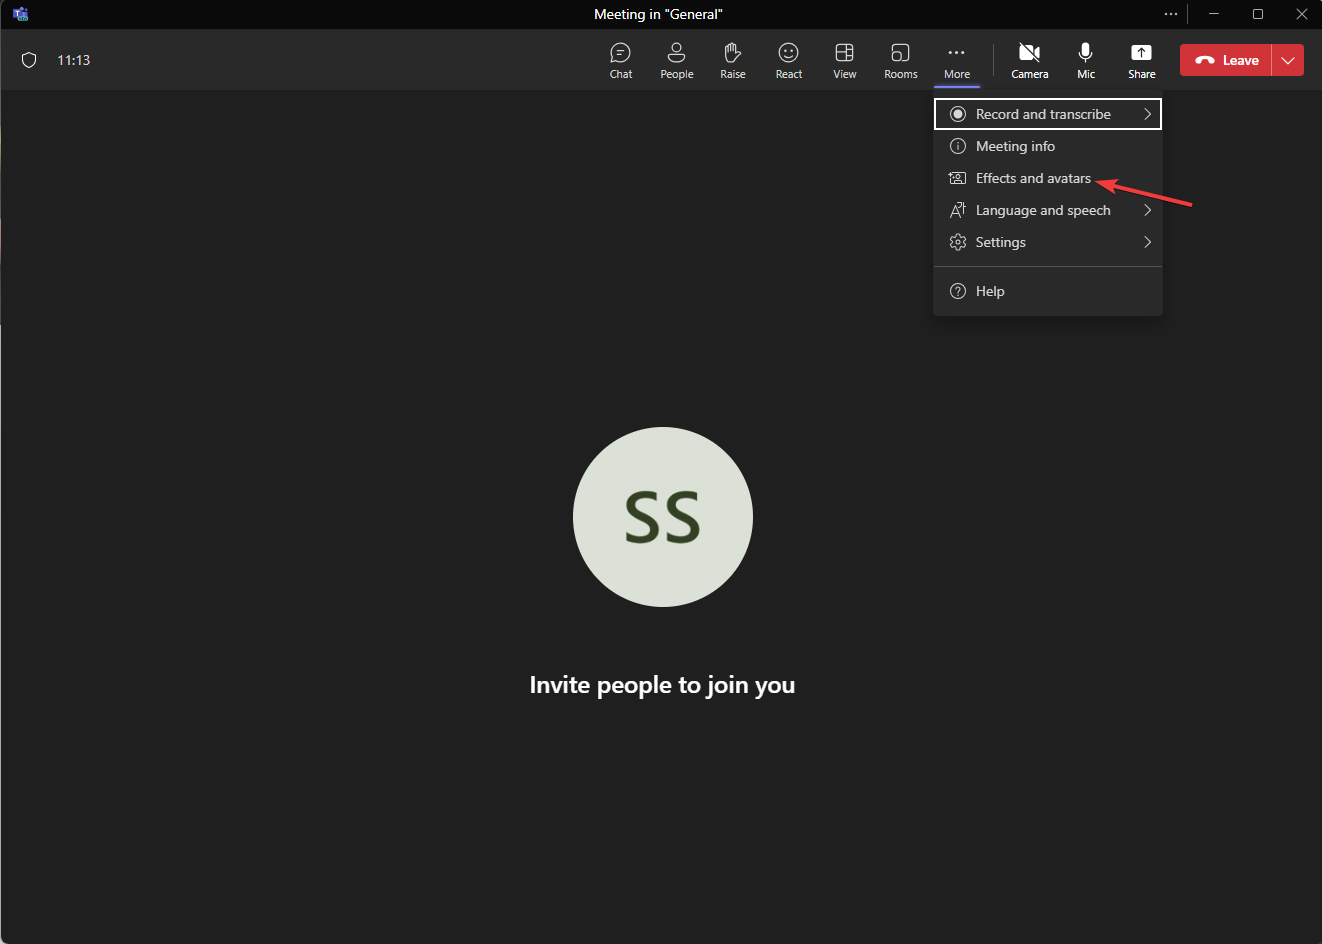
- Join the meeting while your camera is turned off. Click the More icon next to the Camera and select Effects & Avatars from the drop-down menu.
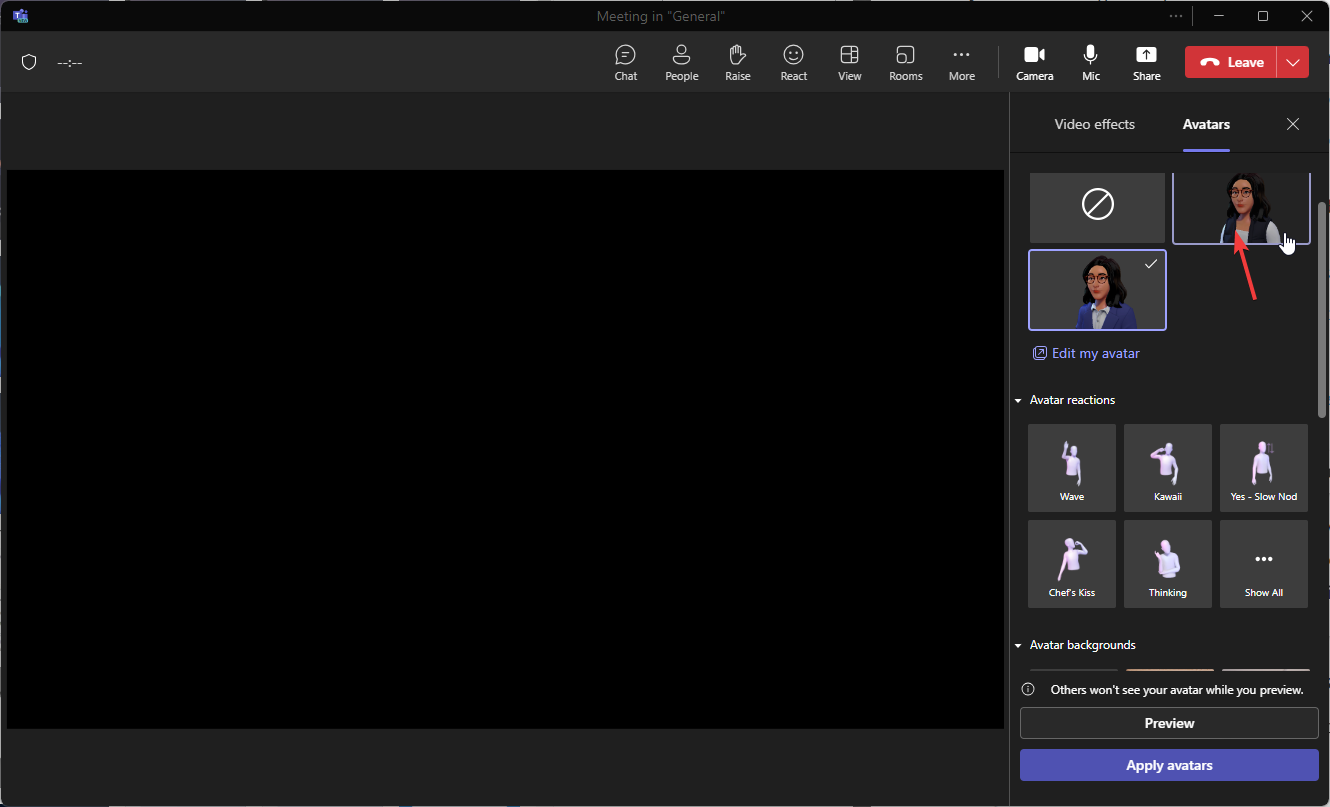
- Choose a preferred avatar from the Avatars tab.
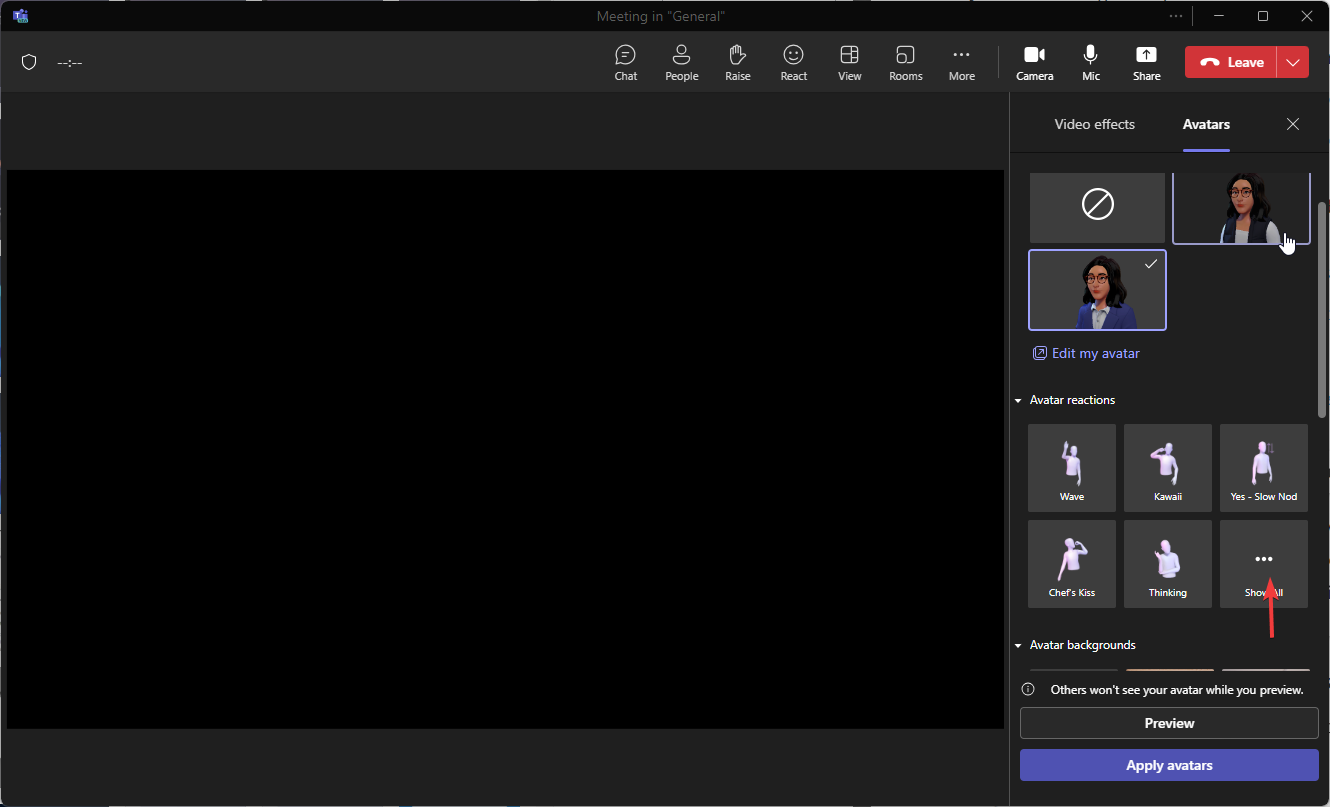
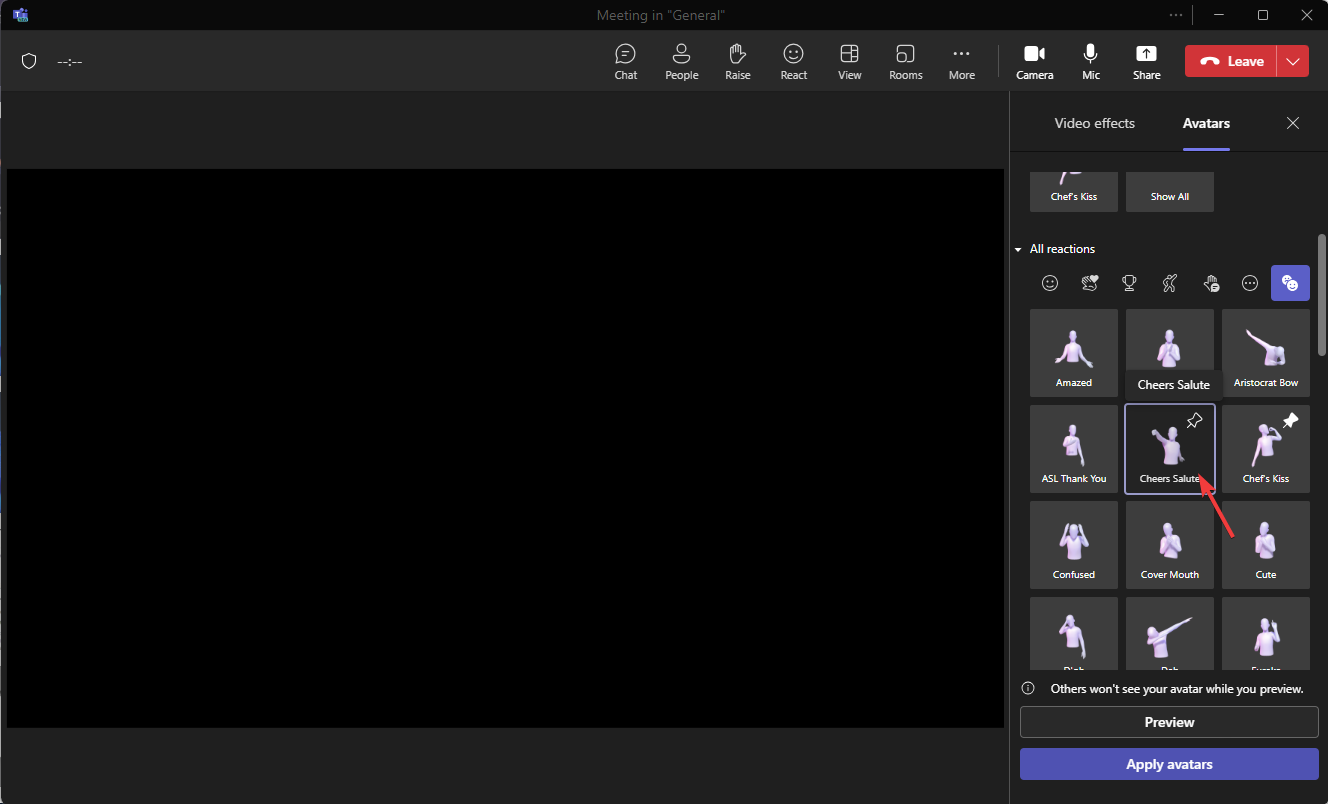
- From the Avatar reactions option, click Show All.
- Under All reactions, select the desired emote and click them to Pin to the list. You can only pin up to 5 emotes, so unpin the ones you don’t want to clear up the list.
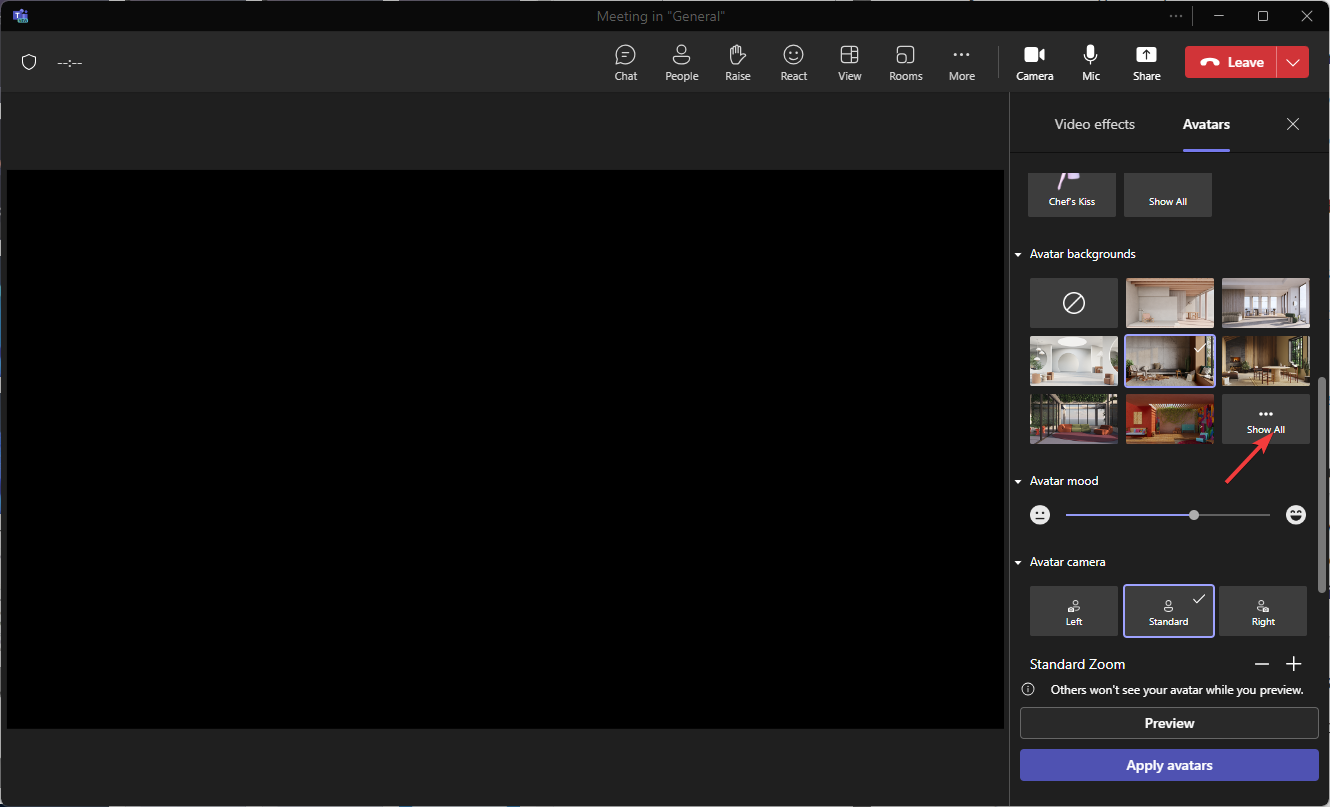
- For Avatar backgrounds, click Show all and select a background according to your meeting setup.
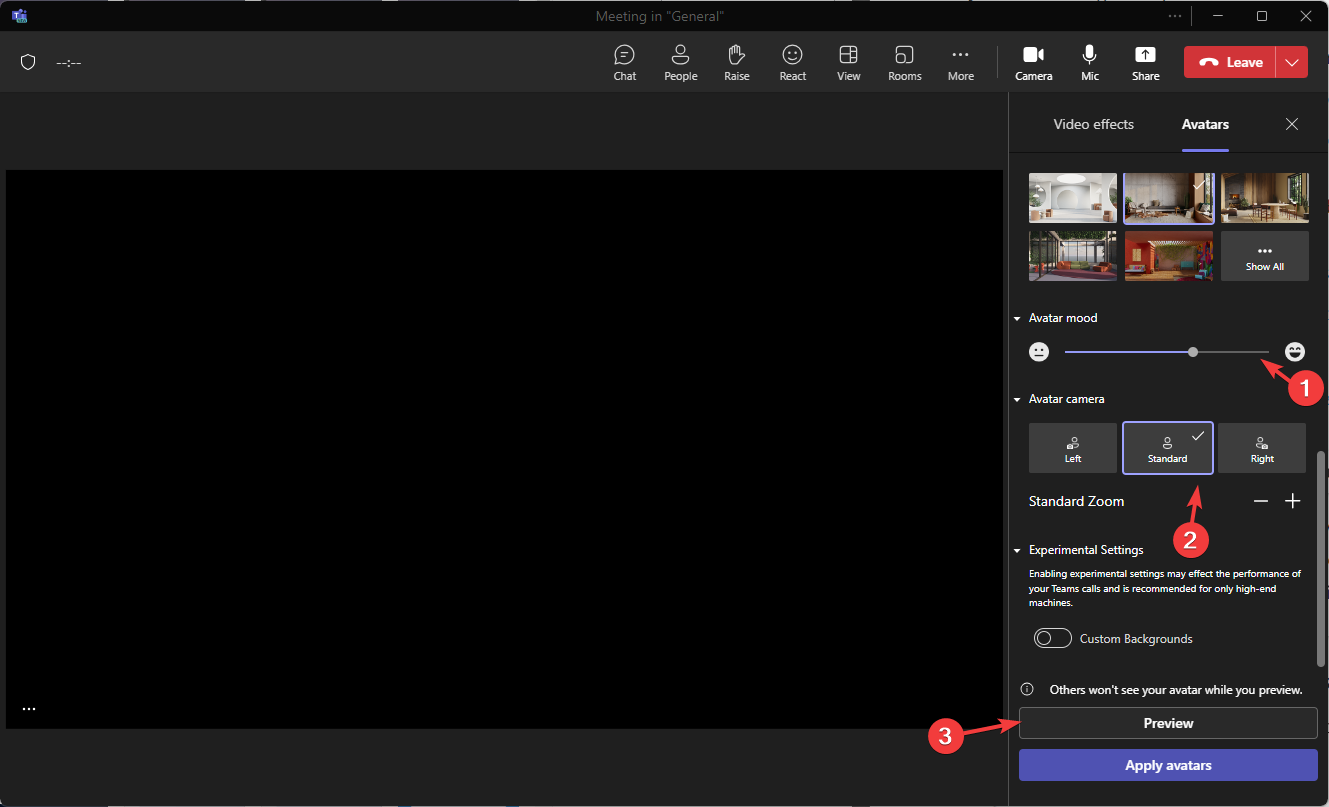
- For Avatar mood, move the slider to adjust your avatar’s facial expression.
- Next, select the camera angle for your avatar from the Avatar camera option and click Preview.
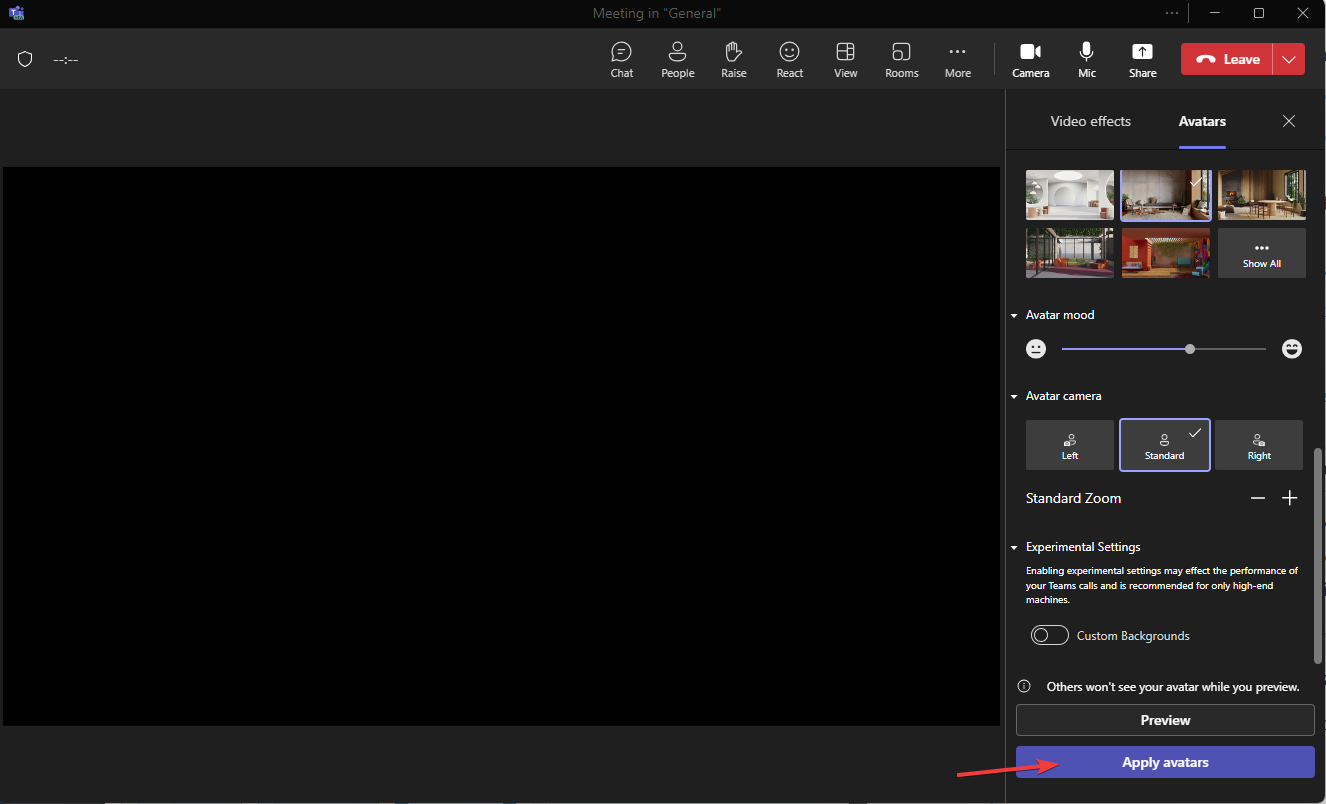
- Once satisfied, click Apply avatars.
You can also add customized stickers to your Teams conversations to make them interesting; read this guide to know how to do that.
How can I set up Avatar via the Teams admin center?
First, ensure all endpoints allow traffic on TCP ports 80 and 443 so that the avatars work properly on the Teams app, then follow these steps:
- Login to Teams admin center.
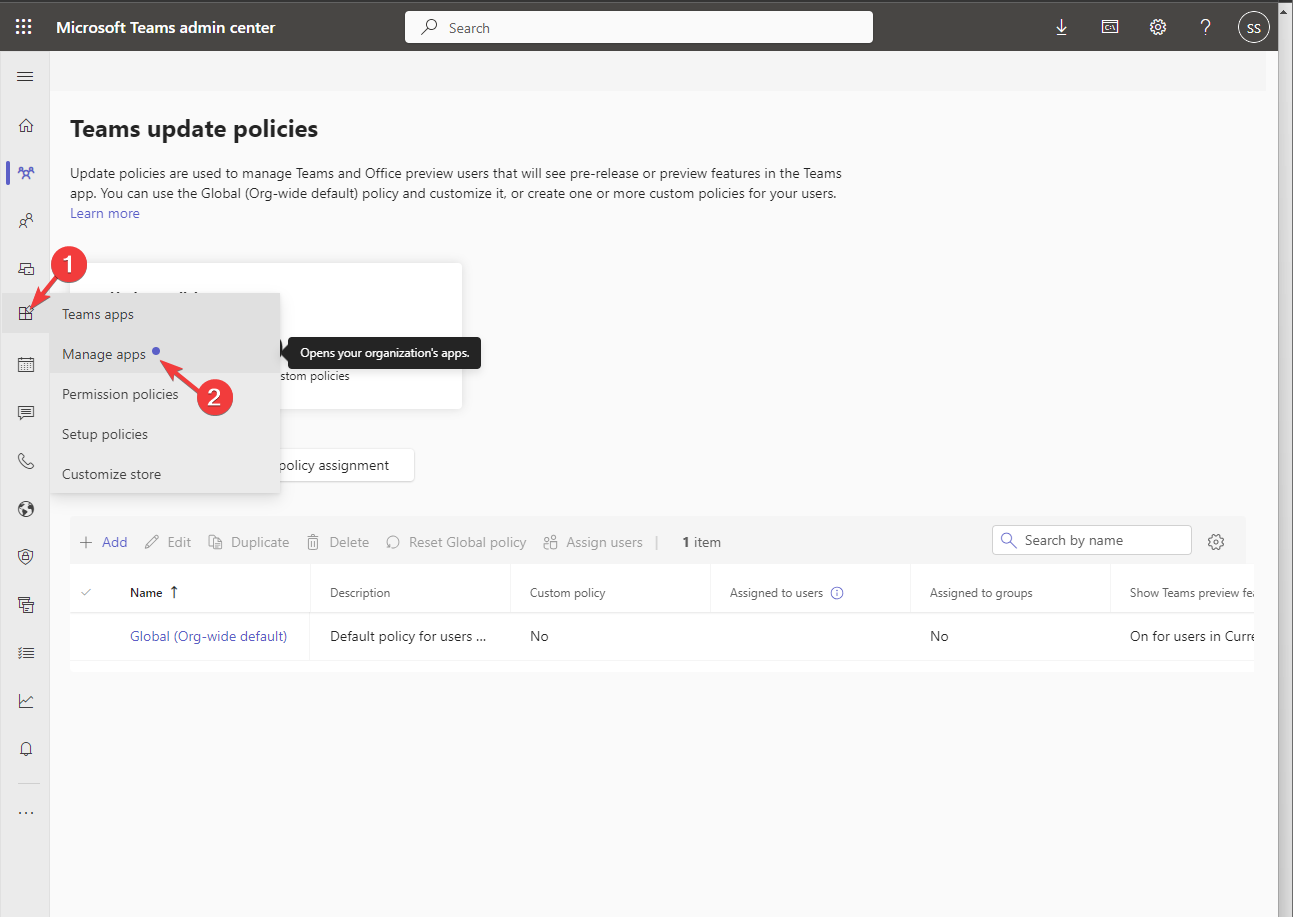
- First, go to Teams apps, then click Manage apps.
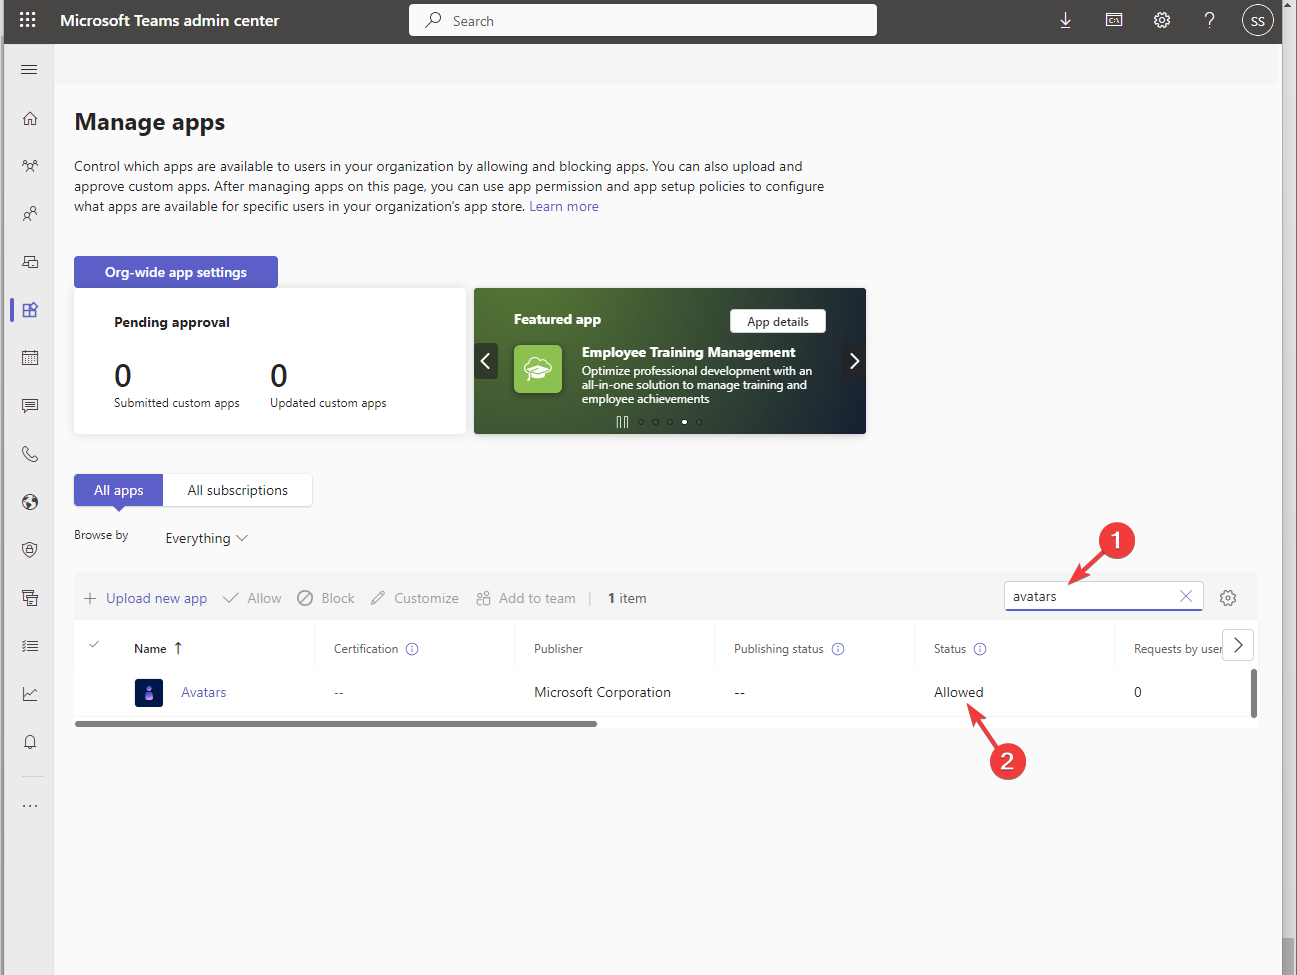
- Search for mesh avatars, select the Avatars app, and choose Allow to set the Status to Allowed.
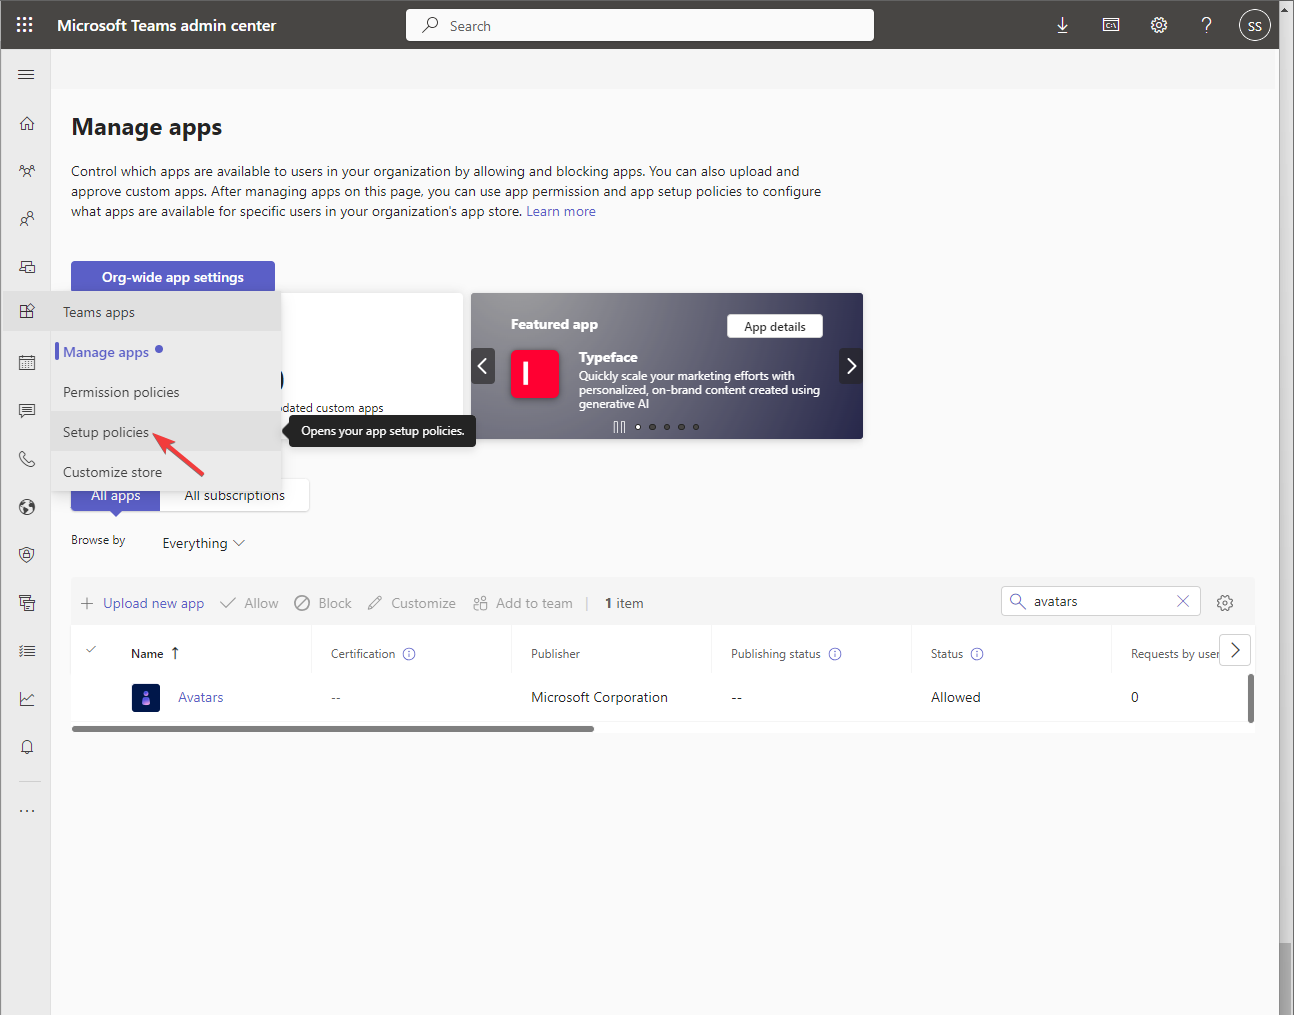
- To preinstall avatars for Teams app users, go to Teams apps> Setup policies.
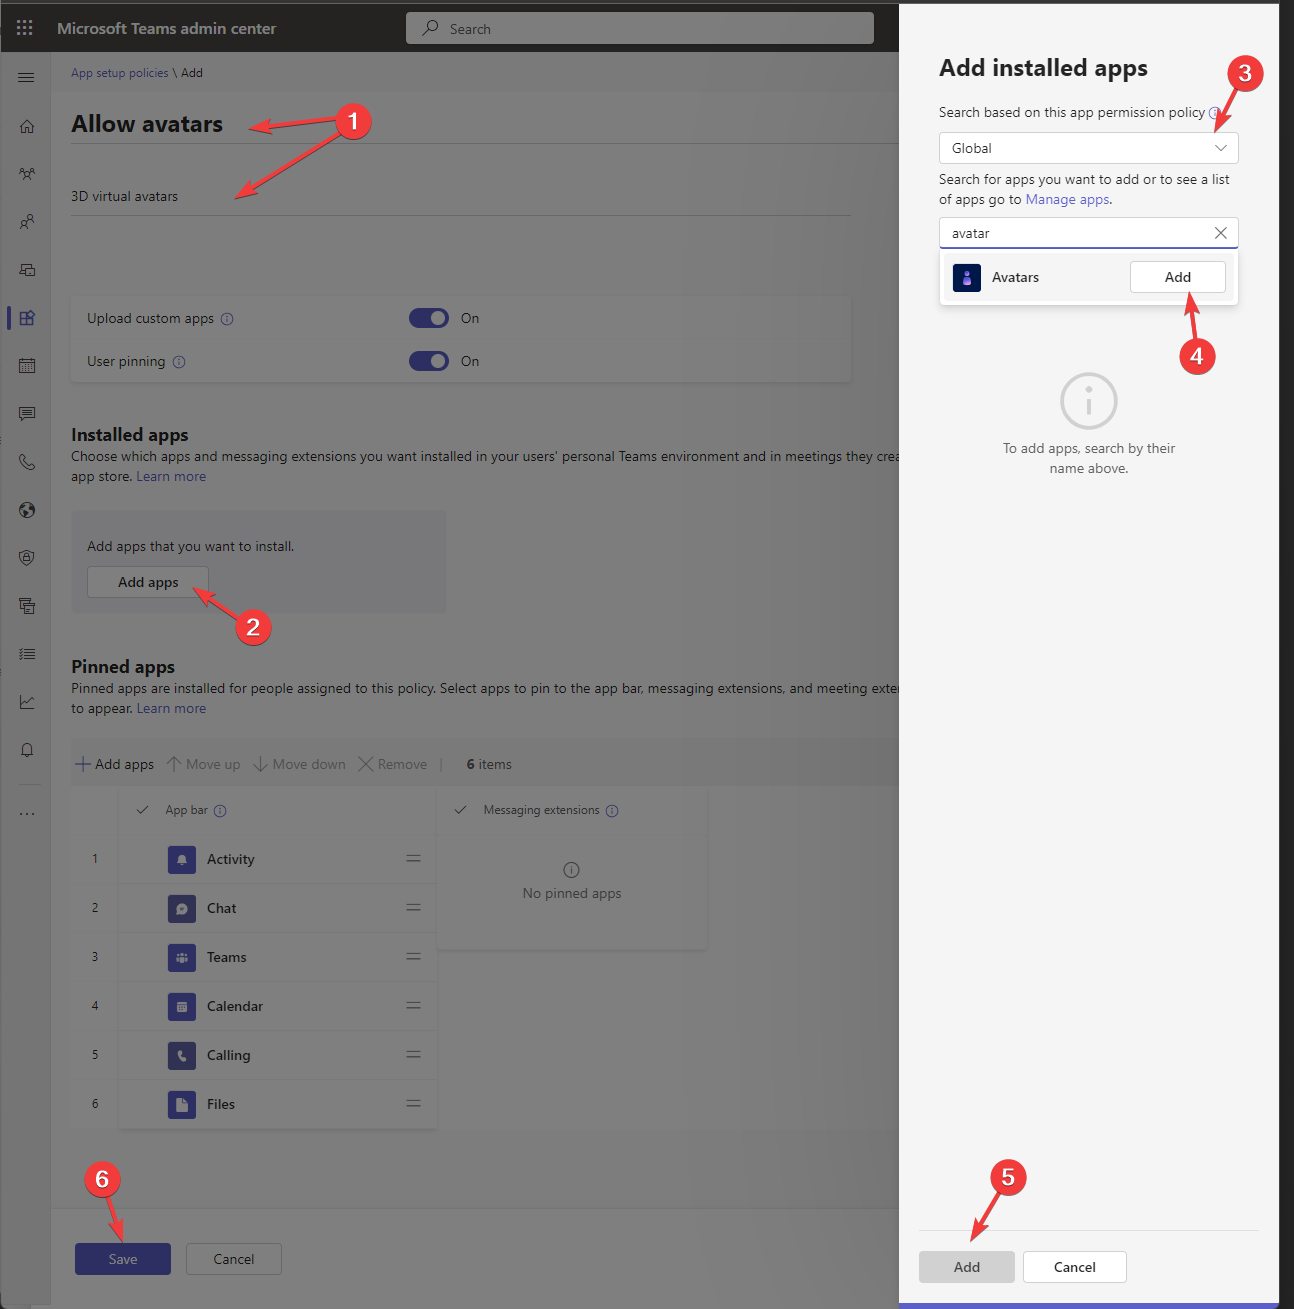
- Choose the policy you want to edit or click Add to create a new one, then add the policy name and description.
- Now locate Installed apps, and click Add apps.
- Under Search based on this app permission policy, choose Global.
- Type avatar, click the Search icon, select Avatars, and click Add.
- Select the Add button, then click Save.
Once created a policy, you need to assign it to the users, groups, or teams you created to apply to. You can also pin the apps for them; under Setup policies, select the policy, and click Edit, toggle on the User pinning option. Go to Pinned apps and add Avatars to the list.
Are there any Teams Avatar creators?
Apart from the app Avatars, Live 3D is another Microsoft Teams Avatar creator app that can help you create rich 3D avatars.
Adding these mesh avatars not only prevents video call fatigue but is really cool way to engage with your colleagues during online meetings.
Another incredible addition to Microsoft Mesh for Teams is immersive spaces, which is available in public preview for Teams users as of now.
It allows you to add Avatars, 3D environments, seat assignments, spatial audio & audio zones, in-built interactive activities, and Live reactions, with the goal of bringing people together.
Other than Teams’ 3D avatar, what other features would be a great addition to the app? Feel free to let us know in the comments section below.


User forum
0 messages