The wait operation timed out [FIX]
![]() 9 min. read
9 min. read
![]() Updated on
Updated on
Share this article

Improve this guide
Read our disclosure page to find out how can you help Windows Report sustain the editorial team Read more
Key notes
- WAIT_TIMEOUT is a system error that can appear on any PC and is accompanied by The wait operation timed out message.
- The issue is thankfully not major and with a few tricks, you will be able to remove it and use your system with no issues.
- It may occur for various reasons including a faulty antivirus configuration, which is why we offer several possible solutions.
- See the step-by-step instructions on how to start the application manually, restart the BITS service, and more.

System errors such as WAIT_TIMEOUT can appear on any PC regardless of the version of Windows you’re running.
This error is usually followed by The wait operation timed out message, and today we’re going to show you how to fix it on Windows 10.
How can I fix the WAIT_TIMEOUT error?
1. Temporarily disable your antivirus software
Antivirus software is important, but sometimes certain antivirus tools can interfere with Windows and cause this problem to appear. Several users reported that this issue was caused by Avast and its Safe Zone feature.
In some cases, certain antivirus settings can cause this problem to occur. To fix the issue, you need to open your antivirus and disable certain settings.
This is an advanced process, so it might require some knowledge regarding antivirus security.
If you’re having this problem on your PC, you might be able to fix it by temporarily disabling your antivirus software. If that doesn’t solve the issue, you might want to uninstall your security software and check if that helps.
Keep in mind that many antivirus tools tend to leave certain files and registry entries even after you remove them. These files can also cause problems, so it’s important to use a dedicated removal tool for your antivirus.
Many companies offer these tools for their software, so be sure to download and use one for your antivirus. If removing the antivirus fixes the issue, you might want to try updating your antivirus to the latest version.
Alternatively, you can switch to different antivirus software and check if that solves the problem. Some antiviruses are more stable and don’t interfere with any other process or app on your system.
We recommend you look into the best antivirus software for your Windows PC and pick one which offers a plan that is suitable for your specific security needs.
Just make sure to look for a strong firewall as well as multilayered protection. Most modern-day antivirus come with these features to ensure protection against multiple types of threats including ransomware, malware, rootkits, and spyware.
2. Restart your PC
This is a minor error and in some cases, you can fix it just by restarting your PC. After your PC restarts, check if the problem still appears. Several users reported that you need to restart your PC several times before this error is fixed, so be sure to try that.
Even though this simple solution can fix your problem, you need to keep in mind that this is just a workaround, so it’s rather likely that the problem will appear again.
3. Start the application manually and then run the desired file
Several users reported this problem while trying to open multimedia files. According to them, they are getting The wait operation timed out message, but you can fix that problem with this simple workaround.
To avoid the error message, first, you need to start your multimedia player. After doing that, navigate to the desired multimedia file and open it. If everything is in order, the playback should start without any issues.
Keep in mind that this is just a workaround, so you’ll have to repeat it every time you experience this problem.
4. Try to open the file again
If you’re getting this error while trying to open images, you might want to try waiting for a few moments. Sometimes there are certain glitches that can occur randomly, and this is one of those glitches.
Simply wait for a few moments and try to access the file again. If the issue still persists, proceed to the next solution.
5. Restart Explorer
5.1 Close the Windows Explorer process in Task Manager
- Press Ctrl + Shift + Esc to open Task Manager.
- Navigate to the Processes tab. Select Windows Explorer from the list and click the Restart button.

- Windows Explorer will now restart.

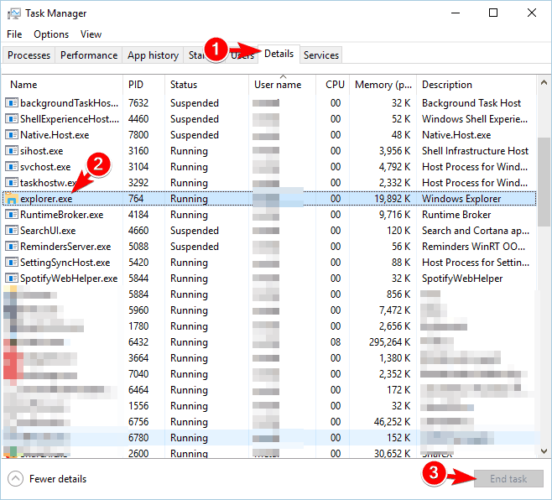
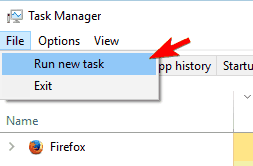
5.2 Stop the explorer process and start it again
- Start Task Manager.
- Go to Details tab, select explorer.exe, and click the End task button.
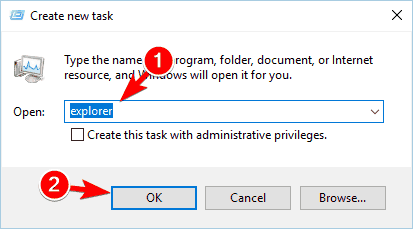
- After ending this process, click File and select Run new task.

- Enter explorer in the input field and click OK or press Enter to start it.

- Once the explorer process restarts, check if the problem is resolved.
Several users reported that restarting Windows Explorer fixed the problem for them, so be sure to try that. Keep in mind that this is just a workaround, so you’ll have to repeat it if the problem appears again.
6. Run DiagPackage.diagpkg
- Navigate to:
C:WindowsdiagnosticssystemWindowsUpdate - Locate DiagPackage.diagpkg and run it.

- Once the application opens, follow the instructions on the screen to scan your PC.


After the scan is complete, problems with Windows Update should be fixed along with the The wait operation timed out message.
According to users, this error can occur due to problems with Windows Update. To fix the issue, you need to run a special tool to scan your system and fix the problems with Windows updates.
7. Check for applications running in the background
This error can occur if certain applications are running in the background. This error usually occurs when trying to play multimedia files.
Sometimes your multimedia app might be running in the background, and that can cause this problem to occur. To fix the issue, you need to open Task Manager and check if your multimedia player is running.
Be sure to check both Processes and Details tab. If the multimedia app is running, end its process and try to open the multimedia file again.
This is just a workaround, and if this solution works for you, you’ll have to repeat it every time this issue occurs.
8. Restart the BITS Service
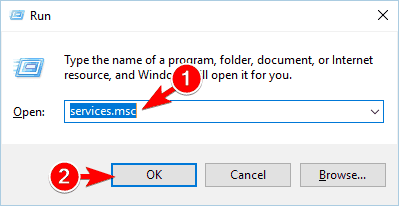
- Press Windows Key + R and enter services.msc. Press Enter or click OK.

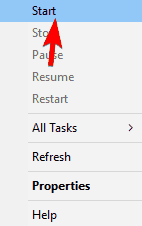
- Locate Background Intelligent Transfer Service (BITS), right click it and choose Stop from the menu.

- Right-click the service again and choose Start.

After restarting the service, check if the problem is resolved.
Sometimes specific service can cause this and other errors to appear. According to users, it seems that this error is caused by BITS service, but you can fix it by restarting the aforementioned service.
9. Enter Safe Mode
- Open the Start Menu and click the Power button. Press and hold the Shift key on the keyboard and click on Restart.

- Choose Troubleshoot, then select Advanced options, click on Startup Settings and click the Restart button.
- After restart, select Enable Safe Mode with Networking by pressing the F5 key on the keyboard.
- Once you enter Safe Mode, check if the problem appears. If everything is in order, restart your PC and start Windows normally.

According to users, to fix this issue you just have to enter Safe Mode and Windows will fix the problem automatically. As you can see, this is a simple solution so be sure to try it out.
10. Perform a System Restore
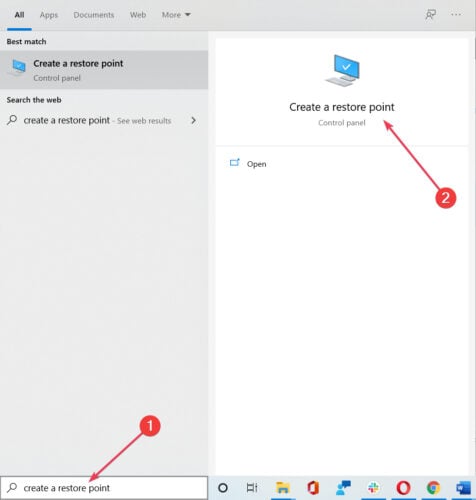
- Press Windows Key + S and enter create a restore point and select the feature from the menu.

- Click on the System Restore button.

- Click on Next (if available, check the Show more restore points option, select the desired restore point and click on Next).

- Follow the instructions on the screen to complete the restoration process.

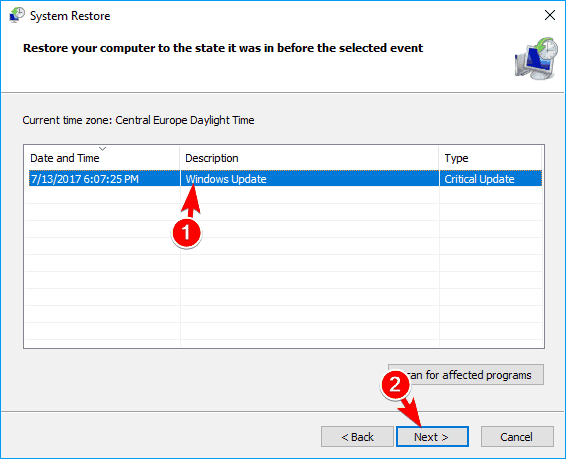
If this problem started appearing recently on your PC, you might be able to fix it by using System Restore. This is a useful feature that allows you to restore your PC and fix many errors.
11. Create a new user account
- Open the Settings app and go to the Accounts section.
- Select Family & other people from the left pane and in the right pane click on Add someone else to this PC.

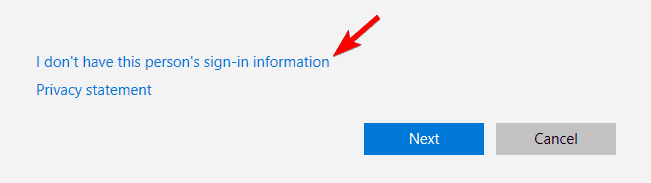
- Select I don’t have this person’s sign-in information.

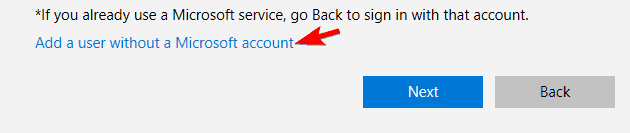
- Click on Add a user without a Microsoft account.

- Enter the desired username and click on Next.

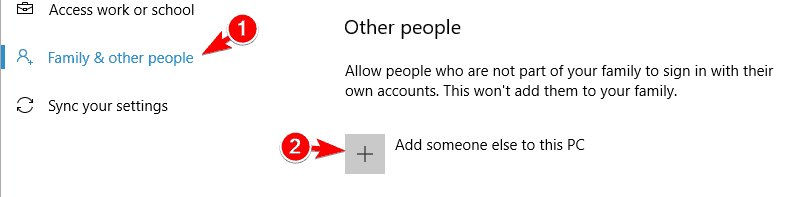
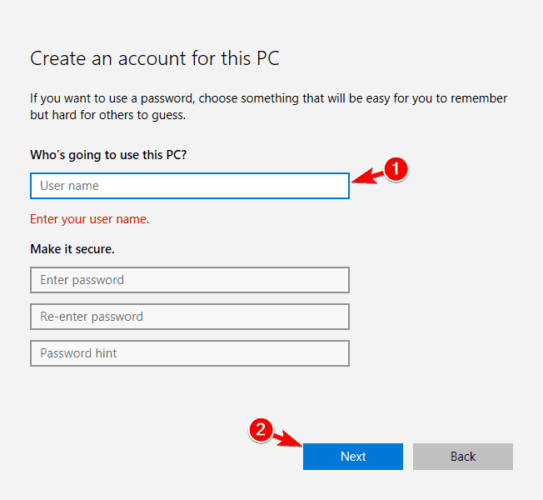
After you create a new user account, switch to it and check if the problem is resolved. If the issue doesn’t appear on a new account, you’ll have to transfer your personal files to it and continue using it as your main account.
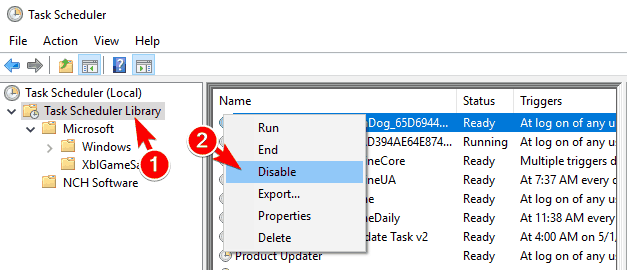
12. Change Task Scheduler and MEMS_schaedule settings
12.1 Change Task Scheduler
- Press Windows Key + S and enter task scheduler. Choose Task Scheduler from the list.

- When Task Scheduler opens, navigate to Task Scheduler Library and find MEMS_Schedule. Right click it and choose Disable from the menu.


12.2 Change the properties of the MEMS_Schedule
- Locate MEMS_Schedule, right click it and choose Properties from the menu.

- Set Configure for to Windows 10 and click OK to save changes.

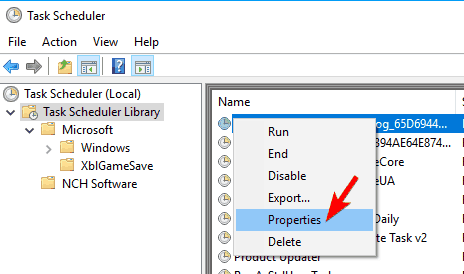

According to users, this solution works on Acer laptops, but even if you don’t use an Acer device feel free to try it out.
It seems that The wait operation timed out message appears every time they start their PC. This can be somewhat annoying, but you can fix the problem by making a few changes in Task Scheduler.
13. Reset Windows 10
- Open the Start Menu, click the Power button, press and hold the Shift key and click on Restart.
- Click on Troubleshoot, then click on Reset this PC and select Remove everything.
- If you’re asked to insert Windows 10 installation media, be sure to do so.
- Select your version of Windows and choose Only the drive where Windows is installed and click on Just remove my files.
- Review the changes that reset will make and click the Reset button to start.
- Follow the instructions on the screen to complete the process.
Note: This is a drastic solution and it will remove all files from your system drive, so be sure to create a backup. In addition to creating a backup, you might also need a Windows 10 installation media.
To create an installation media you can use Media Creation Tool.
After the process is finished, you’ll have a clean installation of Windows 10 and the problem should be resolved.
The wait operation timed out message and WAIT_TIMEOUT error can prevent you from running certain applications. This isn’t a serious error and you should be able to fix it by using one of our solutions.
Our Windows 10 section is full of interesting and helpful information about the OS.
For any other PC issues, you will definitely find a solution in our Troubleshooting Hub.
If you have any additions or suggestions, leave us a line in the comments section below.