Add Twitch Chat on your Browser Source in 3 Steps [OBS & Xsplit]
Twitch chat will help you communicate faster with your peers
5 min. read
Updated on
Read our disclosure page to find out how can you help Windows Report sustain the editorial team. Read more
Key notes
- Adding the Twitch chat to your browser source is easy, and following the steps presented here will also help.
- Using a browser specialized for gaming that comes with a Twitch integration is recommended.
- You'll need to set up the browser source according to your preferences.
- If you want to add the Twitch chat to your browser source, use the URL.
![Twitch error while loading followed channels [Expert Fix]](https://cdn.windowsreport.com/wp-content/uploads/2022/01/Twitch-browser-1-886x590.jpg)
Twitch is one of the world’s leading live streaming platforms where all game enthusiasts can chat. That’s why many users are more interested in discovering how to add Twitch chat to their browser source.
With Twitch chat, you can easily interact with members of the community and the streamers as well.
Thanks to the Twitch chat, everything you need to know regarding gaming events, activities, and many more is one click away.
The Twitch URL is received as a result of using a subscription alert system, such as TwitchAlerts.
What is a browser source?
A Browser Source is a plugin or software that lets you display and edit a web page from the Internet or stored locally.
Using it will let you different elements like chat, streaming sources, Javascript, and more, just like the Twitch chat overlay.
Is OBS or Streamlabs better for streaming?
That is a matter of choice because Streamlabs and OBS Studio deliver excellent performance.
Regarding resource consumption, OBS Studio is a bit better, but if you have a powerful PC, you should go for Streamlabs.
We have gathered in this article exactly how you can add the Twitch chat on your browser source, so keep reading.
How can I add the Twitch chat to my browser source?
1. Use a specialized browser
The Twitch chat is a valuable feature that allows you to keep in touch with the community members and other streamers.
Using a specialized browser that already comes with a Twitch integration is the easiest way to ensure a flawless experience.
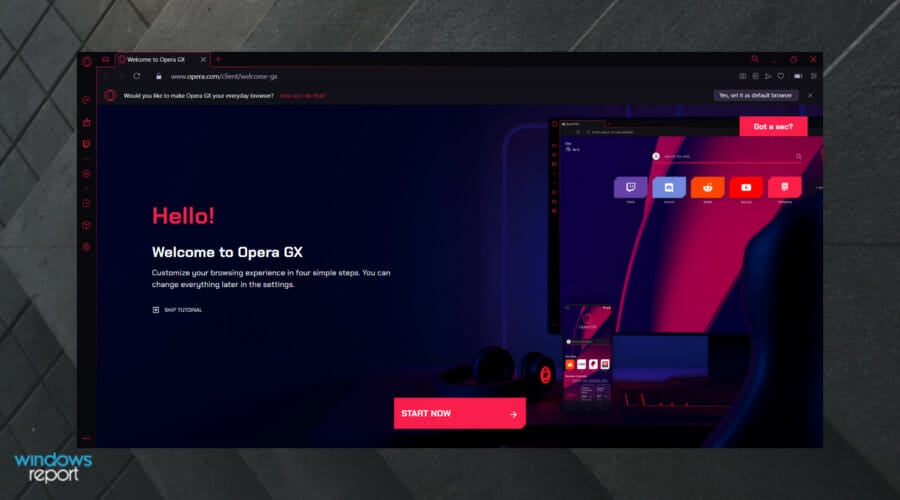
Opera GX is such a browser for gaming enthusiasts, and the excellent news is that it also comes with the Twitch chat integrated.
Opera is grand if you want a safe navigation experience. In addition, its built-in AdBlocker is designed to be privacy-focused, so you won’t have to worry about any Twitch-related problems.
Its top performances are no longer a surprise. That’s why thousands of worldwide users choose to use Opera GX.
Thanks to its complex tools, this browser allows you to customize your experience according to your needs and preferences.
In addition, you have to keep in mind that Opera GX consumes a low amount of resources. Thus, your PC’s performance won’t be affected while using it.
Check out some of the most impressive features of Opera GX:
- Free VPN
- Built-in AdBlocker
- Easy customizable
- Twitch and Discord integration
Opera GX
Have a go with this gaming-oriented browser and enjoy streaming platforms like Twitch right in the browser.2. Set up the browser source
2.1 For OBS
- Download the CLR Browser Plugin.
- After the download, locate the Plugins folder for OBS.
- Right-click on the folder, then select Extract all the files from the folder.
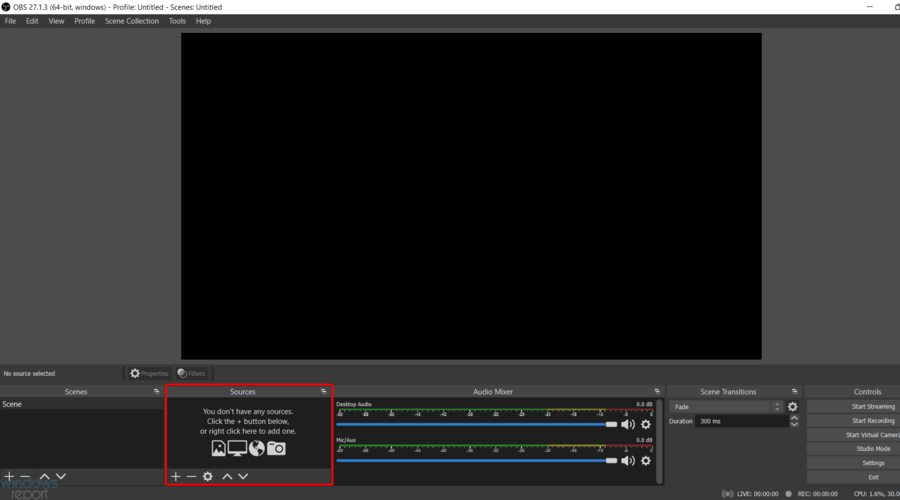
- Launch OBS, and look at the Source section at the bottom of the window.
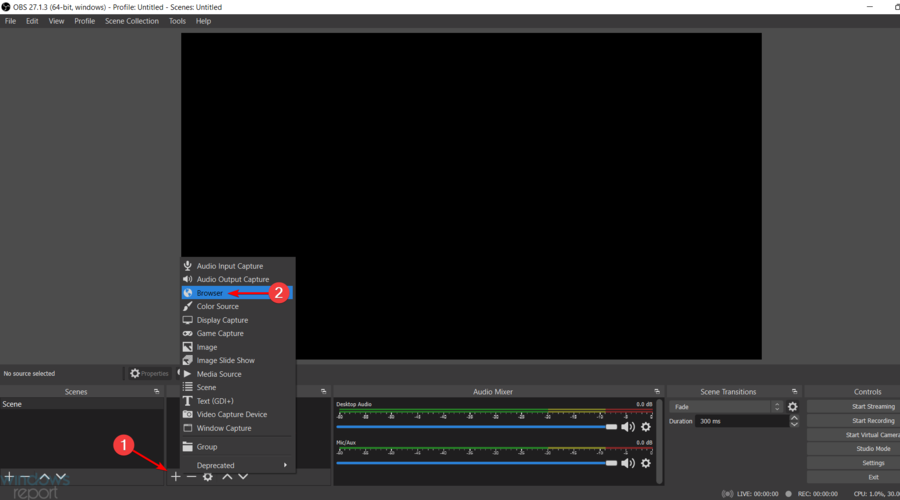
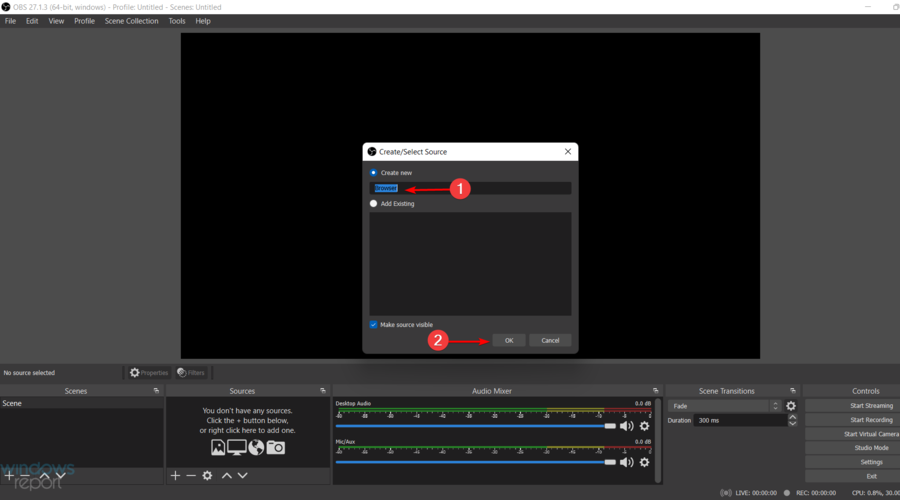
- To add a source, click on the + button, then click on Browser.
- Check the Create new option, then click on OK.
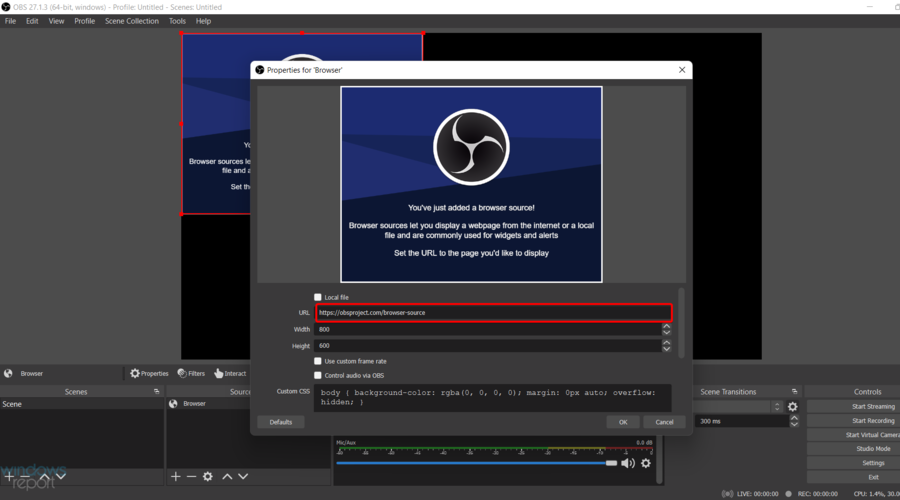
- Enter the provided URL, then click again on OK to save the changes.
So this is how to add the Twitch chat browser source in OBS. Although it may look complicated, if you follow the steps above, you will be all right.
2.2 For XSplit
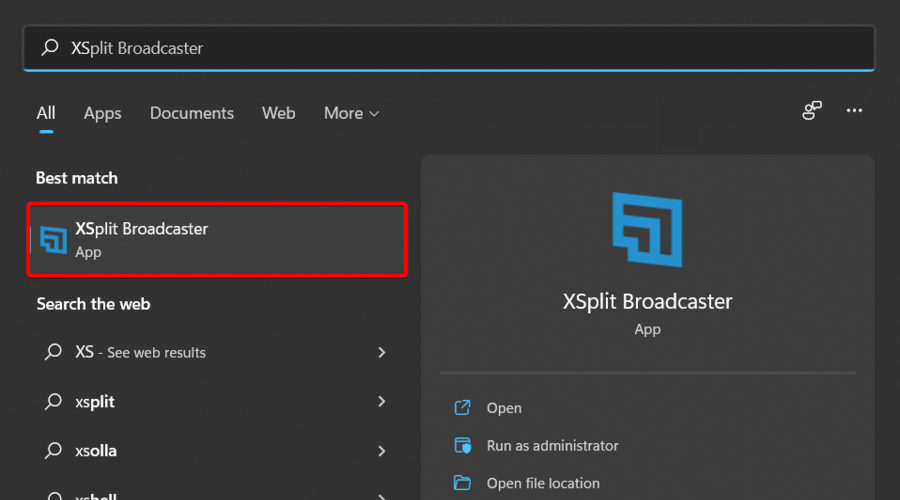
- Press on the Windows key, type XSplit, then open it.
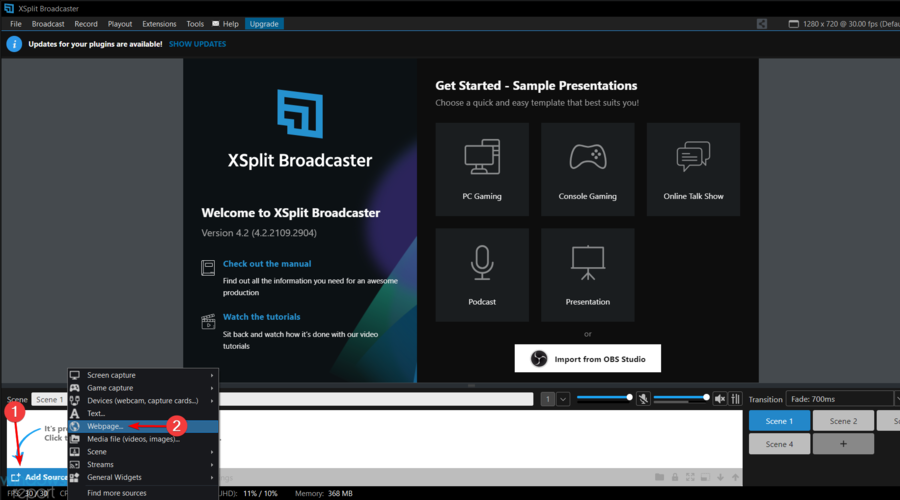
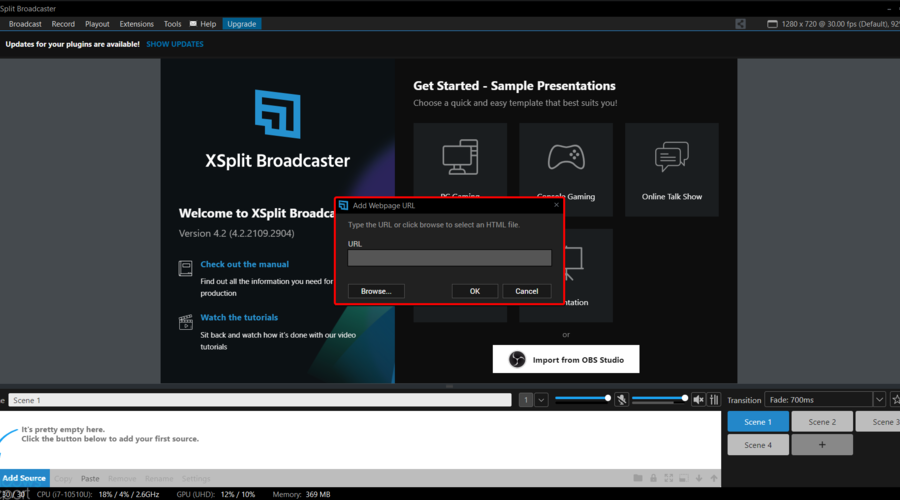
- From the bottom left corner of the page, click on Add Source, then select Webpage.
- Enter the provided URL, then click on OK.
- You will now see the URL under the Scene section. Right-click on it and customize it as needed.
3. Use the URL
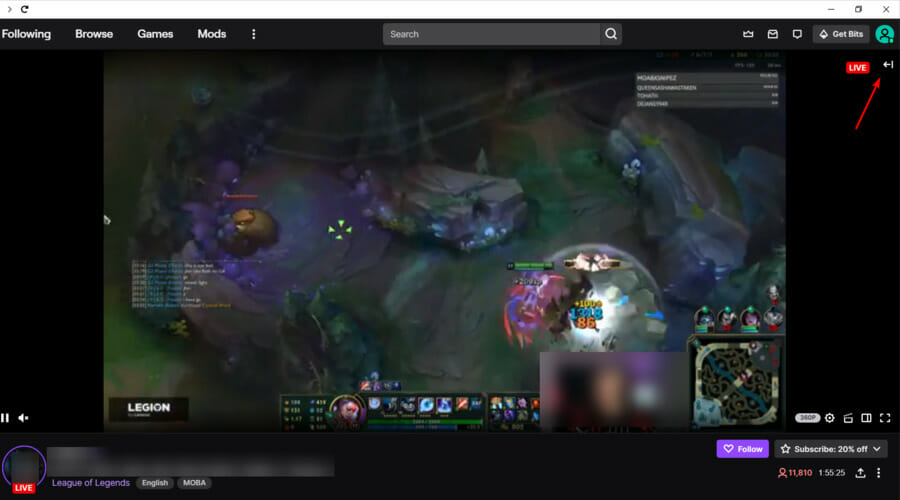
- Go to your channel on your streaming platform of choice.
- Expand the chat.
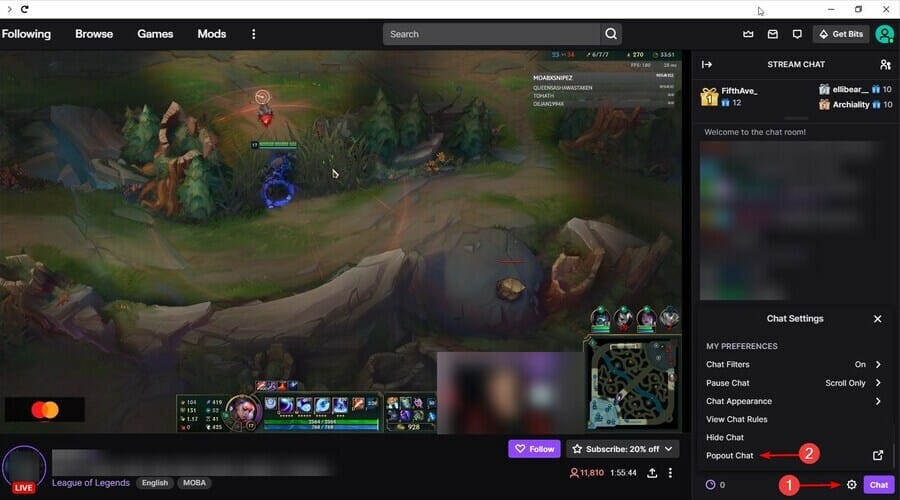
- From the bottom right corner of the window, click on Settings (marked as a gear), then navigate to Popout chat.
- Copy the URL from the address bar from the window that pops out.
- Press on the Windows key, type OBS, then open it.
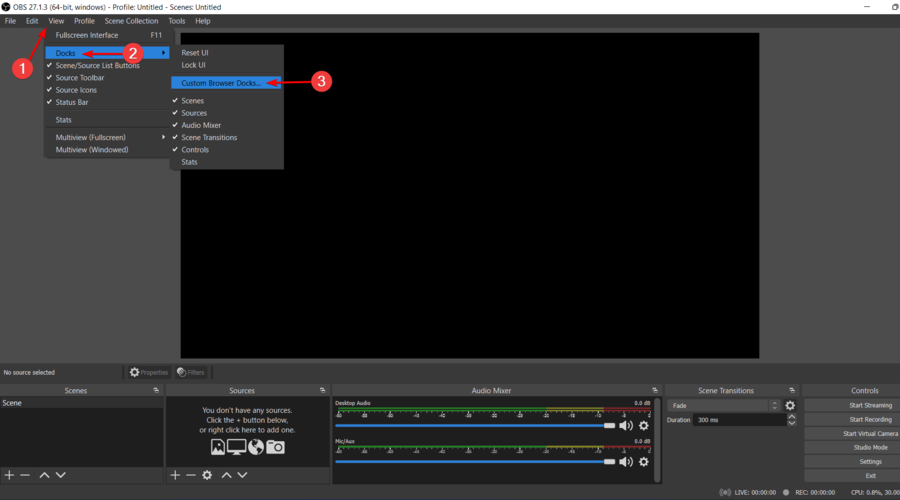
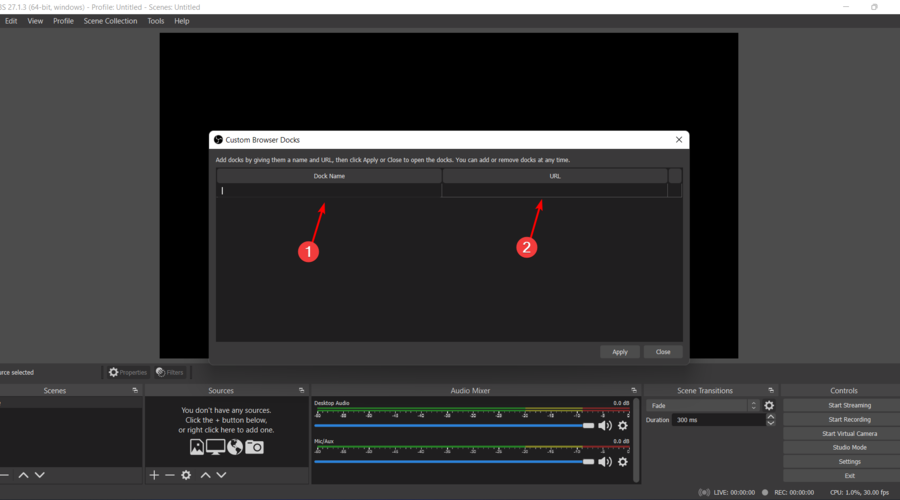
- From the upper menu, go to View, select Docks, then click on Custom Browser Docks….
- In the first empty box under Dock Name, give your chat a name, then in the corresponding box under URL, paste the twitch chat URL from the popout chat window you copied in step 3.
- Click on Apply.
What uses more CPU, OBS, or Streamlabs?
Streamlabs are more demanding when it comes to CPU usage. That’s because it has more features and offers a higher level of customization.
Also, the built-in themes with multiple overlays take a toll on resource consumption, so if you have a slightly older PC, OBS is a better choice.
Adding the Twitch chat to your browser source does not have to be complicated at all. In fact, by following the steps indicated in this article, you will have this done in minutes.
But if the Twitch chat is not showing in OBS, change the chat settings in your Twitch profile to Popout Chat.
You might also be interested in the best Twitch alert sounds for your streams to ensure you instantly get notified.
Please let us know in the comments section below if you have additional recommendations or suggestions.


User forum
0 messages