How to fix printer error: Unsupported Protocol
4 min. read
Updated on
Read our disclosure page to find out how can you help Windows Report sustain the editorial team. Read more
Despite your best efforts of using safe printing practices, you may find yourself facing the following <span id="urn:enhancement-a89224fe” class=”textannotation disambiguated wl-thing” itemid=”/entity/printer”>printer error: Unsupported Protocol.
When dealing with this issue you can try out one of the following troubleshooting tips to get rid of it as soon as possible.
How can I fix printer error: Unsupported Protocol?
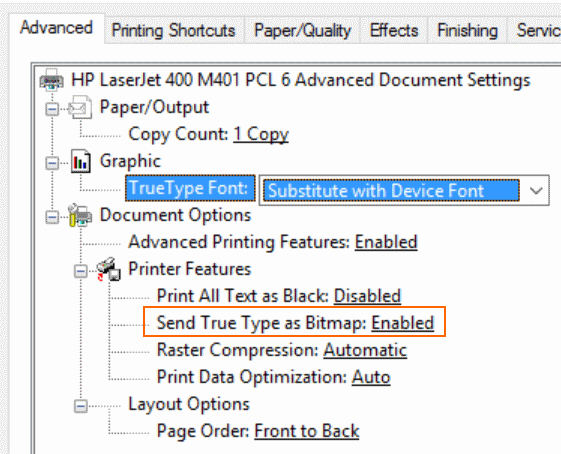
1. Set Send True Type as Bitmap as Enabled
- To change your printer’s settings, head to Control Panel > Hardware and Sound.
- Open Devices and Printers.
- Right-click on your printer’s icon, then select Printing Preferences.
- Open the Advanced tab.
- Under the Printer Features section, you need to set Send True Type as Bitmap as Enabled.
- Confirm by clicking OK and try printing again.
2. Change the Print Optimizations value
- In the Control Panel, right-click your printer to find various options.
- In the Printing Preferences dialog box that appears, select the Advanced tab.
- Under the Document Options section try changing the Print Optimizations value.
- Confirm and try printing again.
If the first procedure didn’t work, it’s a good idea to change the Print Optimizations value. Follow the above steps to do so.
3. Update your printer’s USB drivers
- Press the Windows logo key + R keyboard hotkey to open the Run dialog box.
- Then, just type devmgmt.msc in the Run dialog box.
- Press Enter.
- If prompted for an administrator password or for a confirmation, type the password, or click Allow.
- Expand Universal Serial Bus Controllers in Device Manager.
- Find your USB port driver.
- Right-click on your USB controller driver and click on Update driver software.
- On the next window, choose the Search automatically for updated drivers (connect to the Internet for the latest version of the drivers).
- Let the process complete.
- Finally, click OK.
Let’s continue with the basics. Follow the above procedure to update your printer’s USB drivers or find them online.
4. Remove your printer and add it again
- Locate the printer in Devices and Printers from the Control Panel.
- Then, right-click it.
- Select the Remove device option from the list.
- Click Yes from the Remove Device dialog box.
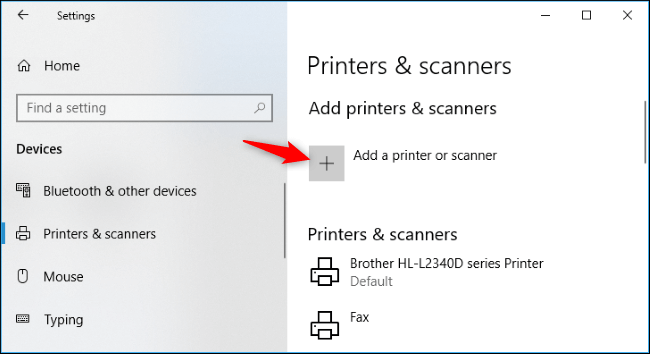
- To add the printer back, head to Settings > Devices > Printers & Scanners.
- Click the Add a Printer or Scanner button to search for nearby printers, whether they’re hooked up to your PC or connected to the network.
- You should see your printer’s name appear here, so click it right away.
- If you don’t see it, click the link that says The printer that I want isn’t listed. This opens the old Add Printer dialog, which gives you the option to scan for older types of printers, connect to network printers, or add printers with custom settings.
- Then, click the Next button.
- Follow the instructions available on the screen to complete the installation process.
- Your printer should finally show up again in the Printers section.
If these steps didn’t help, you could also try to remove the printer from the system where it has been installed. Then, add it again and check if the issue persists.
Other users also try to directly plug in the printer with a USB, then right-click its icon and select Printer Properties. Open the Ports tab and select the USB port before trying to print again.
Don’t hesitate to try any one of these tips and comment below the one that worked for you. You could also check your printer’s manual for more information on its diagnostic features.
In case of having other questions, let us know in the comments below.
READ ALSO:
User forum
0 messages