USB Drive Showing as Unallocated? 2 Ways to Fix It
Give a try to these quick fixes right away
Key notes
- USB drive showing as unallocated means that it is no longer available for data storage.
- Incorrect formatting and virus infections are the prime reasons why the pen drive suddenly becomes unallocated.
- Creating a new partition on the external drive will help get back the unallocated disk space to be utilized again.
USB drives having unallocated space means you can no longer access the data stored on the drive or save new data. When the USB drive becomes unallocated, it will have very little storage space available or will not be visible in File Explorer.
If you are looking for ways to allocate the unallocated storage space of a USB drive, keep reading below.
Why does my USB drive have unallocated space?
If the removable drive is showing an unallocated error despite having files and folders, here are the possible reasons for it:
- Malware infection – A virus attack or malware infection spread from an unprotected computer can result in unallocated disk space. Scan the removable drive with a third-party antivirus to get rid of the viruses.
- Incomplete deletion of data – Any interference when deleting the data stored on the USB can be why the USB drive suddenly has unallocated space.
- Unsuccessful partition – Unsuccessful attempts to partition the USB drive or change the partition system can be why the pen drive shows unallocated status.
- Failed formatting attempt – Incorrect formatting or accidentally deleting the partitions can also cause the external drive to become unavailable for data storage.
Regardless of why the USB drive is showing an unallocated disk space problem, the methods discussed in this guide will help you easily fix it.
How do I fix unallocated space on the USB Drive?
 NOTE
NOTE
1. Create a new volume using Disk Management
- Use the Windows + R shortcut to launch the Run dialog box, type the following command in the text box and press the Enter key to access the Disk Management utility.
diskmgmt.msc
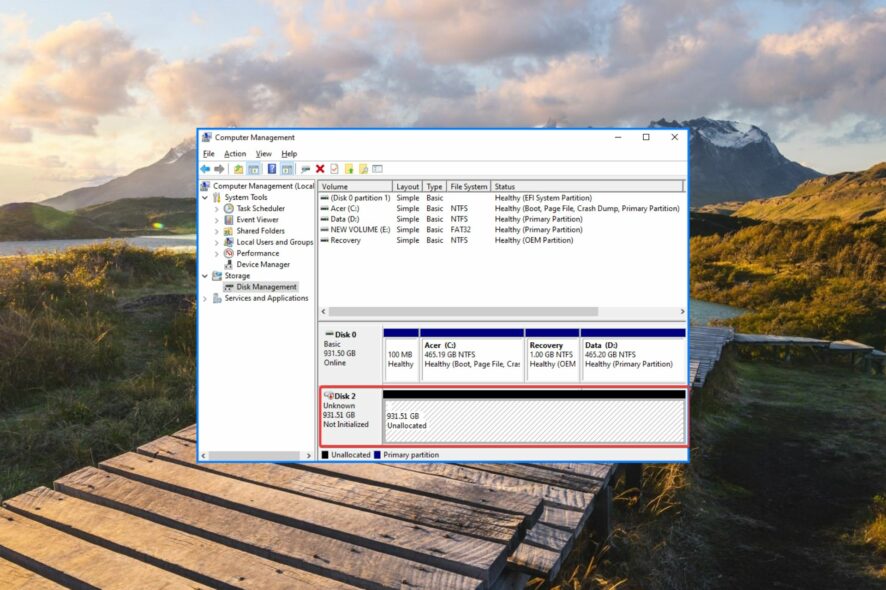
- Look for your unallocated USB drive, generally represented as Disk 1 and marked with a black strip. Right-click the unallocated disk and choose the New Simple Volume option from the context menu.

- Press the Next button on the New Simple Volume Wizard to create a new volume.
- Now set the size for the new partition by incrementing or decrementing the value, and press the Next button again.

- Choose the drive letter you wish to assign to the new partition and press the Next button.
- In the Format partition settings, choose the File system from the drop-down, provide a new name as Volume label, and press Next.

- Verify the settings and press the Finish button to create the new partition.
Once the process is completed, the USB drive that was previously shown as unallocated will now appear as a volume and will be represented by a drive letter.
Disk Management is an in-built tool that lets you manage the storage devices currently attached to your PC, including a USB disk. Thus, you can use the feature to create a new partition on your USB disk to fix the unallocated space problem.
2. Use DiskPart to partition the USB drive
- Press the Windows key, type cmd in the search bar on top, and choose Run as Administrator from the result section.

- Press the Yes button on the User Action Control pop-up to launch the Command Prompt with administrative privileges.
- Type or paste the following command and press the Enter key to access the Disk Partition utility in the Command Prompt.
diskpart
- Choose Yes on the User Action Control prompt.
- Next, execute the following command to view the list of disks and their number currently connected to your PC. Note down the disk number for the USB drive with the unallocated space.
list disk - Type the following command and press the Enter key to select the USB drive. Replace # with the relevant disk number.
select volume #
- Type and press the Enter key to execute the following command to create a primary partition. Replace n with the partition size.
create partition primary size=n
You can use DiskPart, the disk-partitioning command-line utility, to create a new partition and get back the unallocated space on your USB drive.
These are the two ways to create a new volume to fix the USB drive showing unallocated status. Also, if the USB drive gets detected but is not accessible, implement the solutions listed in this guide.
So, were you able to fix the USB drive showing an unallocated issue by the two methods discussed in this guide? Do let us know in the comments below.
Read our disclosure page to find out how can you help Windows Report sustain the editorial team. Read more


Improve this guide

User forum
0 messages