VirtualBox Won’t Show 64-bit: How to Fix It in 5 Steps?
Checking some Hyper-V settings will prove efficient
Key notes
- Virtualbox not showing 64-bit can be frustrating when you know your device meets all the requirements.
- This issue could be due to some system app, or Hyper-V enabled on your PC.
- This guide will discuss all the possible methods to fix the problem.

Wondering why Virtualbox is not showing a 64-bit option when creating a new virtual machine? Well, there could be several reasons for the same.
In this guide, we will discuss the potential reasons along with the fixes to resolve the problem.
What causes VirtualBox won’t show 64-bit guest OS in Windows?
Spotting the exact reason the issue is occurring can be difficult, as there can be several reasons. However, we have listed some of the popular ones here:
- Virtualization Disabled – If Virtualization is disabled from the BIOS utility, the issue can occur.
- Hyper V – Hyper V is a hardware virtualization product that allows you to create a virtual machine. However, it could conflict with VirtualBox and hence the issue. It needs to be disabled.
- Core Isolation – Core Isolation protects against viruses and attacks by separating computer processes from your OS and device. However, this could cause problems in running a virtual machine. Therefore, it needs to be disabled.
- VM platforms – If you have another VM software on your PC, conflict could arise when using resources, causing the problem.
- Device Guard and Credential Guard– Apps like Device Guard provide hardware security and only let those apps run, defined in Windows code integrity policies. This can also cause problems.
How can I fix VirtualBox won’t show 64-bit?
Before moving to the detailed troubleshooting steps, make sure you try these quick fixes:
- Ensure your computer supports x64 bit.
- Uninstall and reinstall Oracle VirtualBox.
- Make sure you are using the latest version of VirtualBox.
- Restart your computer
- Make sure you have Microsoft C++ 2019 Redistributable package installed.
1. Disable Hyper V
- Press Windows + R to open the Run command window.

- Type optionalfeatures.exe and press Enter to open the Windows Features window.
- Locate and remove the checkmark beside Hyper V and click OK.

- Restart your PC.
2. Enable Intel Virtualization Technology
- Press Windows + I to get Settings.
- Go to System, then click Recovery.

- Now locate Advanced Startup and click Restart Now.

- On Choose an option screen, click Troubleshoot.

- Now select Advanced Options.

- Select UEFI Firmware Settings and click Restart.

- Now the screen will present options; choose the one to enter BIOS.
- Click Configuration, then Virtualization Technology, and mark it Enabled.

- Go to the Exit menu and choose Save changes and Exit.
Note: For AMD processors, ensure AMD SVM(Secure Virtual Machine) is enabled.
3. Disable Core Isolation
- Press Windows + I to get Settings.

- Go to Privacy & Settings, then click Windows Security.
- Click Open Windows Security.

- Go to Device Security, then Core isolation, and click on Core isolation details.

- Toggle off the switch under Memory Integrity.

- Restart your PC.
4. Disable Device Guard & Credential Guard
4.1 Use Group Policy Editor to disable Device Guard
- Press Windows + R to get the Run window.

- Type gpedit.msc and press Enter.
- Copy and paste the following path:
Computer Configuration\Administrative Templates\System\Device Guard
- Double-click on Turn On Virtualization Based Security and set it as Disabled.

- Click Apply and then OK.
4.2 Use Registry Editor & Command Prompt to Disable Credential Guard
- Press Windows + R to get the Run window.
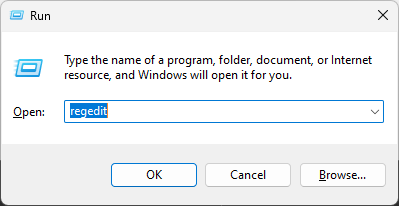
- Type Regedit and hit Enter.
- Copy and paste these paths one by one in the address bar—Right-click on LsaCfgFlags, EnableVirtualizationBasedSecurity, and RequirePlatformSecurityFeatures keys and select Delete.
HKEY_LOCAL_MACHINE\System\CurrentControlSet\Control\LSA\LsaCfgFlagsHKEY_LOCAL_MACHINE\Software\Policies\Microsoft\Windows\DeviceGuard\EnableVirtualizationBasedSecurityHKEY_LOCAL_MACHINE\Software\Policies\Microsoft\Windows\DeviceGuard\RequirePlatformSecurityFeatures - Now, press the Windows key, type CMD, and click Run as administrator.
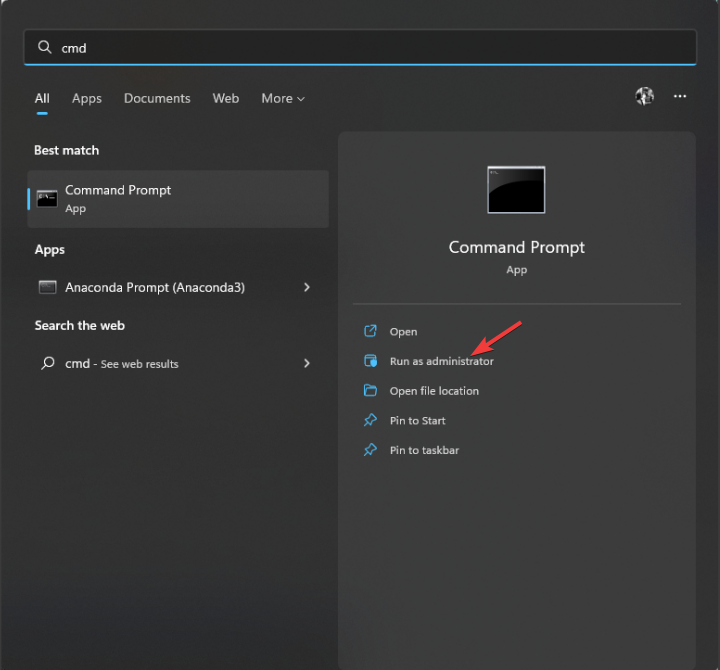
- Copy and paste these commands mentioned below one by one and press Enter after every command
mountvol X: /scopy %WINDIR%\System32\SecConfig.efi X:\EFI\Microsoft\Boot\SecConfig.efi /Ybcdedit /create {0cb3b571-2f2e-4343-a879-d86a476d7215} /d "DebugTool" /application osloaderbcdedit /set {0cb3b571-2f2e-4343-a879-d86a476d7215} path "\EFI\Microsoft\Boot\SecConfig.efi"bcdedit /set {bootmgr} bootsequence {0cb3b571-2f2e-4343-a879-d86a476d7215}bcdedit /set {0cb3b571-2f2e-4343-a879-d86a476d7215} loadoptions DISABLE-LSA-ISObcdedit /set {0cb3b571-2f2e-4343-a879-d86a476d7215} device partition=X:mountvol X: /d - Click Yes to the UAC prompt asking to disable Windows Defender Credential Guard.
- Restart your computer.
5. Uninstall other VM apps
- Press Windows + R to open the Run box.

- Type appwiz.cpl and press Enter.
- Go to the installed apps, select other VM apps, and click Uninstall.

- Restart your PC.
So, these steps you need to follow to resolve VirtualBox won’t show 64-bit. Try them and let us know which methods worked for you in the comments section below.
Read our disclosure page to find out how can you help Windows Report sustain the editorial team. Read more


Improve this guide


User forum
0 messages