Fix: Wi-Fi Frequently Disconnects in Windows 10/11, 7
Give a try to these quick solutions now
![]() 5 min. read
5 min. read
![]() Updated on
Updated on
Share this article
Improve this guide
Read our disclosure page to find out how can you help Windows Report sustain the editorial team. Read more

You can have a stable ISP connection for the Wi-Fi and still occasionally have issues with your Wi-Fi disconnecting. In 80% of the cases, this will be caused by upgrading to Windows 10 or 11. Fortunately for users, a few easy steps will help you fix your WiFi and continue surfing the Internet without any problem from your operating system.
In many cases, you will lose your Internet WiFi connection because you have incompatibilities between the Windows 11, 10, or 7 operating system and the Wi-Fi driver, or your Bluetooth driver is interfering with the Wi-Fi connection, thus making your connection very unstable and unreliable.
Follow the tutorial below for a more detailed explanation of fixing our Wi-Fi connection in just a few minutes.
What can I do if Wi-Fi disconnects frequently on Windows 11, 10, 7?
1. Disable Bluetooth and Network Adapters
- Press and hold the buttons “Windows” and “R”.
- Type in the box that pops up the word in quotes: “devmgmt.msc”.
- Under the topic “Bluetooth” you will need to disable everything you have there.
- Under the topic “Network Adapter” you will have to disable all the entries except the one for the Wireless adapter you have.
- Reboot the Windows PC or laptop.
- See if you have a stable Wi-Fi connection after the restart.
2. Update your Wi-Fi drivers
You will have to look on the manufacturer’s website to see if you have any available WiFi drivers that are compatible with your OS. After Windows 11 was released, most of the manufacturers released new WiFi drivers that are fully compatible with your OS version.
Install the drivers available on the website and reboot your Windows PC. After you restart it, check if WiFi still disconnects frequently. Updating the driver also helps when the Internet keeps disconnecting while gaming.
Alternatively, you can fix the Wi-Fi driver issue more efficiently and faster using dedicated driver update software.
By choosing this alternative, it’s likely to update your drivers accordingly without harming your system even more. The process is automatic, and it finds the appropriate drivers in minutes.
Then, you should have renewed drivers that help your connection to be more stable, so try this method to get it done already.
⇒ Get PC HelpSoft Driver Updater
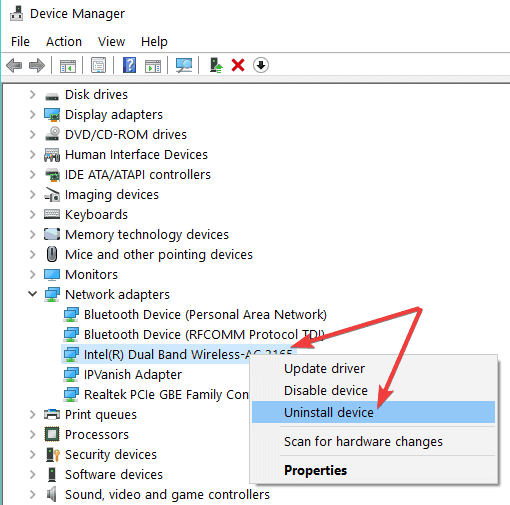
3. Uninstall your WiFi driver
Suppose the options listed above do not work. In that case, we will uninstall the current driver for the WiFi adapter and let Windows install it automatically after a reboot.
- Press and hold the buttons “Windows” and “R”
- Type in the box that appeared in the new window “devmgmt.msc” to launch Device Manager
- Click(left click) on “Network adapters”
- On all the wi fi adapters, you have there you need to click( right click) on them and select the “Uninstall” feature.

- Reboot your Windows PC or laptop.
- After the reboot, the installation of the Wi-Fi drivers will begin automatically.
- Check and see if your Wi-Fi still disconnects after you reboot your machine.
4. Change Power settings
- Press and hold the buttons “Windows” and “R” to launch a new Run window
- Type ‘control panel’ in the new window and hit Enter to open Control Panel > type ‘power’ in the search menu located in the upper right-hand corner
- Click (left click) on “Power options” situated in the Control panel window.

- Click (left click) on “Change Plan Settings”.
- Click (left click) on “Change Advanced Power Settings”
- Click (left click) on “Wireless Adapter Settings”
- Click (left click) on “Power Saving Mode”
- You have there a feature that says “Plugged in”, you will have to change this to “Maximum Performance” feature.

- Reboot the Windows PC and check if the wi fi works now.


5. Disable ‘Allow this computer to turn off this device to save power
- Press and hold the buttons “Windows” and “R”.
- Type in the box that appeared “ncpa.cpl”
- You will have to click(right click) on the wi fi connection you have there and select “Properties”

- Click(left click) on “Configure”
- In the upper side of the new window you will have to click(left click) on the “Power Management” tab.
- From the “Power Management” tab, you will need to uncheck the feature that says “Allow this computer to turn off this device to save power”

- Click(left click) on “OK”
- Reboot the Windows PC and check your Wi-Fi connection now.


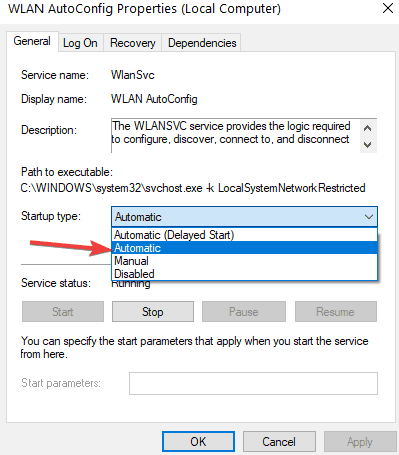
6. Restart Wi-Fi AutoConfig
If the problem persists, you can try to restart and then reset the Wi-Fi AutoConfig service. Here’s how you can do this:
- Go to Start > type services.msc > hit Enter to launch Services. You can also launch a Run window, type services.msc and then hit Enter to launch Services.
- Locate the WLAN AutoConfig service > double-click on it
- Select Restart to refresh the service

- Now, right-click again on WLAN AutoConfig > select Properties
- Go to Startup type > select Automatic >hit Apply and OK

- Check to see if your Wi-Fi connection is working as it should.

You can use all the options listed above to fix your Wi-Fi internet connection. In the majority of the cases, applying one of the options above will solve the problem. However, do leave us a comment below to let us know if your Wi-Fi still keeps disconnecting.


User forum
6 messages