Network Adapter Driver for Windows 11 [Download/Update]
Updating your network drivers is crucial, just like with any other driver
Key notes
- You can update Windows 11 network drivers by manually downloading them from company websites and installing them.
- Windows 11’s Device Manager utility enables you to either manually or automatically install new network drivers.
- Third-party driver updater software can also come in handy for updating Windows 11 drivers for network adapters and other devices.

Network drivers in Windows 11 are required for the computer’s network adapters. Your PC’s network adapter is the device needed for Internet connectivity. Wireless network adapters’ drivers are also known as Wi-Fi drivers.
Drivers facilitate communication between Windows 11 (or any other OS) and internal and external hardware devices. Companies regularly update drivers for their hardware devices.
Therefore, the original drivers that came with your PC will get outdated.
Windows 11 doesn’t include any new utility for updating device drivers. Therefore, there isn’t any new way you can update network drivers in the latest OS.
However, you can still easily update adapter drivers in Windows 11. In our article today, we will teach you how to update the network drivers.
Do I really need to update my PC’s network driver?
Updating the driver for the network adapter can enhance both its performance and reliability. For example, an antiquated network driver might reduce the download speed on your desktop or laptop.
For the sake of faster download speed, it’s worth updating a network adapter’s driver. Furthermore, connectivity issues will more likely arise on a PC with an outdated network adapter driver.
If you can’t connect to the Internet, you won’t be able to download a new driver to fix that issue. So, it’s best to update your computer’s network driver when you can do so to forestall connection inconveniences.
How to install network adapter driver Windows 11 without Internet?
Without a doubt, our computer and operating system will not function normally if we do not have the appropriate drivers installed.
Before we go any further, you need to be aware that the installation of drivers on Windows 11 may be performed with or without an Internet connection.
It is essential to have up-to-date drivers because, in the event that they become corrupted or otherwise inoperable, hardware may become unresponsive or malfunction.
In addition to this, they conceal the fundamental workings of your hardware devices, so enabling you to make use of an incredibly user-friendly interface.
We prepared a dedicated article on how to manually install your drivers, which we recommend you check out as the first two solutions do not require an Internet connection.
How can I update my PC’s network driver in Windows 11?
1. Use Device Manager
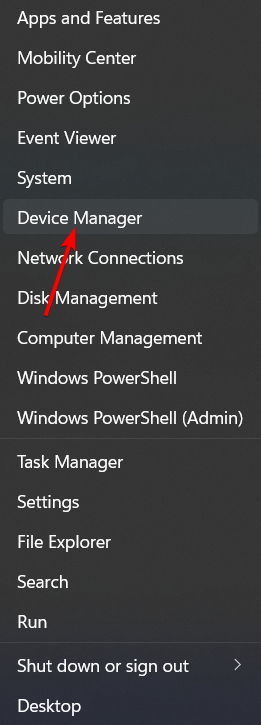
- Press the Windows key and X simultaneously to open a menu that includes some handy shortcuts.
- Click the Device Manager shortcut to open that utility in Windows 11.

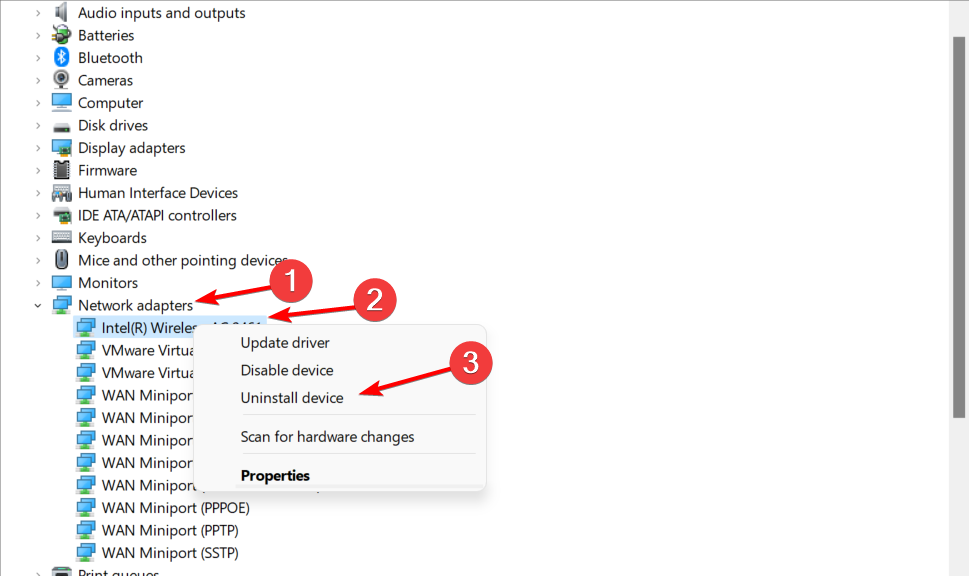
- Double-click Network adapters to expand the device list for that category.
- Then right-click your Internet network adapter there and select the Update driver context menu option for it. You can do this for any Ethernet driver in Windows 11 as well.

- Select the Search automatically for drivers option to initiate a Windows search.

- If the updater utility detects a better driver, wait for Windows to install it.
2. Use the Windows Update Service
1. Open the Start menu by clicking on the Start button on the taskbar.
2. Click on the Settings app pinned to the Start menu.

3. Next, click the Windows Update tab on the left of Settings.
4. Select Advanced options on the Windows Update tab.

5. Click Optional updates within Advanced options.

6. If a network adapter driver is listed within the optional updates, select its checkbox.
7. After, press the Download & install button.
If you are not fan of using Device Manager to update your network adapter drivers, you can instead use the Windows Update Service. It is also a built-in tool, and it is responsible for keeping your device up to date.
From the Windows Update Service menu, you can scan for, download and install new updates for your network adapter driver at any time.
 NOTE
NOTE
3. Manually update your PC’s network adapter driver
- Open a web browser in Windows 11 and search for your network adapter’s driver provider website, which will be the manufacturer’s site. For example, Intel provides the drivers for Intel network adapters.
- Then open the manufacturer’s website and click the link for the driver download section of the website. It is usually found under Support.
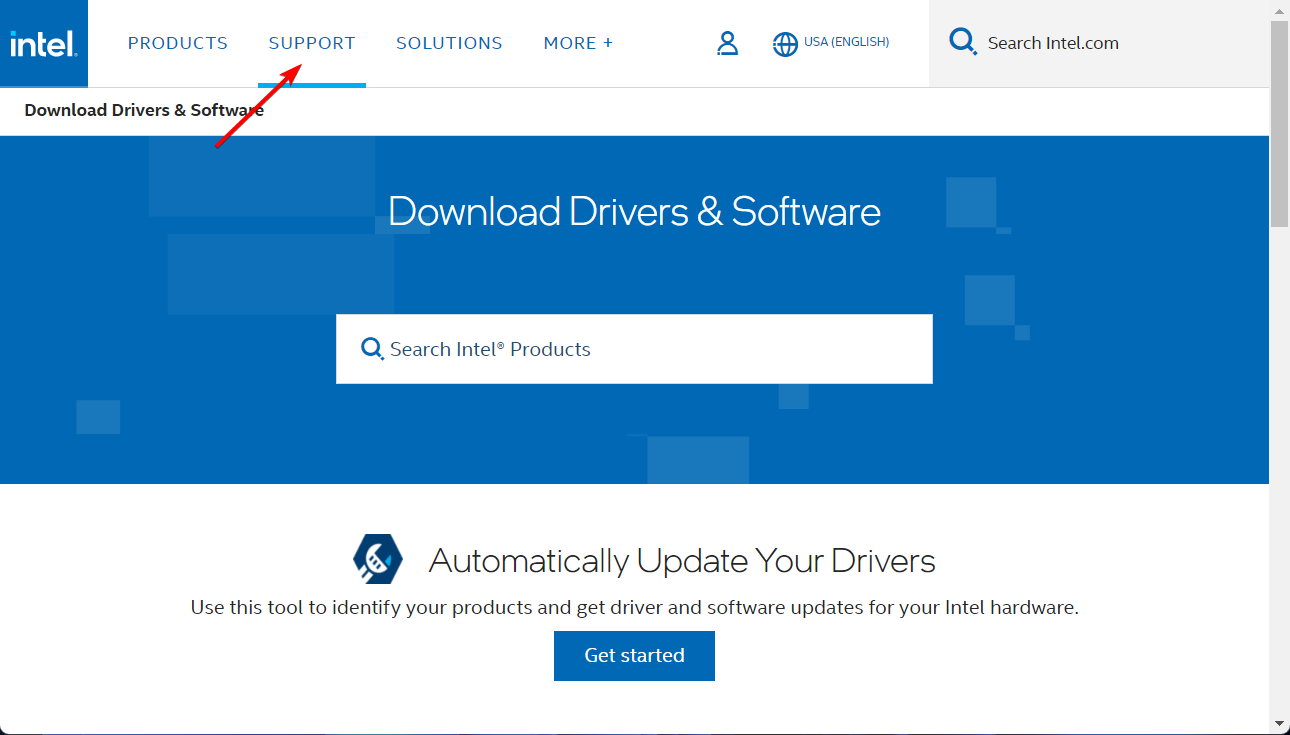
- Select the network adapter (or wireless) product category.
- Then enter the name of your network adapter, as specified within Device Manager, in the website’s device search box.
- Click the Download option for your network adapter’s latest driver package listed on the website, which must be compatible with your Windows 11 platform.

- Thereafter, select a folder to download the driver package to and click the Save button.
- When you’ve downloaded the driver package, click File Explorer’s taskbar button.

- Open the folder you saved the driver package in.
- Double-click the driver package’s EXE file to open its installer window.
- Then go through the installer window’s instructions to install the network driver. You can do this for any network controller in Windows 11 that you need to be updated.
NOTE
If you are looking for a quicker and easier solution, using a specialized tool is what you need. You can update any of your PC’s drivers by selecting the download and install options within the driver updater.
You can prevent these problems by using an automatic tool that will search and install the correct driver versions on your computer with just a few clicks. That's why we recommend you use Fortect and its Driver Updater feature. Here's how to do it:
- Download and install the Fortect app.
- Launch the software.
- Wait for the app to perform the initial scan of your entire PC or Laptop
- Afterward, navigate to the Driver Updater Section and start the scan process
- After the scan is complete, choose which drivers to update or click the update button

- Register and Activate for the full suite and automatic update, or use the 24-hour trial to update manually all that you have the time to
- Restart your PC to ensure the applied changes.
Disclaimer: In order to perform some operations, this software must be updated to the premium plan.
How do I reinstall network drivers in Windows 11?
- Right-click the Start icon and select Device Manager.
- Expand the Network Adapters section, right-click on your network drivers, and select Uninstall device.
- Reboot your PC to reinstall the drivers automatically. That’s it!
How can I enable (or disable) automatic driver updates in Windows 11?
Windows 11 will automatically download and install some device drivers if configured to do so. You can enable automatic driver downloads with device installation settings. This is how you can do that in Windows 11.
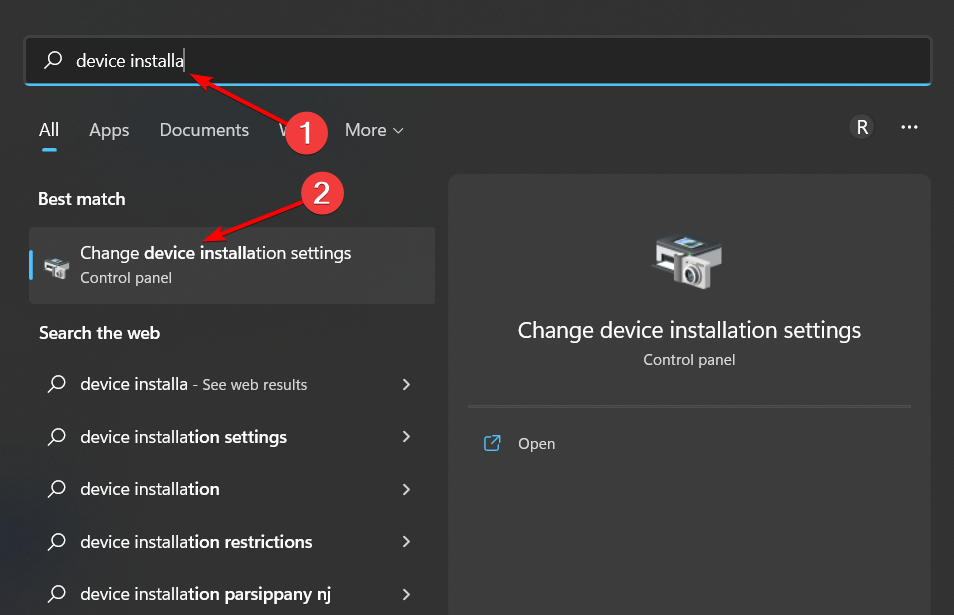
- Press Windows then type device installation settings within the search box. Click Change device installation settings to open that window.
- Select the Yes option on the Device installation window if it’s not already selected. Or you can select No if the opposite is true.

- Press the Save changes button to confirm.
Bear in mind that enabling automatic updates doesn’t mean Windows Update will update all device drivers on your PC. However, it will at least update the more essential device drivers.
So, there are numerous ways you can update your computer’s network driver. Choose whatever method you prefer for updating the network adapter and other device drivers.
Connectivity issues will less likely arise on your PC if you keep its network adapter driver up-to-date with the above methods. It’s best to update network drivers to prevent connection issues from arising in the first place instead of waiting for them to happen.
Even more, driver problems occur while playing games such as Minecraft and BattleField. Check out this dedicated guide on solving outdated drivers’ errors on Windows 11.
Have the above procedures worked for you as well? Let us know in the comments area below.
Read our disclosure page to find out how can you help Windows Report sustain the editorial team. Read more


Improve this guide


User forum
0 messages