Fix: No Internet in Windows 11 Safe Mode With Networking
Make sure the network adapter is enabled
Key notes
- The no internet issue in Safe Mode with Networking on Windows 11 could occur due to driver issues, conflicts with third-party software, or improper network configuration.
- To fix it, check all the hardware cables, run a Network troubleshooter, restart the network services, or update the network driver.
- Keep reading to know the detailed steps for each method.
Encountering no internet connectivity on your Windows 11 computer while in Safe mode with networking can be frustrating, especially when you are diagnosing & troubleshooting system issues.
In this guide, we will talk about the potential causes of the problem and list the effective solutions to ensure you get internet access when in safe mode.
Why is there no internet in Safe Mode with networking?
- The network adapter is not compatible or properly loaded.
- Third-party firewall, security software, or antivirus may interfere with network connectivity in safe mode.
- Network services are not running.
- Malware infection.
What can I do if the internet is not working on Windows 11’s Safe Mode with networking?
Before engaging in advanced troubleshooting steps, you should consider performing the following checks:
- Make sure you sign in using an account with admin privileges.
- Restart your computer and ensure there are no pending Windows updates.
- Disable third-party security software temporarily.
- Check the ethernet cables, and other connections to ensure they are securely plugged in.
- Verify the internet works fine without any issues in normal mode.
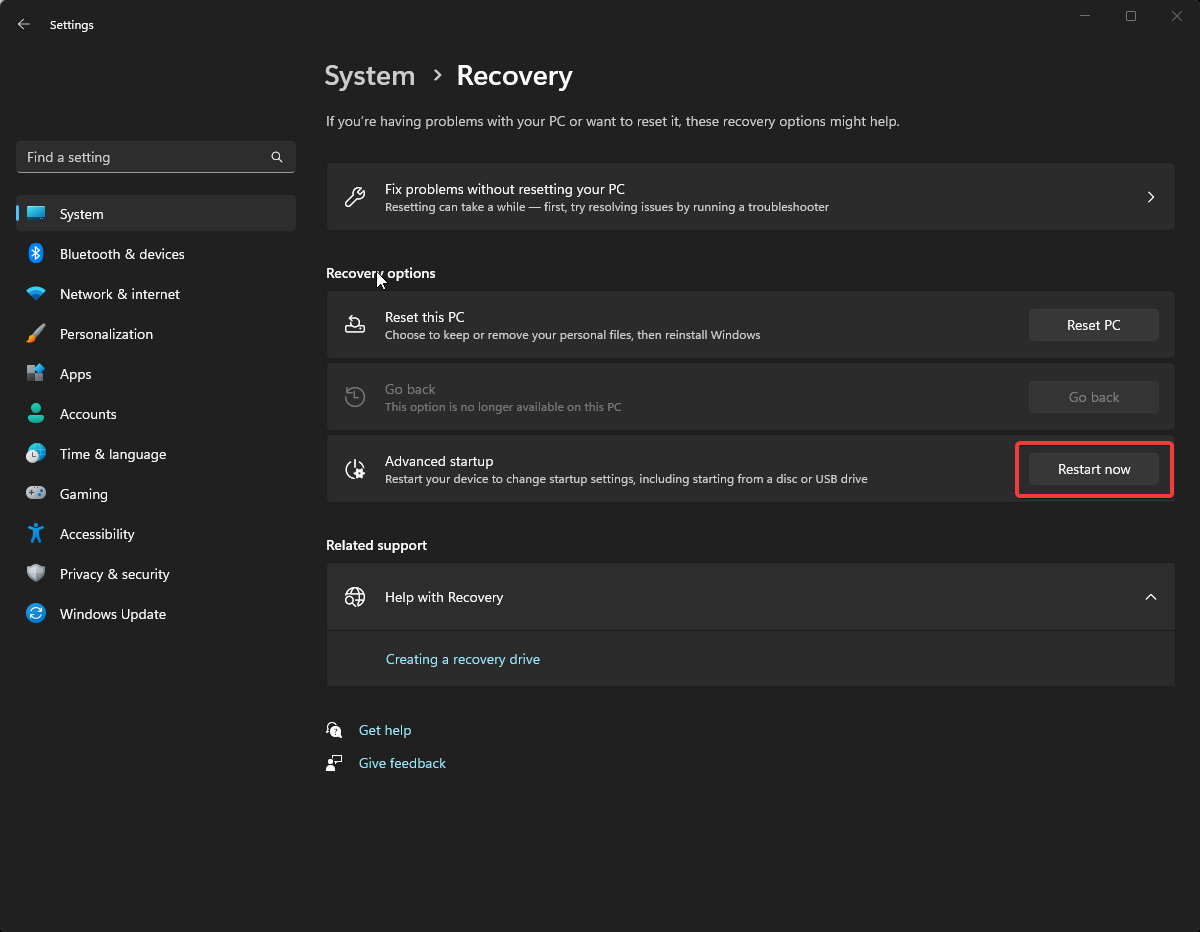
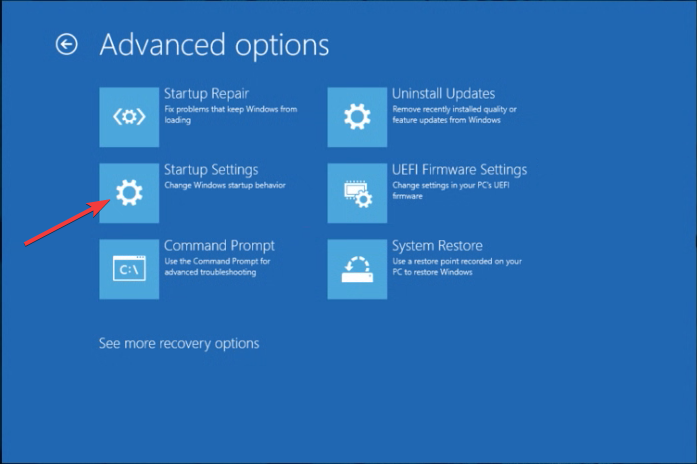
1. Use Advanced startup to enter safe mode
- Press Windows + I to open the Settings app.
- Go to System, then click Recovery.

- Next, locate Advanced startup, and click Restart.
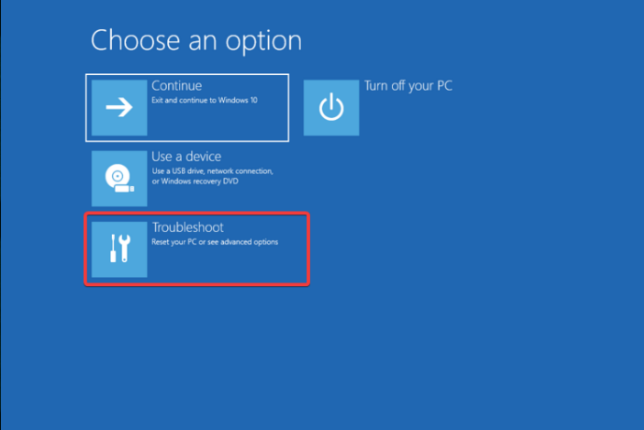
- Your computer will restart, and you will get Choose an option screen, select Troubleshoot.
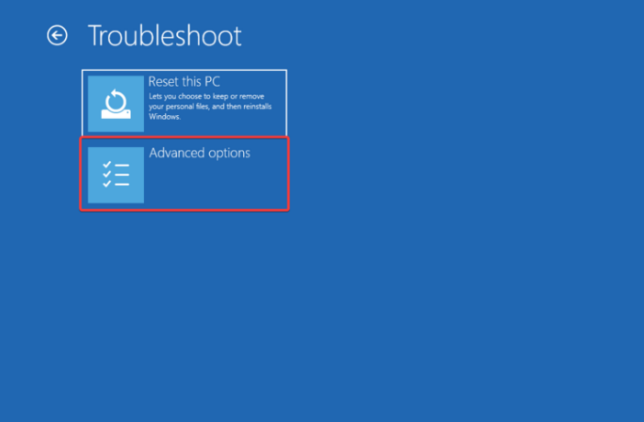
- Next, choose Advanced options from the Troubleshoot page.
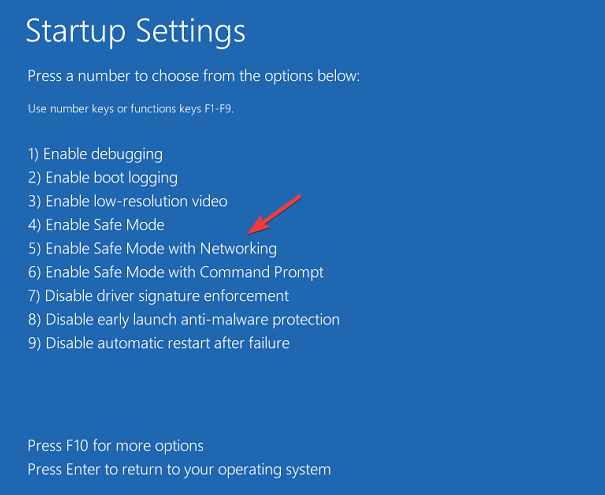
- On the Advanced options screen, click Startup Settings.
- Your computer will restart and show you a list of Startup Settings options, and press the number or the function key mentioned for Enable Safe Mode with Networking.
If you can’t get your internet connection to work in safe mode, then use the System Configuration window to restart your computer in normal mode and follow the steps mentioned below.
2. Verify if the Internet Protocol Version 4 (TCP/IPv4) option is selected
- Press Windows + R to open the Run window.

- Type ncpa.cpl and click OK to open the Network Connections.
- Right-click the ethernet connection and choose Properties.

- Under The connection uses the following items heading, scroll, and check if the Internet Protocol Version 4 (TCP/IPv4) option is selected.
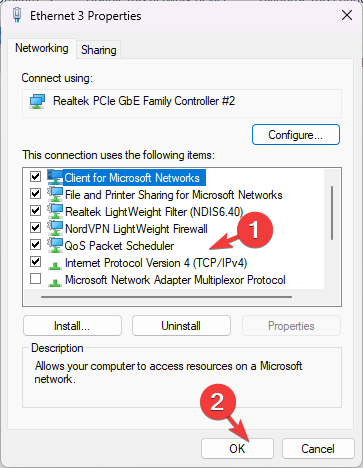
- If not, then select it and click OK.
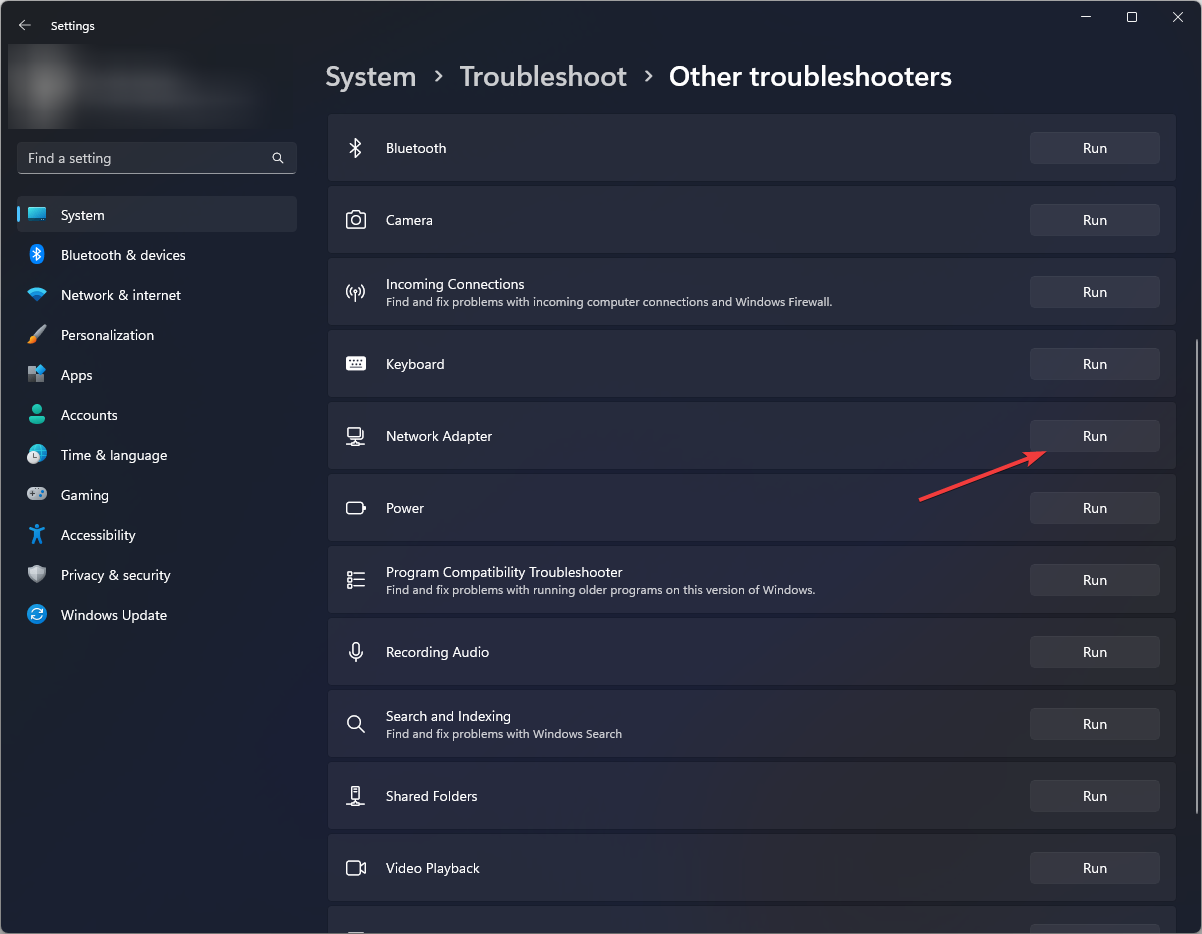
3. Run the Network troubleshooter
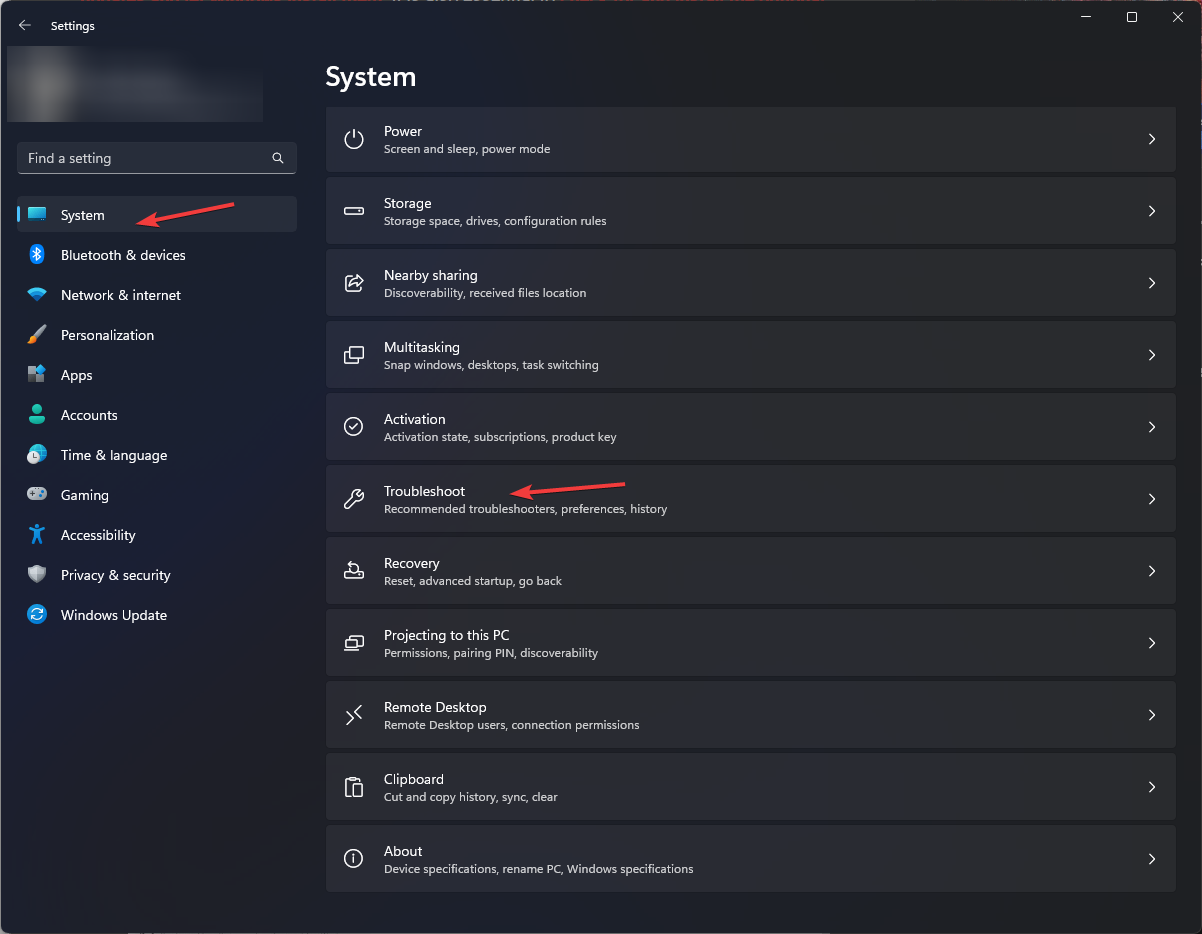
- Press Windows + I to open the Settings app.
- Go to System, then select Troubleshoot.
- Click Other troubleshooters.
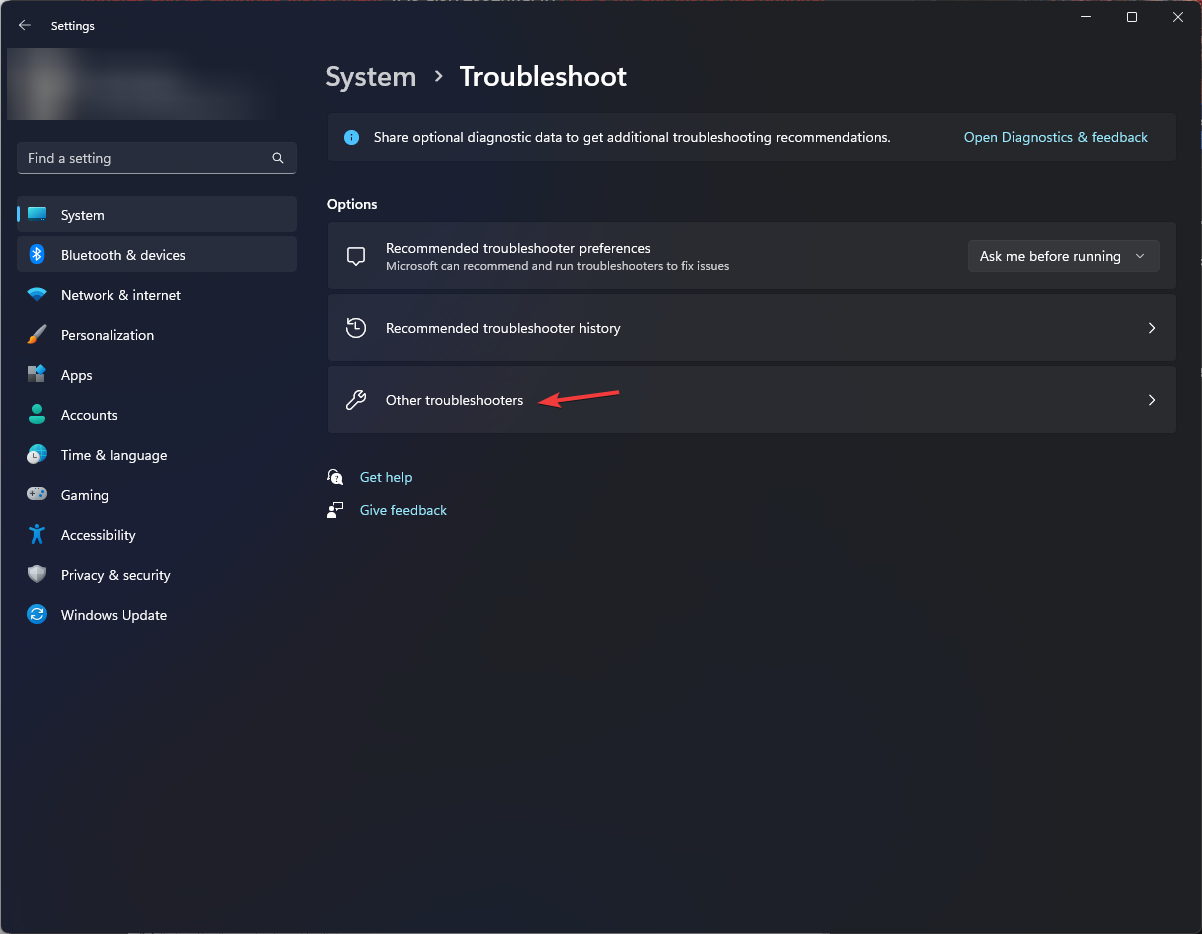
- Locate the Network Adapter option and click Run to launch the troubleshooter. Follow the on-screen prompts to complete the process.
The network troubleshooter can be pretty helpful in fixing connection issues, especially after a Windows update.
4. Start the WLAN Auto Config Service
- Press Windows + R to open the Run dialog box.
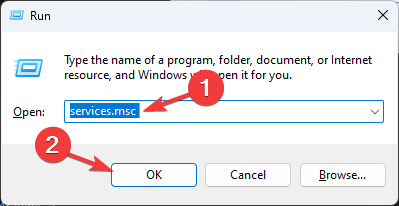
- Type services.msc and click OK to open Services.
- Locate and right-click WLAN Auto Config and select Start.
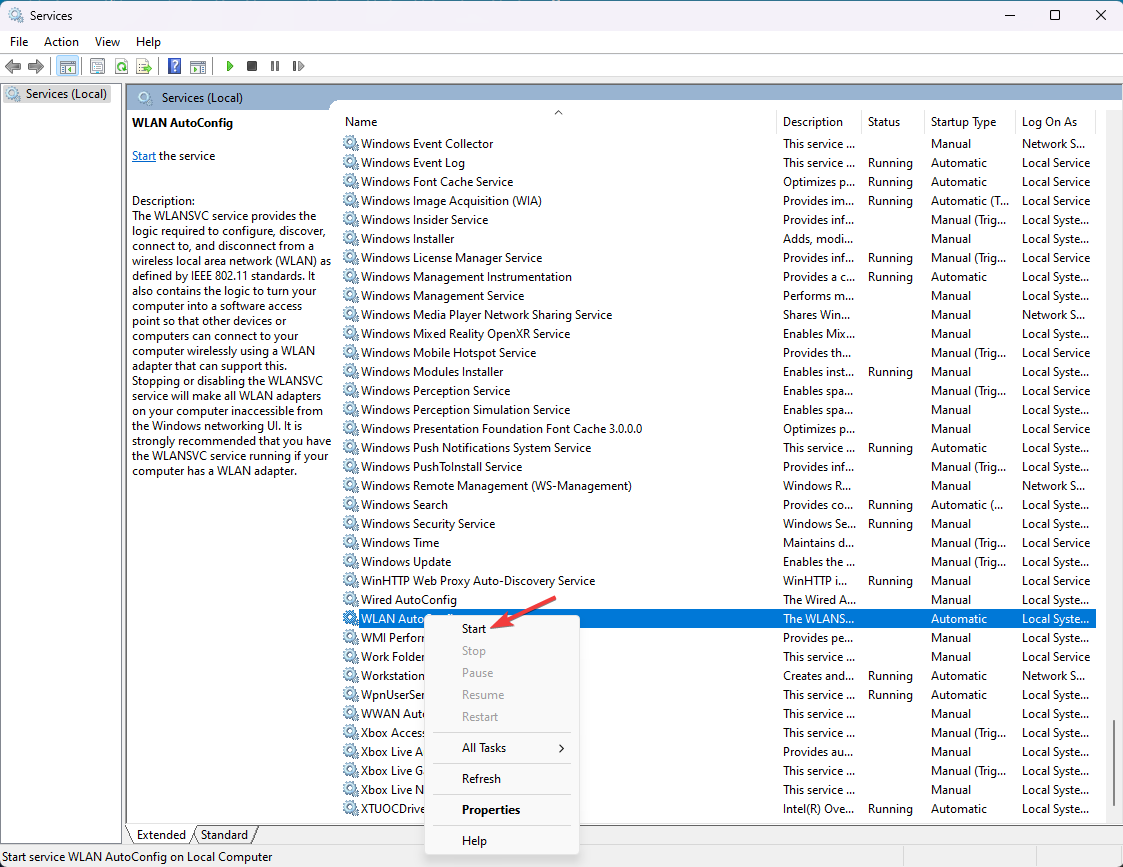
- If the Start option is grayed out, click Restart.
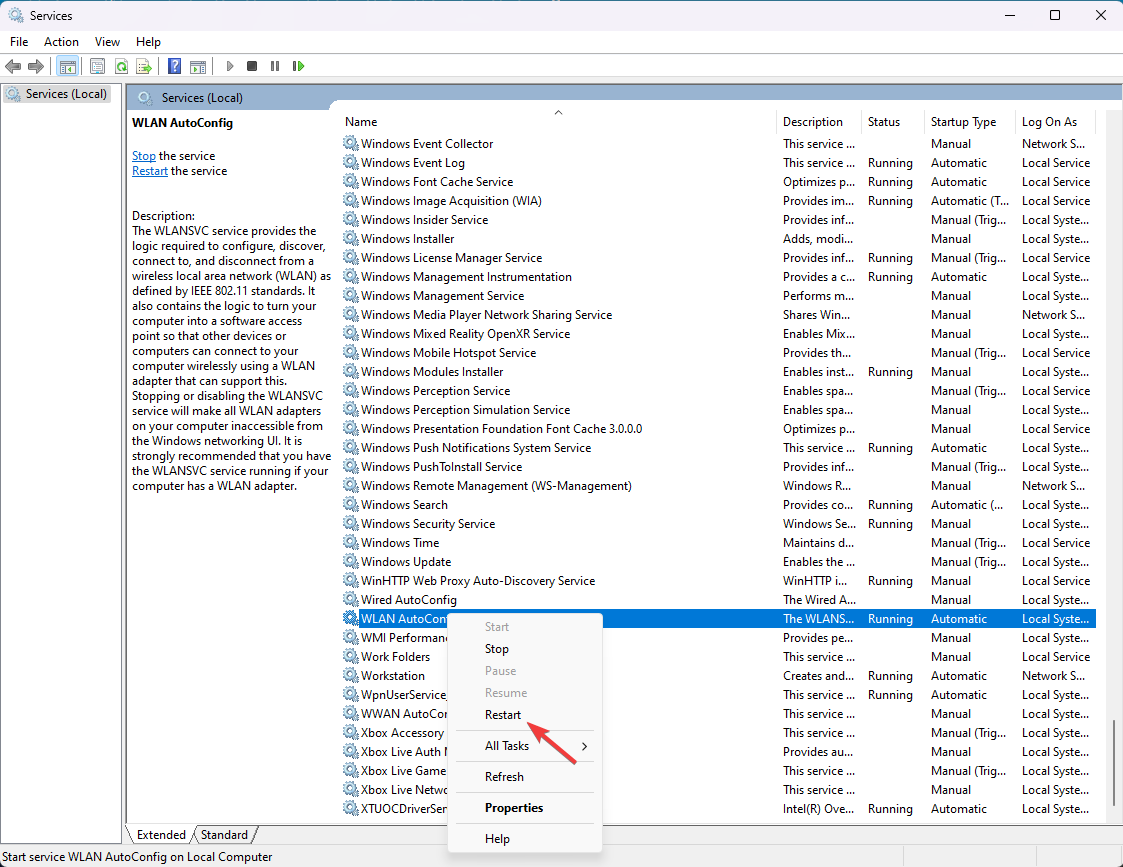
- Wait for the service to start again, then close the Services window.
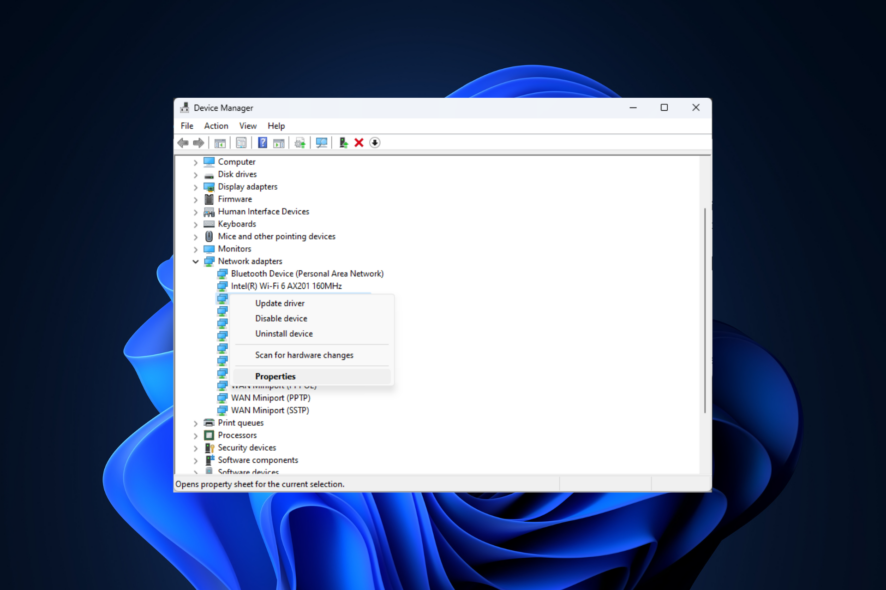
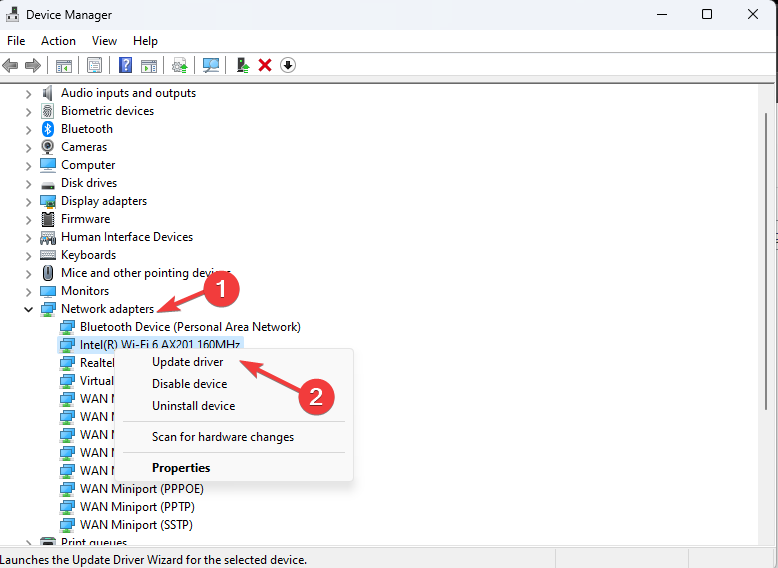
5. Re-enable the network adapter
- Press Windows + R to open the Run window.
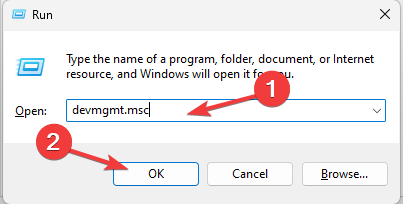
- Type devmgmt.msc and click OK to open the Device Manager window.
- Locate the Network adapter and click to expand it. Right-click the network driver, and select Enable device. You will get the Enable device option only if the network adapter is disabled.
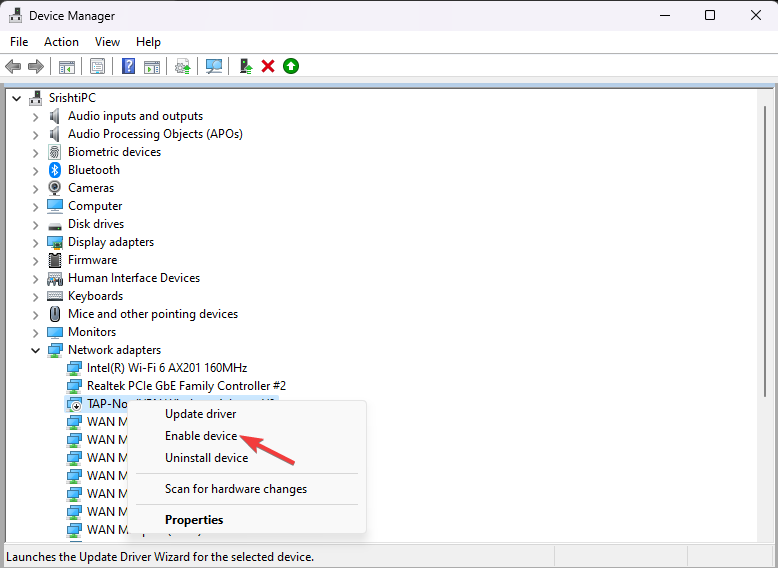
- If you see the Disable device option, click it, then select Yes on the following prompt to confirm the change.
- Now, right-click the driver and select Enable device to re-enable.
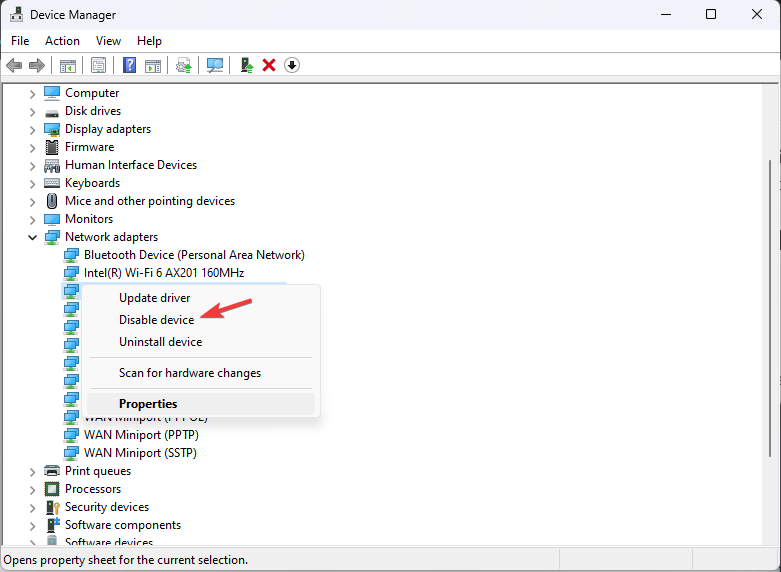
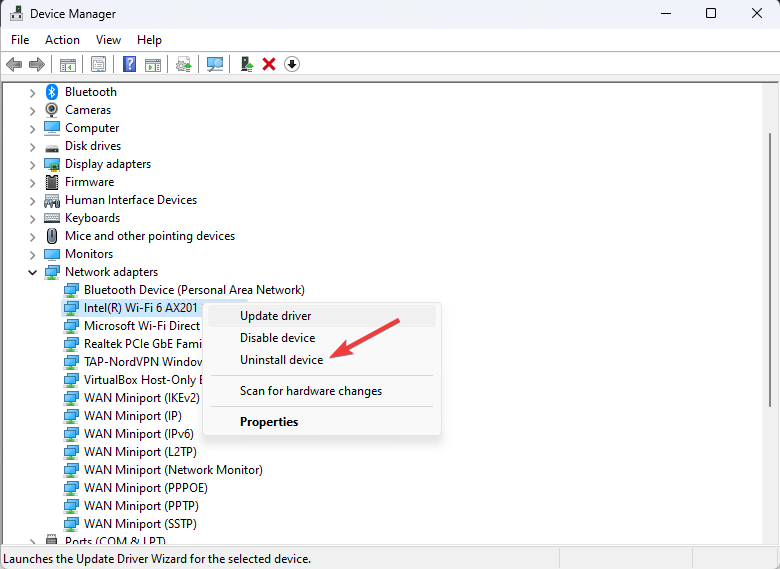
6. Update/Reinstall your network driver
- Press Windows + R to open the Run window.
- Type devmgmt.msc and click OK to open the Device Manager window.
- Locate the Network adapter and click to expand it. Right-click the network driver, and select Update driver.
- Click Search automatically for drivers and follow the on-screen instructions.
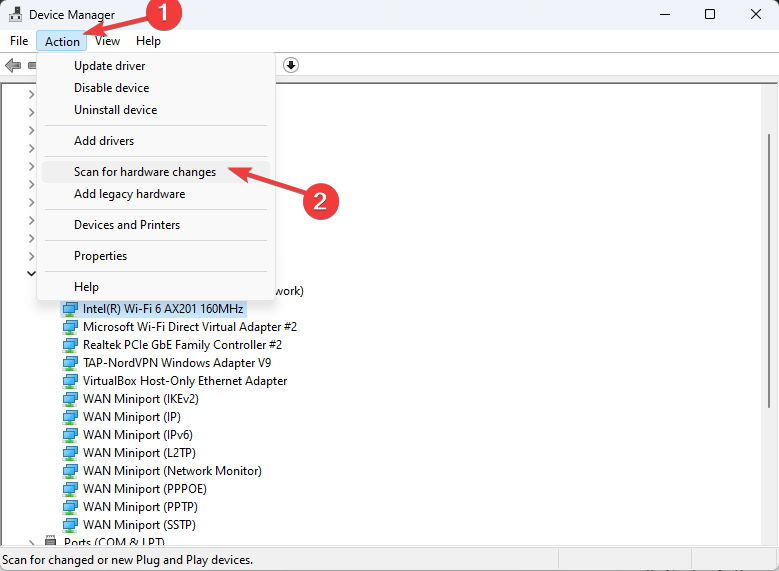
- If no update is found, right-click the driver again and select Uninstall driver.
- Next, go to Action, then select Scan for hardware changes to reinstall the driver.
Keeping the network drivers up to date can help you prevent other network connectivity issues like Windows can’t find a Wi-Fi network.
7. Reset TCP/IP stack
- Press the Windows key, type cmd, and click Run as administrator.
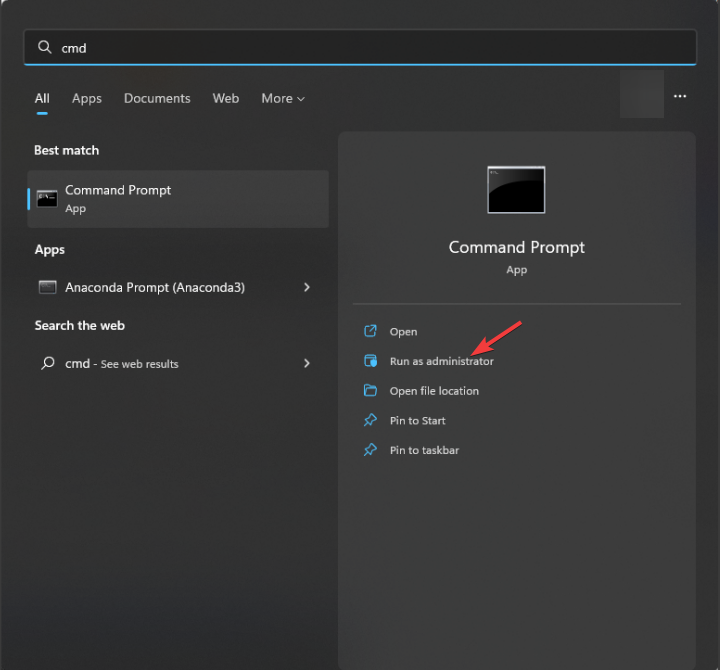
- Copy & paste the following command to reset your network connection and hit Enter:
netsh int ip reset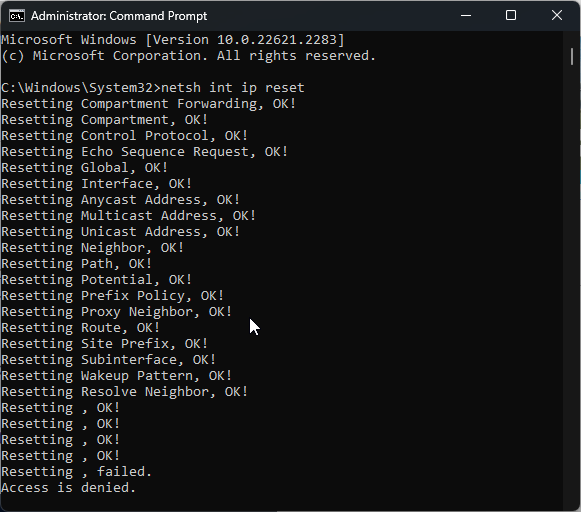
- Once executed, restart your computer.
To successfully use the internet in safe mode, ensure you have a stable internet connection in normal mode via ethernet cable.
Once the task is done, don’t forget to revert to normal mode to enjoy the full functionality of the operating system.
In case you are facing another internet connection issue on your Windows computer, read this guide to find quick solutions.
If you have any questions or suggestions about the methods mentioned, feel free to mention them in the comments section below.
Read our disclosure page to find out how can you help Windows Report sustain the editorial team. Read more


Improve this guide


User forum
0 messages