Windows 11 Split Screen Not Working: How to Force it
Check pre-verified solutions that work for all
Key notes
- Split screen is one of the most popular features in Windows 11, but for many, it’s not working.
- Your primary approach should be to verify that the feature is enabled.
- Many fixed things by running the SFC scan or updating the graphics driver, amongst other solutions.

Microsoft’s Windows 11 operating system allows you to simultaneously launch four to six windows by dividing the screen. But several users reported that the split screen is not working in Windows 11.
Several users have encountered the error, and some shared it online. However, we saw a shortage of reliable solutions and took matters into our hands. So, let’s find out how you can fix things when the Windows split screen shortcut is not working.
Why is the split screen not working on Windows 11?
Here are a few reasons why the split screen is not working in Windows 11:
- Snap windows feature is disabled – In most cases, users later realized that the snap windows feature was disabled.
- Corrupt system files – If the system files are corrupt, it would trigger a range of issues and affect the operating system’s functionality.
- Outdated or corrupt display driver – Running a corrupt or outdated driver is just as likely to cause the problem, and this is usually the case after you have just upgraded to Windows 11.
How can I fix Windows 11 split screen if it’s not working?
Before we try the slightly complex solutions, here are a few quick ones to try:
- Restart the computer.
- Update Windows 11 since it could be a bug in the current version.
- If the split screen in Windows 11 is working, but you find one half to be lighter/darker than the other, verify the same in the system BIOS. And if the problem persists, it’s likely a problem with the display.
- HP device users should disable Focus Mode in the HP Command Center, a feature often responsible for affecting the brightness in split screen on Windows 11.
If these two don’t work, head to the fixes listed next.
1. Enable Snap windows
- Press Windows + I to open the Settings app, go to System, and click on Multi-tasking.

- Now, switch the toggle button to enable the Snap Windows option and click on it to see a drop-down menu with all the detailed splitting scenarios.

The feature should have been enabled by default once you installed Windows 11 on your computer. However, due to specific bugs or personal errors, the option ends up being disabled. Once you enable it, verify whether Windows 11 split screen is still not working.
2. Update the graphics driver
- Press Windows + R to open Run, type devmgmt.msc in the text field, and hit Enter.

- Expand the Display adapters entry, right-click on the graphics adapter, and select Update driver.

- Now, select Search automatically for drivers.

A compatible driver might not have been installed if you just upgraded to the latest iteration. So, check for it and even try manually updating the driver to fix things when Windows 11 split screen is not working.
If the driver wasn’t properly installed or you just couldn’t find the right one, we recommend using an automated driver updater, Outbyte Driver Updater.

Outbyte Driver Updater
Have your graphics driver updated with all other outdated drivers to avoid future errors.3. Restart explorer.exe
- Press Ctrl + Shift + Esc to open the Task Manager, go to the Details tab, and locate the explorer.exe task. Once you have found it, right-click on it and choose End Task.

- Now go to File and choose Run new task.

- Enter explorer and click OK.

4. Run the SFC scan
- Press Windows + S to open the Search bar, type cmd, right-click on the result, and select Run as administrator.
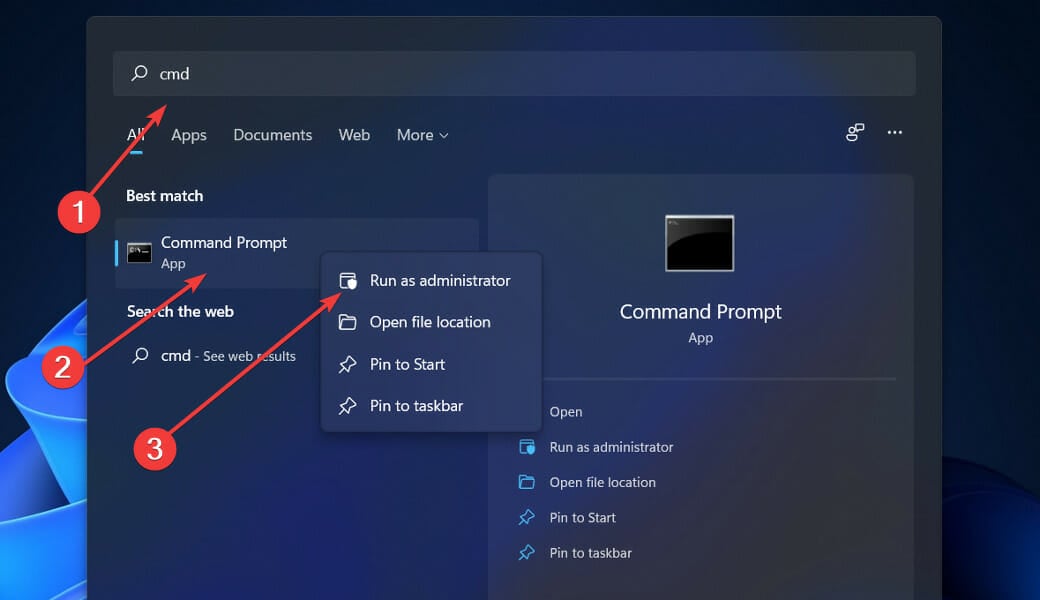
- Click Yes in the UAC prompt.
- Paste the following commands one at a time, and hit Enter after each to run the DISM tool:
DISM /Online /Cleanup-Image /ScanHealthDISM /Online /Cleanup-Image /RestoreHealth - Similarly, execute the following command to run the SFC scan:
sfc /scannow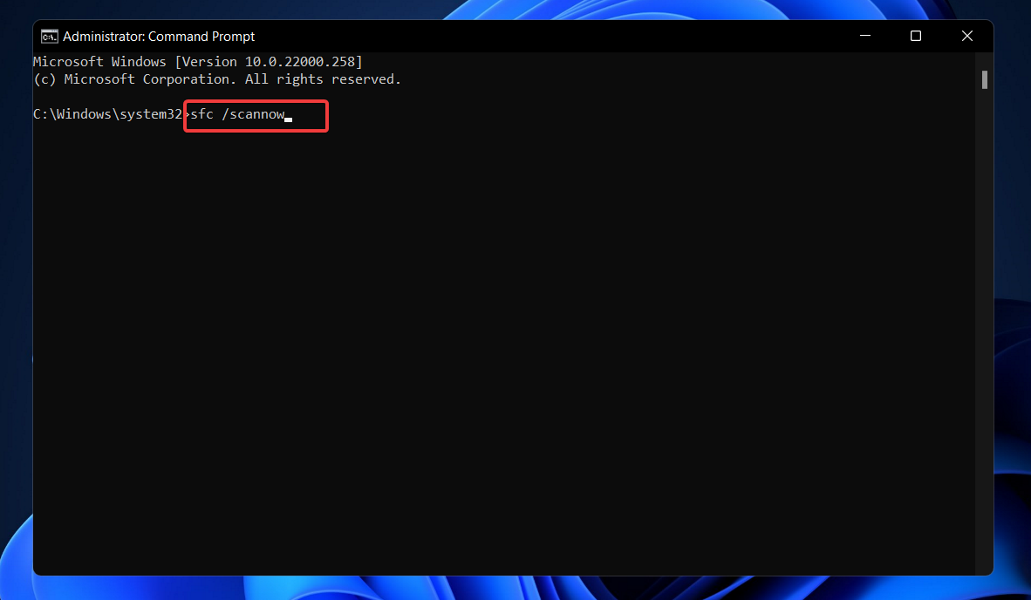
If that does not work, you can try using a specialized third-party repair software, which will scan your PC and repair it if the error is related to corrupted system files or missing DLLs.
5. Use the keyboard shortcut
If the previous methods didn’t work, you could use the keyboard shortcut to split the screen in Windows 11 manually.
Open the program you want to split, hold the Windows key, and press the desired arrow key. For instance, to place the current program to the left, hit Windows + Left, and the other open applications appear on the right.
That’s all! It would be best if you now had the split screen feature working in Windows 11 and could easily place programs across the screen, thus increasing productivity.
Also, find out how to split screen in Windows 11 and everything else there’s to know about the feature. Besides, do not forget to check how to make Windows 11 faster than ever.
Please let us know in the comments section below which method worked best for you and which operating system version you prefer to use the most. Thanks for reading!
Read our disclosure page to find out how can you help Windows Report sustain the editorial team. Read more


Improve this guide


User forum
0 messages