This PC Can't Run Windows 11: Fix This Error in 3 Steps
Surefire ways to bypass this error message and install the latest OS
Key notes
- Various users report encountering errors while checking if their PC is compatible with Windows 11.
- Even though machines respect the minimum hardware requirements, Microsoft's utility sends an error message.
- The secret lies in having a TPM 2.0 on the motherboard and a BIOS setting that needs to be enabled.

Everyone wants to enjoy Windows 11, and many users are complaining about receiving the error saying This PC can’t run Windows 11 error while checking if their PC is compatible.
Sadly, this happens even for machines that genuinely respect the minimum system requirements asked by Microsoft.

The error message will also appear: This PC will not run Windows 11 after scanning when you are browsing with your machine on Microsoft’s official system requirements page.
We’ve also checked this on a cutting-edge Dell XPS 17 machine, with monster system requirements, and we can say that the reports are valid.
Even though the PC has powerful hardware specs to move mountains, the PC Health Check application says Windows 11 is incompatible.
The problem rarely lies with the machine’s hardware itself, but more with a TPM 2.0 chip on the motherboard and a BIOS setting that needs to be enabled, called Secure Boot.
What does the PC can’t run Windows 11 error message mean?
This PC can’t run Windows 11 message means your computer does not meet the official requirement to use the latest OS. So, you might need to upgrade your PC to install it officially.
However, if you are facing the issue on a PC that meets all the formal requirements, it might be because of the absence of a feature on your motherboard. Also, it might be because you have not enabled the correct settings.
We will show you to fix this in the subsequent sections of this guide.
How to check if your PC is ready for Windows 11?
- Download the PC Heath Check application.

- Run the downloaded file, which will install the PC Health Check app.

- After it installs, click Finish to open the app.

- Now click on the Check now button.

- Hopefully, you will get a message saying that This PC meets Windows 11 requirements. In addition, you can now click on See all results or Device specifications to see which installed apps are compatible with the new OS.

Unfortunately, you can also see this great message from the PC Health Check app to get the bad news that your PC is not ready when you try to install the OS.
That’s why we prepared a few solutions to bypass this PC can’t run Windows 11 problem and install the OS as soon as possible.
How can I fix the error saying This PC will not run Windows 11?
1. Check if your PC has a TPM 2.0 chip
1.1. Start the Trusted Platform Module console
- Press the Windows key + R to start Run, type tpm.msc, and press Enter or click OK.

- In the TPM Manufacturer Information screen, check the value of the Specification Version. This should be equal to 2.0, as in our screenshot.

- If you receive an error with the Compatible TPM is not found message, then the TPM chip is unavailable on your motherboard or disabled in BIOS.

So, you don’t know yet if your PC has a TPM 2.0 chip. You need to check that on your BIOS and activate the TPM Support to find out for sure. This is the first step to this PC can’t run Windows 11 using a bootable USB or fresh install.
1.2. Enter BIOS and enable TPM Support
- Restart your PC and enter BIOS. Usually, it would be best to press an F (function) or Del keys on your keyboard before Windows boots up, but it’s different for each manufacturer. Check your manual in that regard.
- Now, go to the Advanced options on your BIOS, find the TPM Support option, and enable it.

- Save and exit BIOS. You can usually do that by pressing the F10 key, which may be different for your PC.
If you don’t find any TPM-related in the BIOS options, your PC doesn’t have a TPM 2.0 chip and can’t run Windows 11. However, you can still avoid the TPM check so follow the steps in our guide on how to install Windows 11 without TPM.
2. Download and change the appraiserres.dll file
- First, get the Windows 10 and 11 ISO files from the Microsoft dedicated page.

- Look for the appraiserres.dll file in the Windows 10 kit, right-click on it, and select Copy.

- Mount the Windows 11 ISO.

- After mounting or extracting the ISO, go to the Sources folder and delete the appraiserres.dll file inside the folder.
- Now paste the appraiserres.dll file you copied from the Windows 10 kit in the Windows 11 Sources folder.

- Try installing Windows 11 on your PC again.
The Windows 10 OS doesn’t check if a computer has a TPM 2.0 chip, so you force it to bypass this process by replacing the file with the one in Windows 11.
3. Check if Secure Boot is enabled
- Restart the PC and enter BIOS by pressing an F or Del keys according to the manual of your PC before Windows boots up.
- Search through the BIOS menu to find the location of the Secure Boot option and switch it on. You can usually find it under the Security settings, but this differs for each BIOS.

Microsoft claims that Windows 11 requires a Secure Boot capable machine, but this feature needs to be switched On. Not that straightforward, right?
You can check again with the PC Health Check Utility at the end of the procedure, and you should now receive a confirmation message.
What can I do if I still get the This PC doesn’t meet the requirements error?
Unfortunately, apart from the false-positive message we talked about at the beginning of this article, there is also a possibility of getting a false-negative message.
That means your PC meets all the requirements to upgrade to Windows 11, but when you visit the Windows Update section, you see the message that you can’t upgrade.
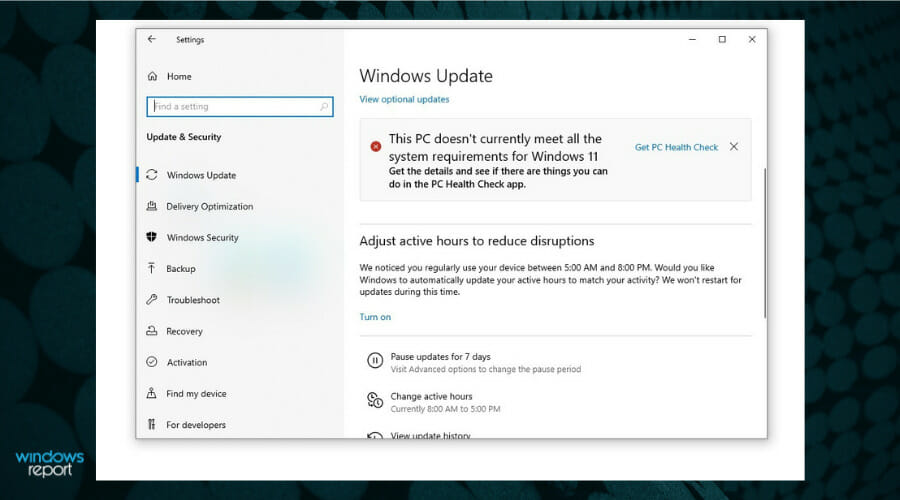
The complete message says that This PC doesn’t currently meet all the system requirements for Windows 11. Get the details and see if there are things you can do in the PC Health Check app.
While Microsoft is working on a solution for this problem, you can still upgrade to Windows 11 using the ISO file or the Windows 11 Installation Assistant.
You can get into a mess where your system won’t boot up because no operating systems have been detected.
In that case, you will need to use a disk converter to switch your disk from the Master Boot Record (MBR) to the GUID Partition Table (GPT) partition style without modifying or deleting data.
Although it says you won’t lose any data, we strongly suggest creating a backup of your data before doing that. However, after you convert your disk to GPT, disable the Legacy or CSM boot from BIOS before booting.
How do I bypass system requirements in Windows 11?
All hope is not lost if your PC does not meet the system requirements to run Windows 11. You can install Windows 11 on an unsupported PC by downloading the ISO file from the official website.
Also, you can bypass the requirements by editing your registry. We have detailed steps to do this in our guide on installing Windows 11 on an unsupported CPU.
We hope our guide helped you fix all the compatibility issues, and you can finally enjoy Windows 11.
If you still have any issues or suggestions, you can address them in a comment below this article, and we will get back to you as soon as possible.
Read our disclosure page to find out how can you help Windows Report sustain the editorial team. Read more


Improve this guide

User forum
12 messages