Fix: Windows 7 to Windows 10/11 upgrade black screen
Since support for Windows 7 has ended, many users are now forced to upgrade to the next best alternative: Windows 10. There are many advantages to Windows 10, and unless you’ve bought Extended Support, you’ll need to learn how to upgrade from one to another eventually.
However, some users have been reporting problems with the upgrade process. It would seem that they re getting a black screen when trying to upgrade from Windows 7 to Windows 10.
[…] I upgraded my Windows 7 netbook to Windows 10, but sadly, it did not work, only a black screen keeps on appearing whenever I restart it. […]
There are many reasons why this black screen may occur, that is why we’ve compiled a list of solutions that address each of these problems.
How can I get rid of the black screen issue?
1. Check the registry
- Boot the PC in Safe Mode
- Press Start
- Select Run
- Type in regedit.exe and select OK
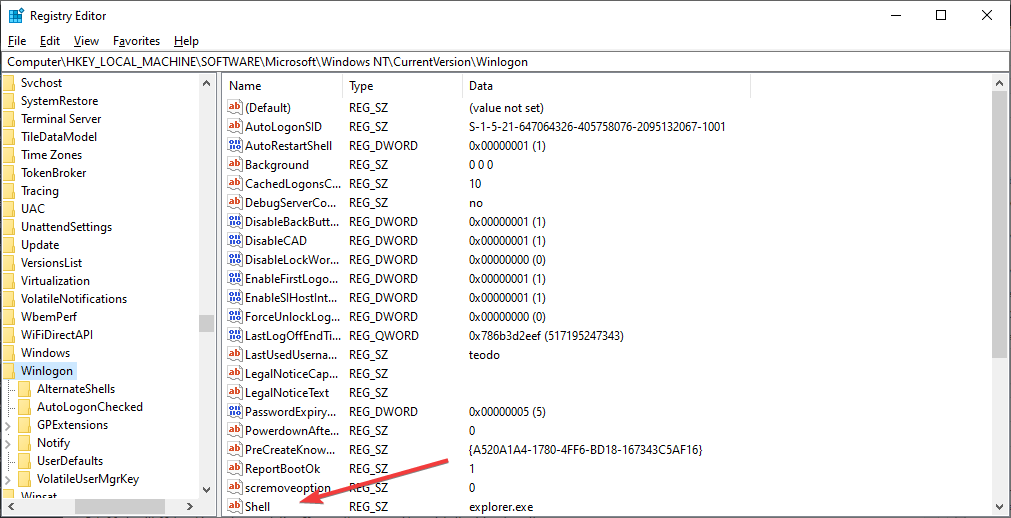
- Go to the following registry key:
- HKEY_LOCAL_MACHINESOFTWAREMicrosoftWindows NTCurrentVersionWinlogon
- Select the key and click on Shell
- If the shell value is not explorer.exe, double-click Shell
- Go to Value data, type in explorer.exe, and press OK
- Restart your PC
Do modifying registries seem too difficult? Why not use these tools that make it all easier!
2. Check your video drivers
When you upgrade from Windows 7 to Windows 10, the driver for your display adapter may no longer be supported by the newer OS. This is especially the case if you have an older PC.
More so, it can simply be a case of your driver being outdated. Since you cannot update the driver without actually seeing the screen, your only option is to try booting your PC in Safe Mode with Networking or low resolution. You can then proceed to update the driver from there.
- Turn off your PC 3 times in a row while booting
- The PC should go to the Recovery Environment because of the failed boot attempts
- Select Troubleshoot
- Select Startup Settings
- Restart
- When it restarts, choose Safe Mode with networking or try Low-Resolution Video
- Open the Device manager once you’ve booted
- Select the Display adapter
- If you have multiple display adapters, try disabling them one at a time, and look to see if that fixes the problem
- If you only have one display adapter, uninstall the display driver and then reboot
- Go to the manufacturer’s website, get the latest driver, and follow the on-screen instructions to install it.
3. Issues with the peripherals
If you upgrade from Windows 7 to Windows 10 and you get a black screen but can still see the cursor, remove all peripherals from the PC.
If the screen remains black and you can see the cursor, repeat the steps written in the previous solution.
If that works, plug them back in one at a time, and then proceed to update all peripheral drivers if available.
4. Issues with the driver for your display adapter
When upgrading from Windows 7 to Windows 10, your pc may change where it sends the signal from the display adapter. These include changes such as from HDMI to DVI, or DisplayPort to VGA.
Thus, if you have a desktop PC and have multiple ports, try them all or use adapters to see if that fixes the issue.
By following these steps, you should be able to get rid of any black screen issues when upgrading from Windows 7 to Windows 10.
Did you too encounter a similar problem? tell us about it in the comment section below.
RELATED ARTICLES YOU SHOULD CHECK OUT:
Read our disclosure page to find out how can you help Windows Report sustain the editorial team. Read more


Improve this guide


User forum
0 messages