Fix: Tablet Won't Verify Device in Windows 8.1
![]() 3 min. read
3 min. read
![]() Updated on
Updated on
Share this article
Improve this guide
Read our disclosure page to find out how can you help Windows Report sustain the editorial team Read more
If you have issues with your Windows 8.1 tablet and it signs you out of applications then you came to the right place. After following the tutorial in this article you will manage to fix your tablet and be able to verify your device normally as you did in the past using the Windows 8.1 operating system.
Usually the verification procedure stops responding after you do a system refresh or an update to the Windows 8.1 operating system but the steps you need to do in this article are as simple as they can get. Basically we will start by doing a verification procedure using the Windows 8.1 system settings and if this does not solve your issue we will also switch from the live account you use to the local account and back again.
Tutorial on how to solve your tablet verify device feature in Windows 8.1
First Step:
- Move the mouse cursor over to the upper left side of the screen.
- from the menu that appears left click or tap on the “Settings” feature.
- From the Settings sub menu left click or tap on the PC settings feature.
- Now left click or tap on the “Accounts” option you have in the menu.
- Find and left click or tap on the “Verify” button you get in the Accounts window you opened.
- In the lower left side of this window you will need to find and left click or tap on the “Cancel update” feature.
- You should now have a new email address you have set as a backup in front of you.
- Left click or tap on the “OK” button to proceed.
- Now go and log in to the email you had as a backup in the previous email.
- Copy and paste the code you get on your email into the verification window in Windows 8.1.
- Now after you successfully verified the account please reboot the operating system.
- After the device starts check again if you can log in to your applications normally.
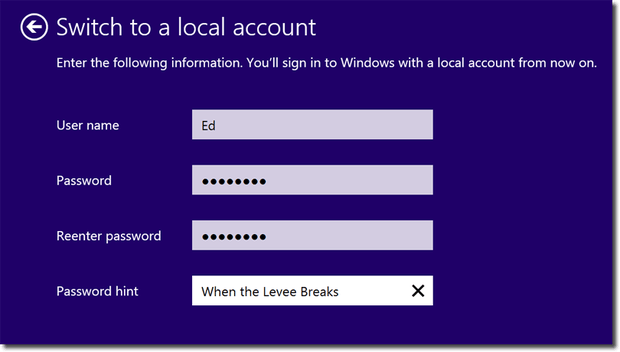
Second Step:
- Left click again on the PC settings feature you accessed in the step above.
- Left click or tap on the “Accounts” feature to open it.
- Now you will need to find and left click or tap on the “Disconnect” button.
- From here you will need to change your account status to “Local”.
- In this next window write the email address from your Windows Apps.
- Now write in again the email and the password.
- If another email address appears as a backup you can leave it like this and left click or tap on the “OK” button.
- Now the activation code should be send to your email address.
- Please log in to your email address and copy the code to this window.
- After you successfully made the activation reboot again the operating system.
- Check again to see if you can normally log in to your accounts in Windows 8.1
And you are done, if you carefully followed the steps above you will have manage to fix your accounts in Windows 8.1 and get back to your normals day work. If you do run into any more issues along the way in this tutorial please write us in the comments section of the page below and me or my colleagues will help you further as soon as possible.
READ ALSO: How to Calibrate Screen Color, Contrast, Gamma and Brightness in Windows 10


User forum
0 messages