Fix: XP-PEN Pen Pressure is Not Working in Photoshop
You may have to reinstall the device after every update
5 min. read
Published on
Read our disclosure page to find out how can you help Windows Report sustain the editorial team. Read more
Key notes
- When XP-PEN pressure is not working in Photoshop, create a PSUserConfig.txt file or reconfigure Windows Ink Workspace.
- The problem usually appears due to misconfigured settings or hardware issues.
- Read this guide to find out how our experts fixed things in no time!
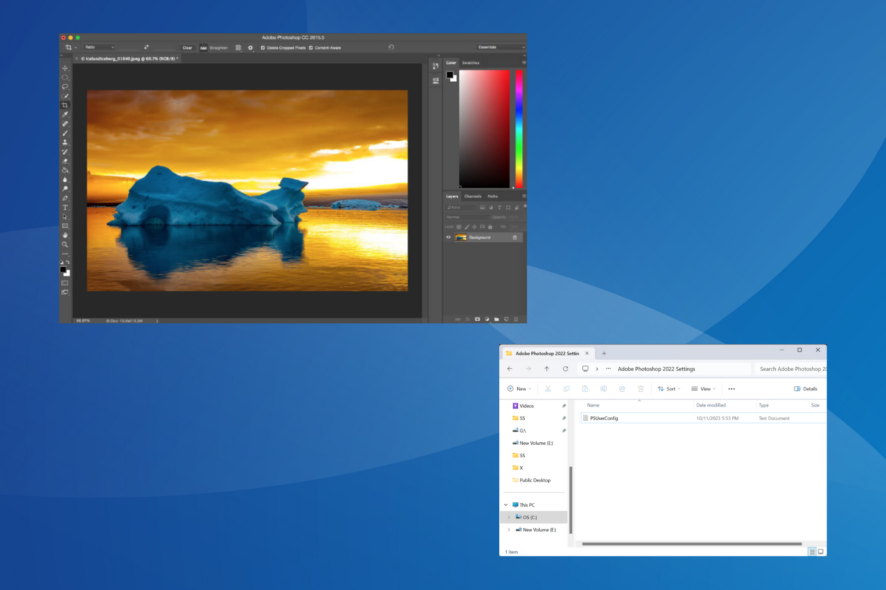
While the excitement of getting a new drawing tablet supersedes anything, issues with it are not uncommon, and many have, for long, reported that XP-PEN pressure is not working in Photoshop.
The problem is present across models, be it XP-PEN Artist or the Deco series, and usually has to do with an issue at the user’s end. It could be the misconfigured pressure settings, outdated drivers, or a Windows Ink issue to blame.
Is XP pen pressure sensitive?
Yes, all styluses for XP-PEN tablets support pressure sensitivity, as per the information available on the official website. Most have 8192 levels, while in a few of the latest models, such as Artist Pro 16, there are 16384 pressure levels.
How do I fix XP-PEN pen pressure in Photoshop?
Before we start with the slightly complex solutions, try these quick ones:
- Restart Photoshop, or simply reboot both the computer and the XP-PEN drawing tablet.
- Update Adobe Photoshop.
- Replace the nib on your XP-PEN tablet.
- Make sure pressure control is enabled in Adobe Photoshop. There’s a dedicated button in the menu bar, which, when hovered on reads, Always allow pressure for size. When off, brush presets control pressure.
If none work, move to the fixes listed next.
1. Create a PSUserConfig.txt file
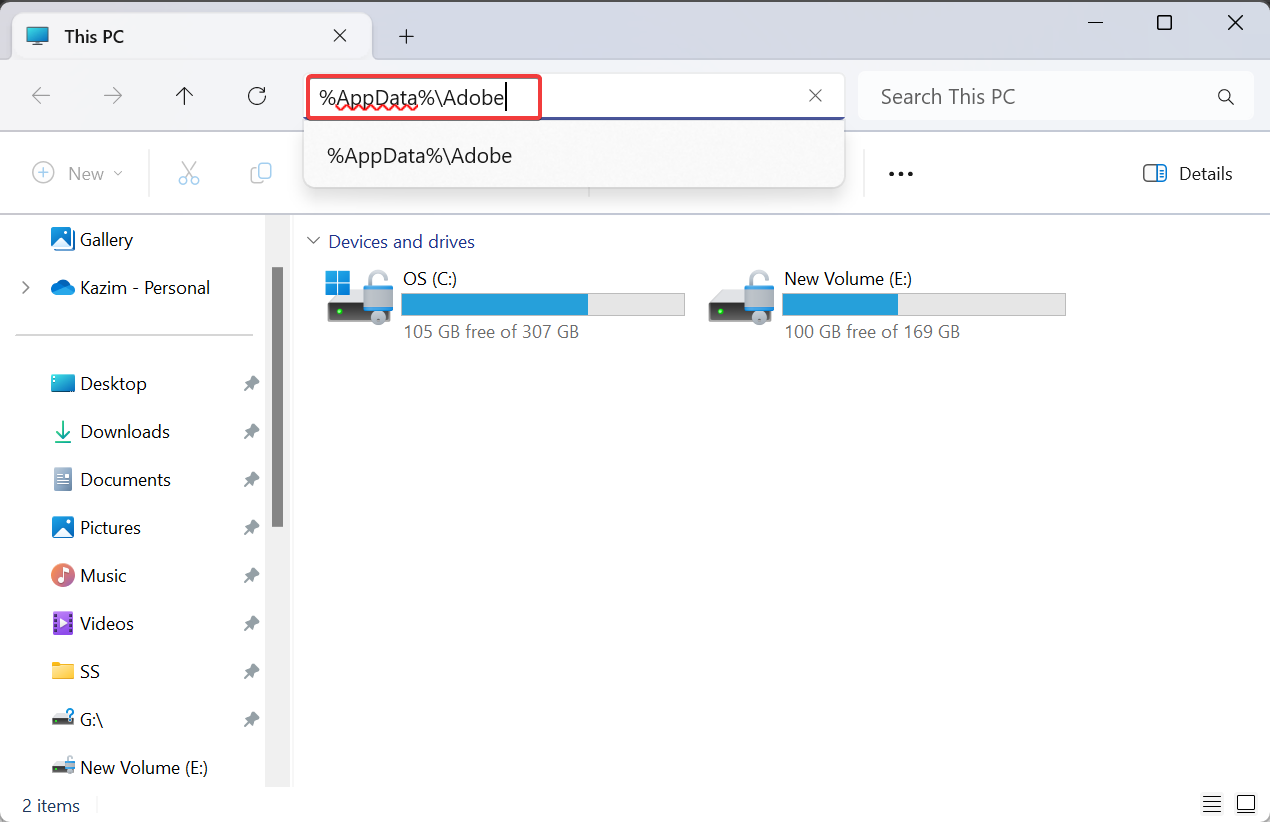
- Press Windows + E to open File Explorer, paste the following path in the address bar and hit Enter:
%AppData%\Adobe - If you can’t find the AppData folder, make sure the hidden items are visible.
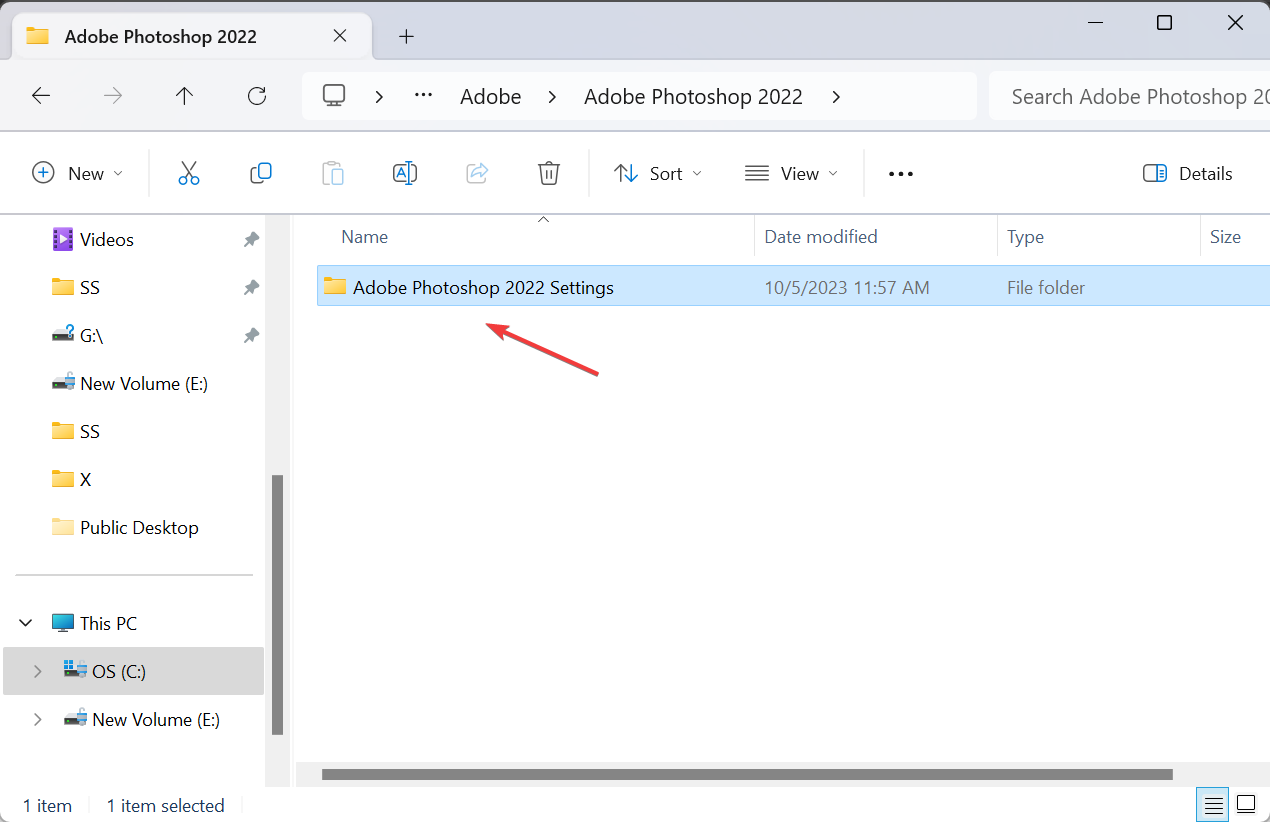
- Now, double-click the folder for the latest Adobe version, and then open the Abobe Photoshop Settings folder.
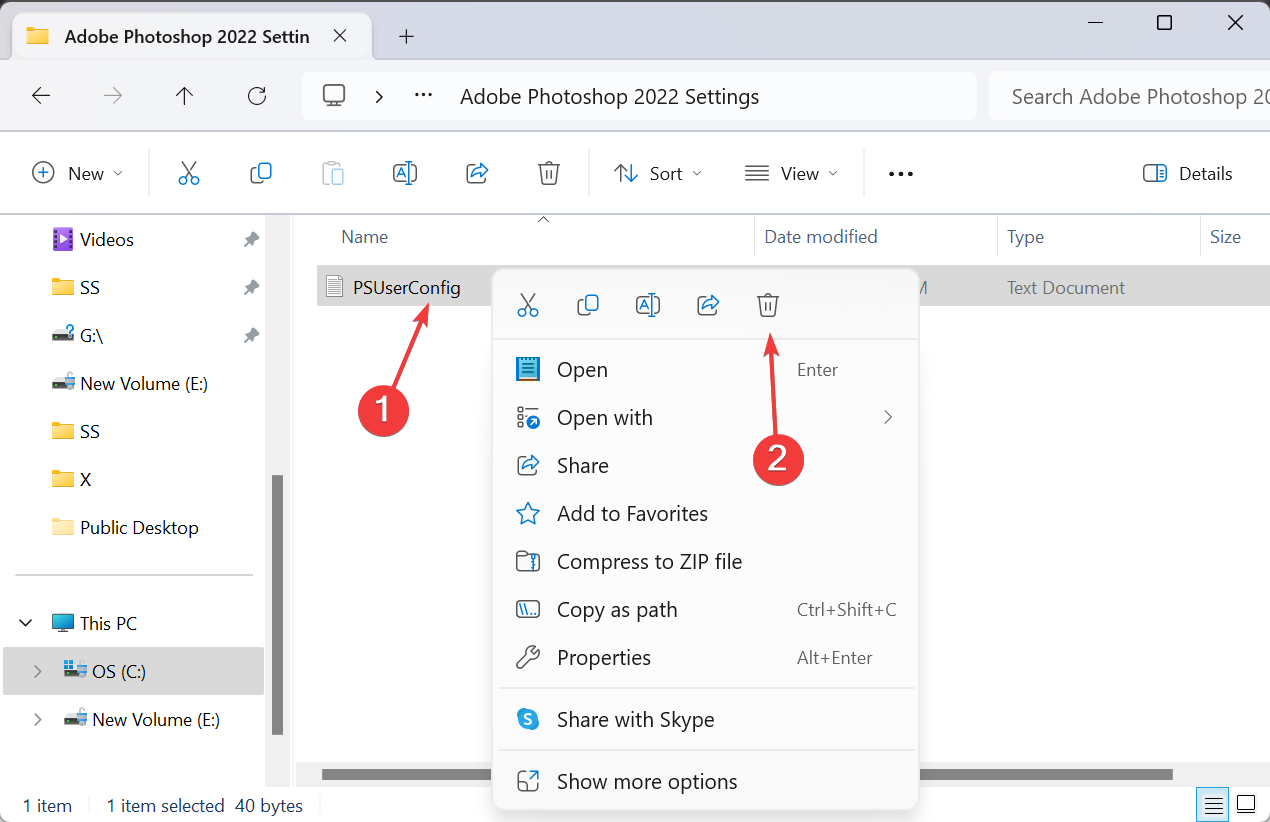
- Check if a PSUserConfig.txt file exists there. If yes, right-click on it, and choose Delete.
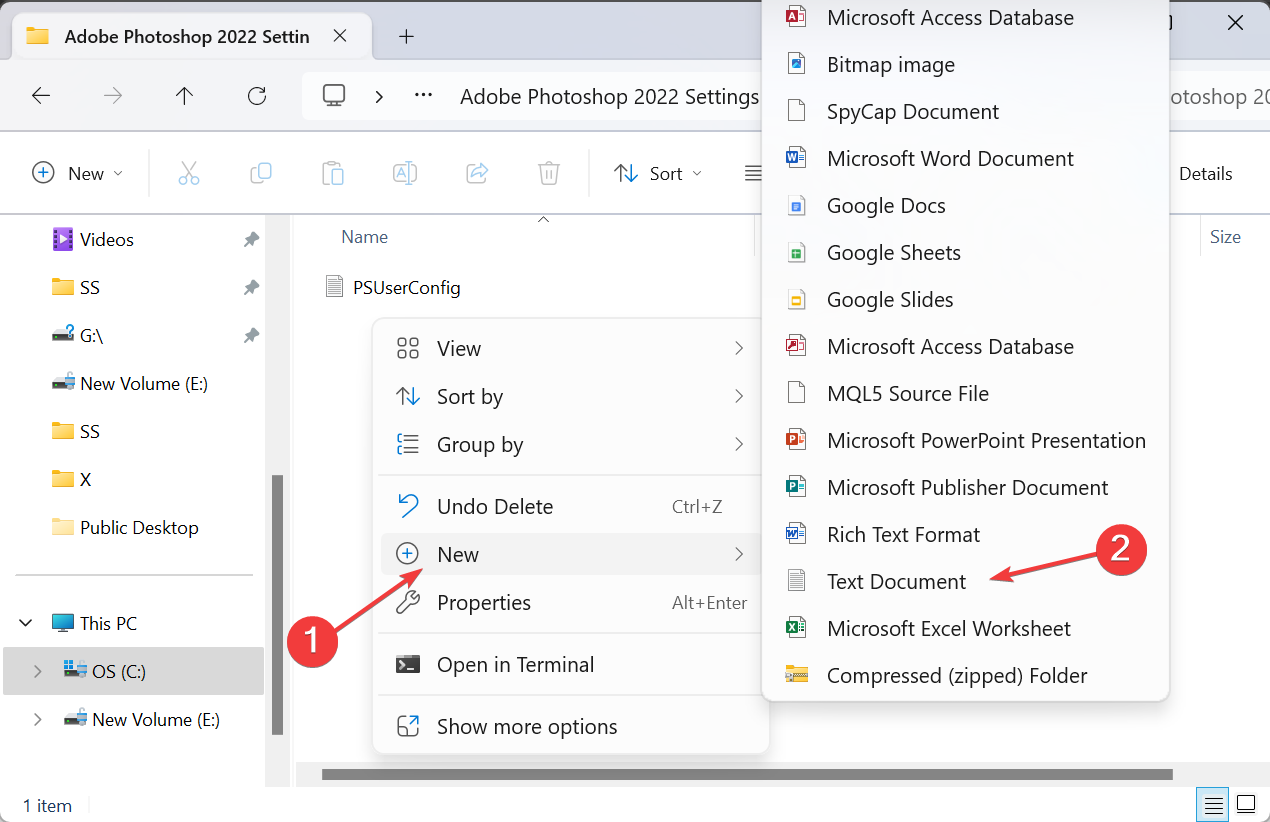
- Again, right-click in the File Explorer, hover the cursor over New, select Text Document, and name it PSUserConfig.txt.
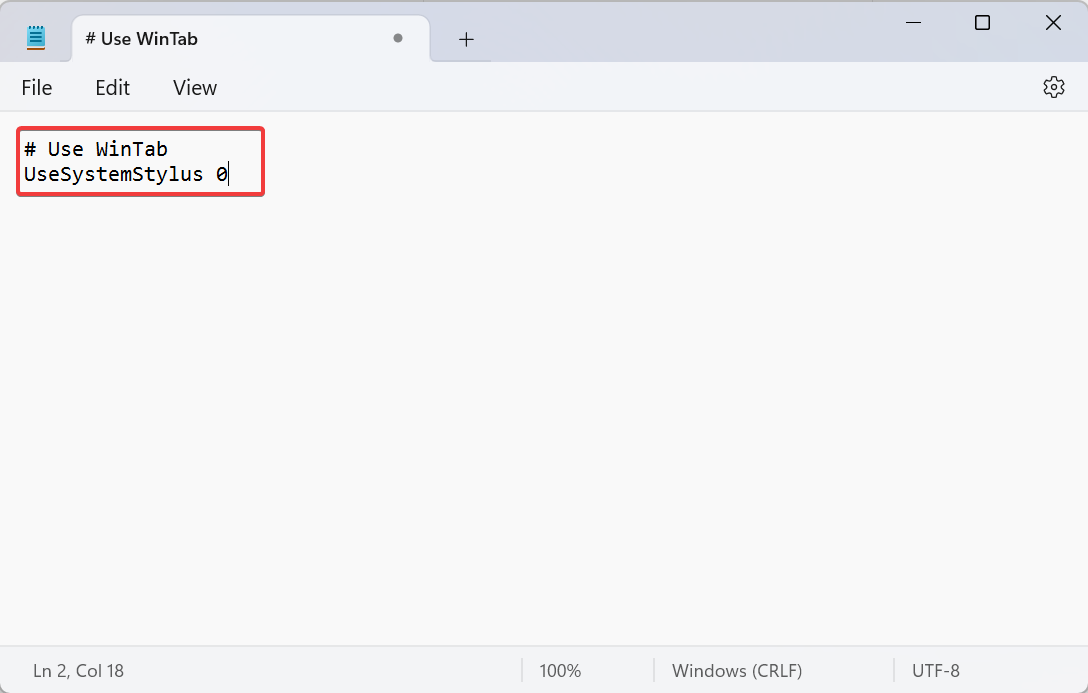
- Open the file, and paste the following code in it:
# Use WinTab
UseSystemStylus 0 - Now, press Ctrl + S to save the changes, and close the Notepad.
- Relaunch Adobe and check whether the XP-PEN pressure issue is fixed.
2. Turn on Pen Pressure in Photoshop
- Launch Photoshop, and press B or click the Brush tool icon in the toolbar.
- Click the Window menu, and choose Settings.
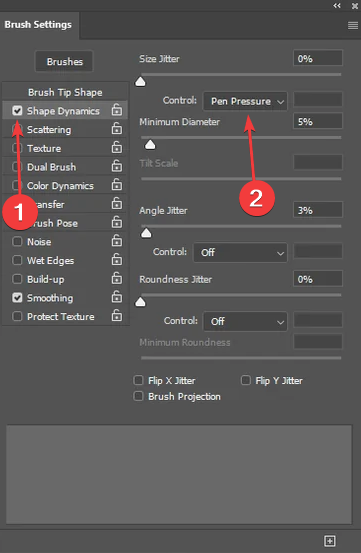
- Tick the checkbox for Shape Dynamics from the left, and then select Pen Pressure from the Control dropdown menu.
- Verify whether the pen pressure functionality now works in Adobe Photoshop.
For your stylus to adjust the width based on pen pressure, the functionality has to be manually enabled in Adobe Photoshop. Remember, this applies across drawing tablets, even when Wacom pen pressure is not working.
In case selecting Pen Pressure shows a warning sign that reads, Control by pen pressure requires the use of a pressure sensitive tablet, make sure you install the latest XP-PEN drivers.
3. Enable Windows Ink in the XP-PEN app
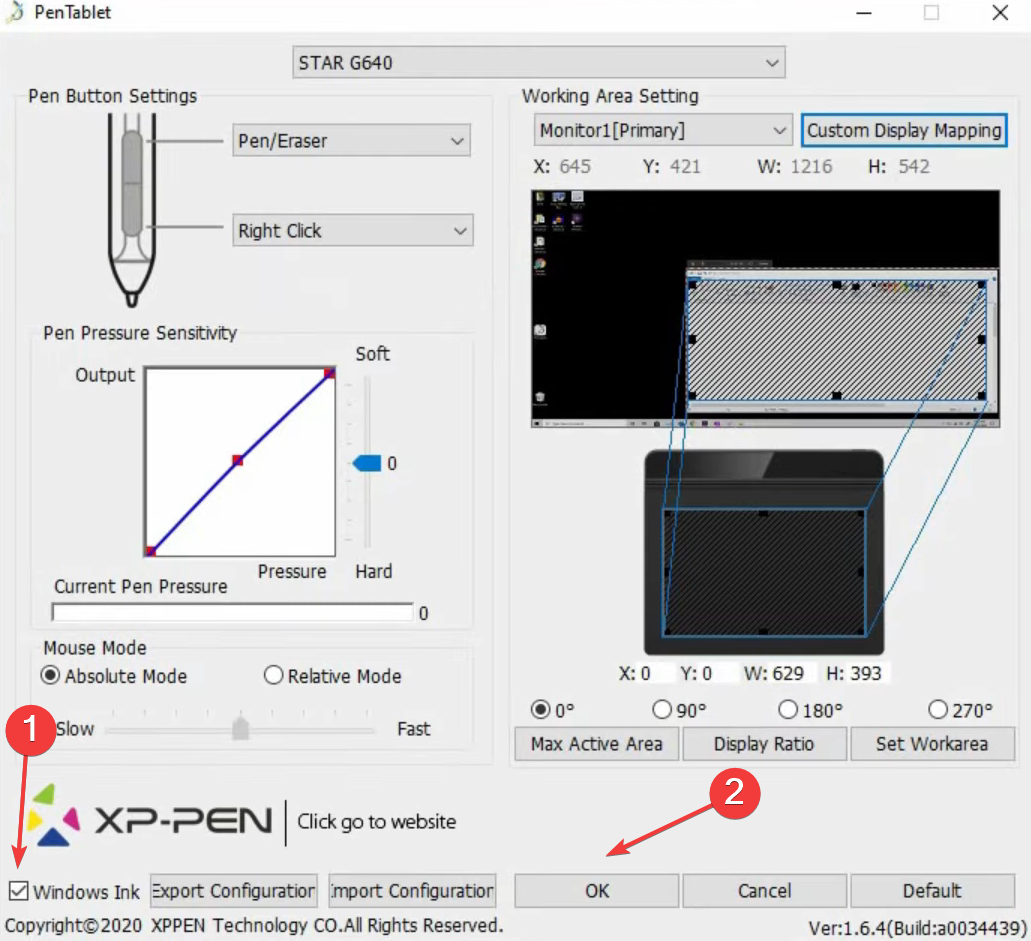
- With the XP-PEN connected to the PC, click on the icon in the device icon in the System Tray near the bottom right of the desktop.
- Now, tick the checkbox for Windows Ink, and click OK to save the changes.
4. Reinstall the XP-PEN device
- Press Windows + X to open the Power User menu, and select Device Manager from the list of options.
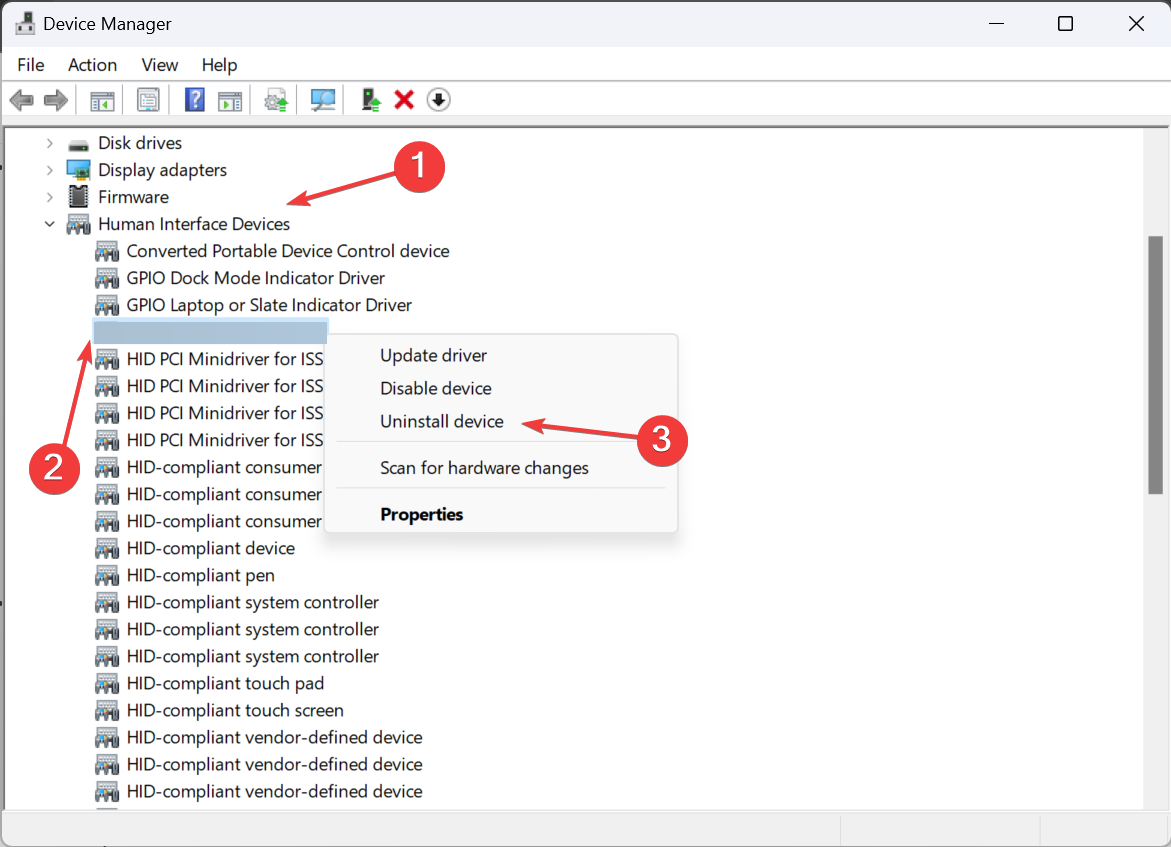
- Expand the Human Interface Devices entry, right-click on the XP-PEN tablet, and select Uninstall device. If the graphics tablet is not listed here, expand the other entries.
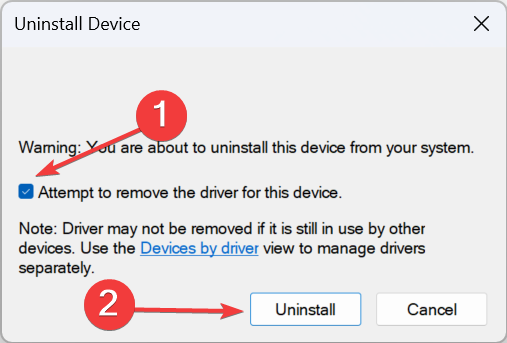
- Now, tick the checkbox for Attempt to remove the drivers for this device, if it is available, and then click Uninstall.
- Once done, restart the computer, and check whether Windows has automatically installed the drivers. If not, get it from the XP-PEN’s official website.
5. Update the XP-PEN driver
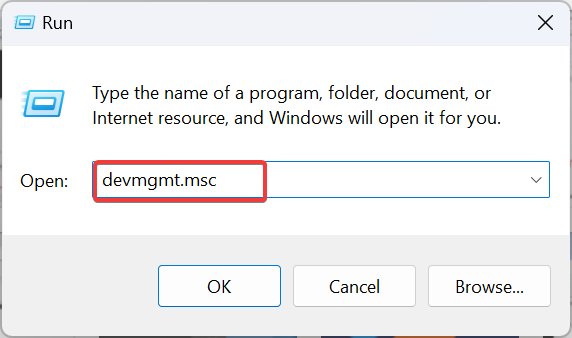
- Press Windows + R to open Run, type devmgmt.msc in the text field, and hit Enter.
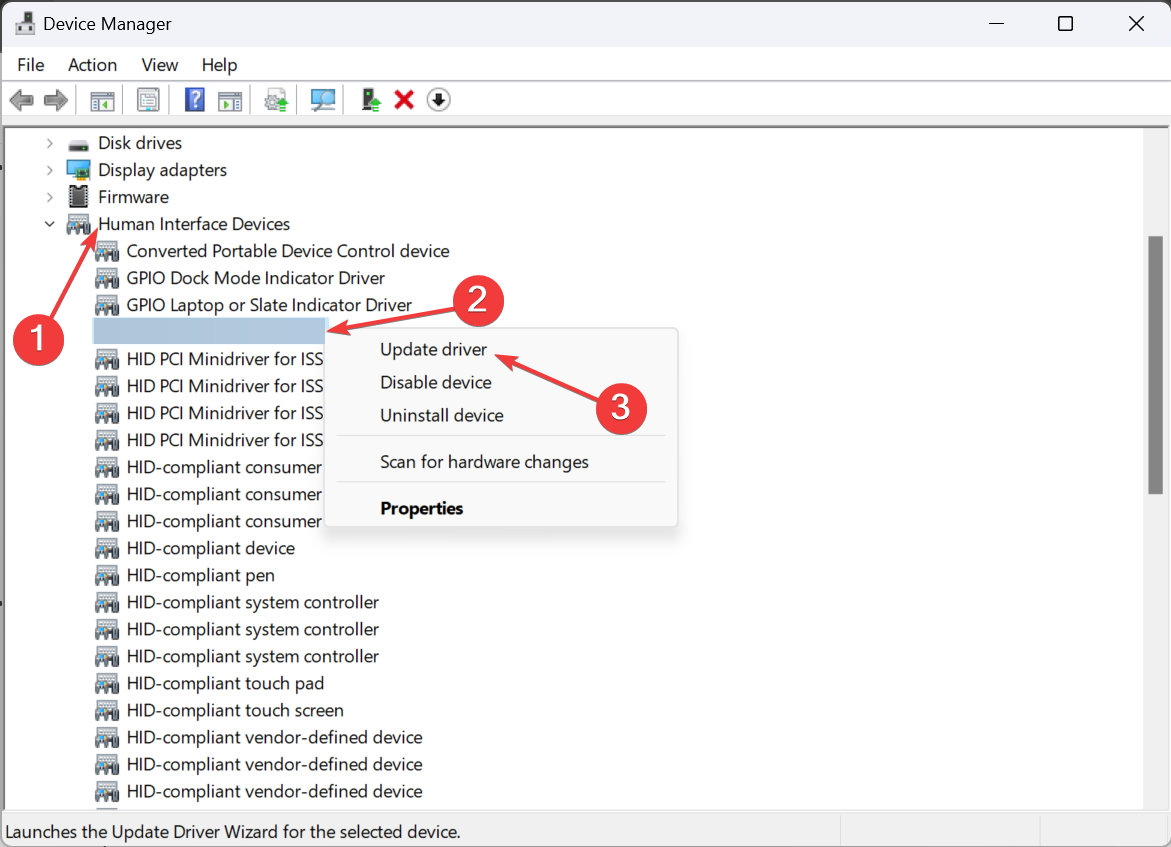
- Find the XP-PEN display tablet here, right-click on it, and select Update driver. The tablet is usually listed under Human Interface Devices.
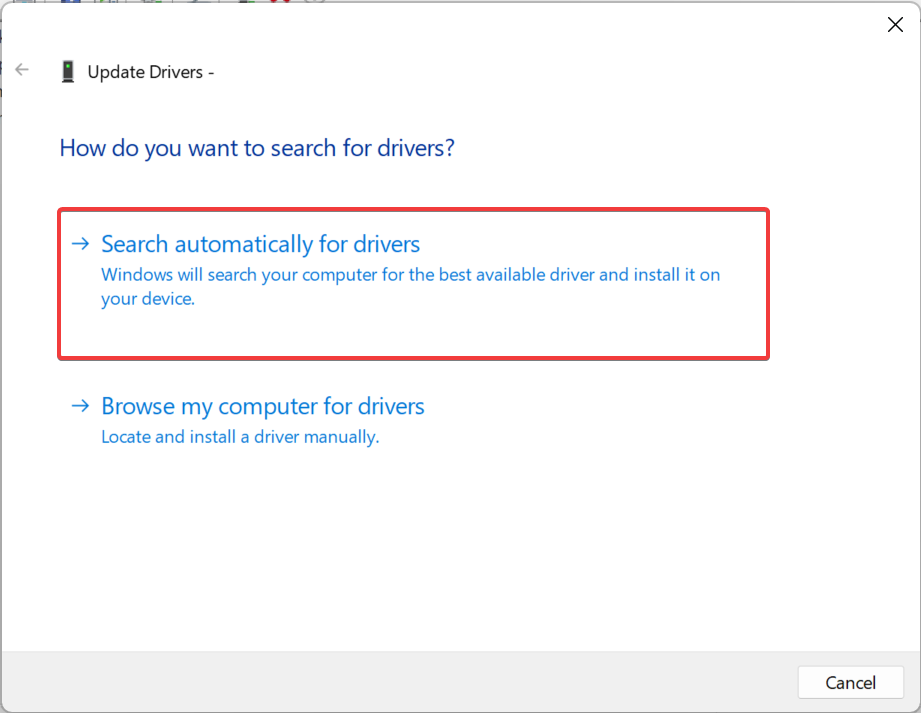
- Choose Search automatically for drivers and wait for Windows to install the best version available locally.
- Restart the computer and check for improvements.
When the XP-PEN pressure is not working in Photoshop, it could always be the driver to blame. And updating them does the trick! It’s also an effective fix when Huion pen pressure is not working.
And if Windows can’t find one, check the official website, choose your tablet model, download the latest version, and then manually install the driver.
6. Enable/Disable Windows Ink Workspace
- Press Windows + R to open Run, type regedit in the text field, and click OK.
- Click Yes in the UAC prompt.
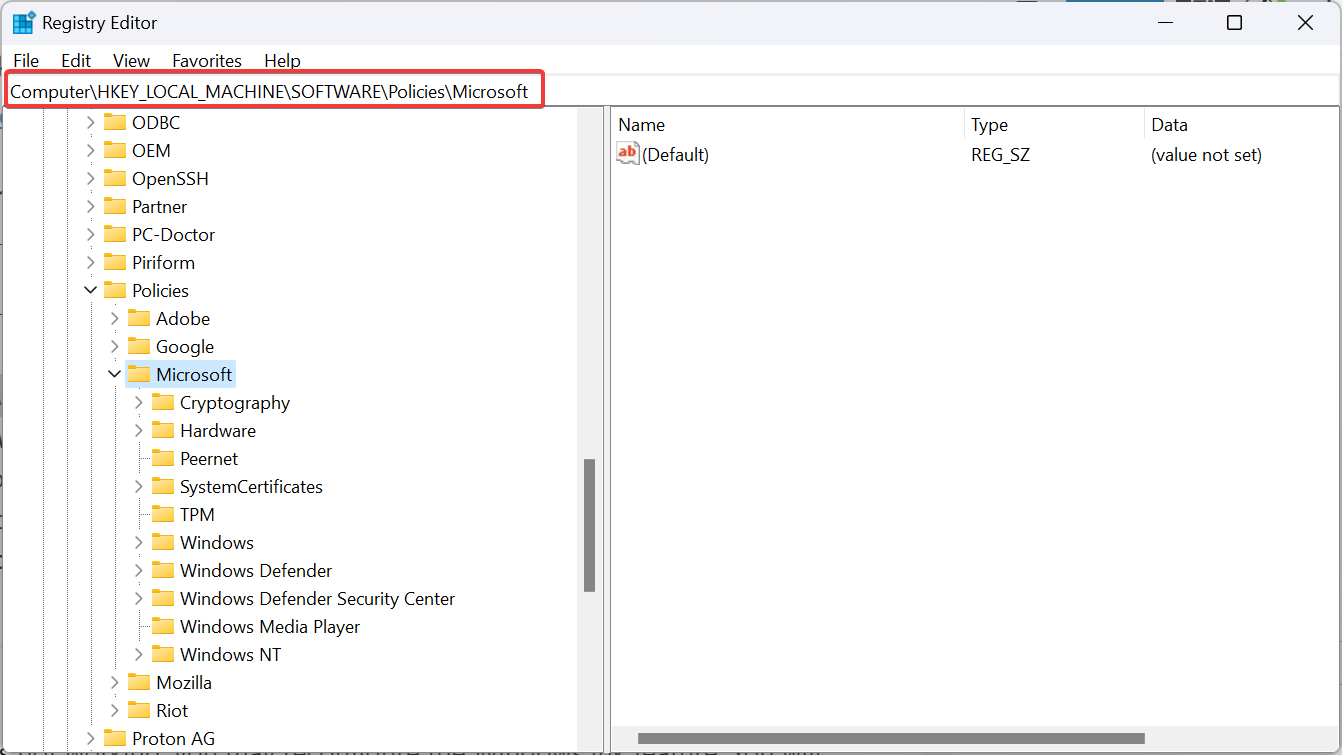
- Navigate the following path or paste it in the address bar and hit Enter:
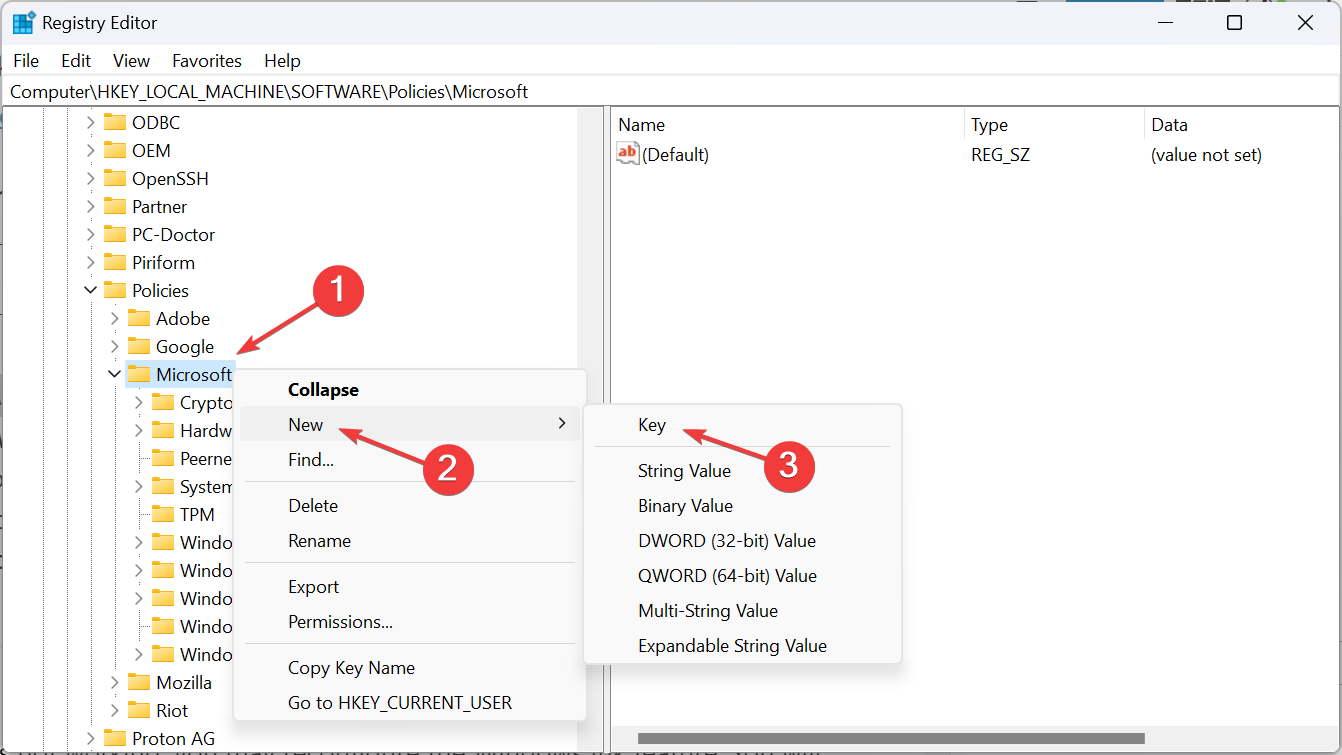
HKEY_LOCAL_MACHINE\SOFTWARE\Policies\Microsoft - Double-click the WindowsInkWorkspace key. If it doesn’t exist, right-click on the Microsoft key, hover the cursor over New, choose Key, and name it WindowsInkWorkspace.
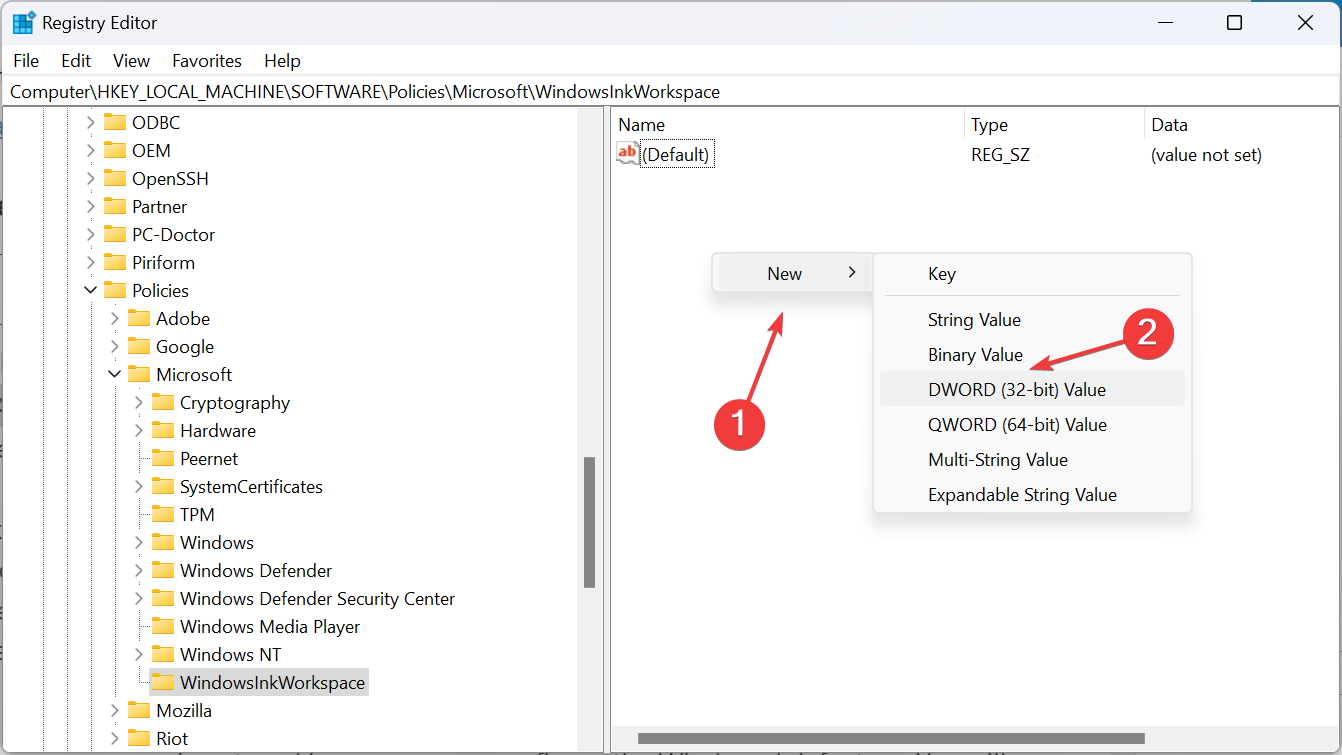
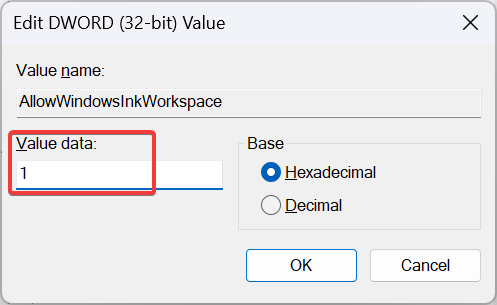
- Now, right-click on the empty portion, select New from the context menu, choose DWORD (32-bit) Value, and name it AllowWindowsInkWorkspace.
- Double-click the DWORD.
- The digit 1 under Value data enables the feature, while 0 disables it. Enter either and click OK to save the changes.
When the Photoshop pen pressure is not working, you may reconfigure the Windows Ink feature. You will have to try both enabling and disabling it since the two worked for users. And this should eliminate all issues with pen pressure!
If XP-PEN has no pressure in Photoshop or the line width is not proportional to the applied pressure, it usually has to do with how things are configured. But you should be able to get pen pressure sensitivity working through either the PSUserConfig.txt files or through the latest drivers.
Besides, many users found that XP-PEN is detected as a keyboard, which, too, is a driver-related problem.
For any queries or to share what worked for you, drop a comment below.



User forum
0 messages