9 Easy Ways to Fix Dxgkrnl.sys BSOD Error in Windows 10
Resolve this BSOD error with our expert solutions
Key notes
- The dxgkrnl.sys Windows 10 error usually happens due to driver problems.
- Using third-party software that restores your files will quickly fix the dxgkrnl.sys blue screen.
- Turning it off in the NVIDIA settings should also eliminate the issue if you’re using SLI.
- Some users suggested updating your Windows 10 and hardware drivers to the latest versions.
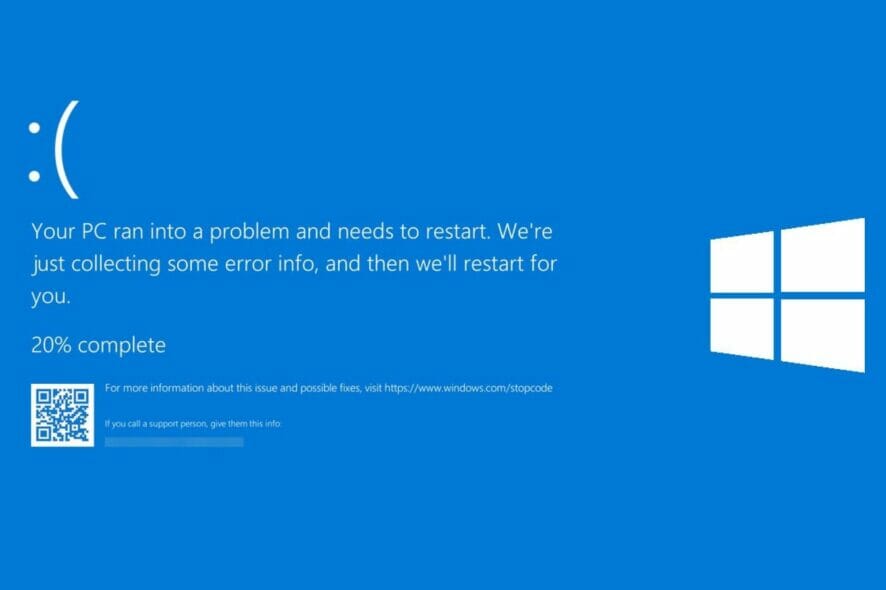
Blue Screen of Death errors can cause many problems, and users have reported that file DXGKRNL.sys causes these issues on Windows 10.
They’re unpleasant and unlikely to get solved out of the blue. If you experience such an error, let’s see how to fix it quickly.
Here are some more examples of this problem:
- dxgkrnl.sys failed – When facing this issue, check if there is any hardware failure that requires your attention.
- dxgkrnl.sys dpc latency Windows 10 – Is this your problem as well? Then, make sure to keep your Windows 10 and graphics card drivers updated.
- dxgkrnl.sys Windows 10 won’t boot – In this case, don’t hesitate to run the SFC scan and get further answers.
- driver_irql_not_less_or_equal dxgkrnl sys – When bothered by this error, the first thing you should do is turn off Nvidia Surround.
What causes the DXGKRNL.sys BSOD?
The DXGKRNL.sys BSOD is usually encountered when running an outdated version of DirectX. And to update DirectX, you need to update the graphics driver installed on the PC.
Besides, other underlying causes for the error include corrupt system files, problematic drivers, or connecting incompatible hardware to the PC. But these are unlikely scenarios, and the error usually involves the graphics driver.
How can I fix the BSOD error caused by DXGKRNL.sys?
1. Use a third-party BSoD fixer
The easiest and least consuming way to fix the blue screen DXGKRNL.sys in Windows 10 is by installing a third-party repair app that will do it for you.
The software can automatically scan your device for problematic files and restore or replace them with healthy ones, thus keeping your system up and going.
2. Disable SLI
- Open the Nvidia Control Panel.
- Go to 3D Settings from the navigation pane, and click on Configure SLI, Surround, PhysX.
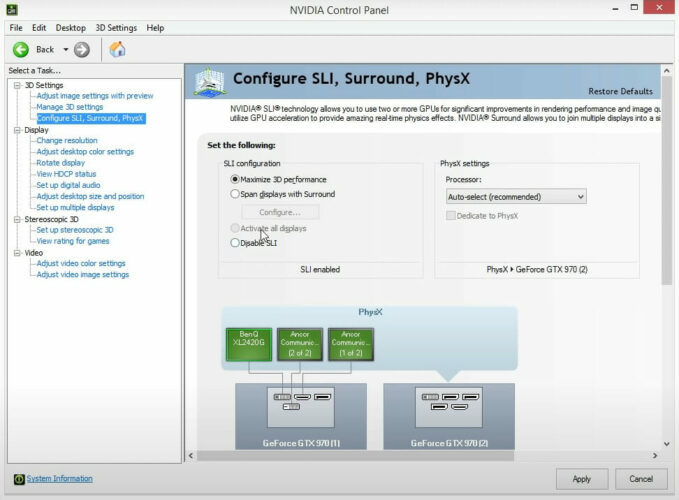
- Make sure the Disable SLI option is selected, and click Apply to save the changes.
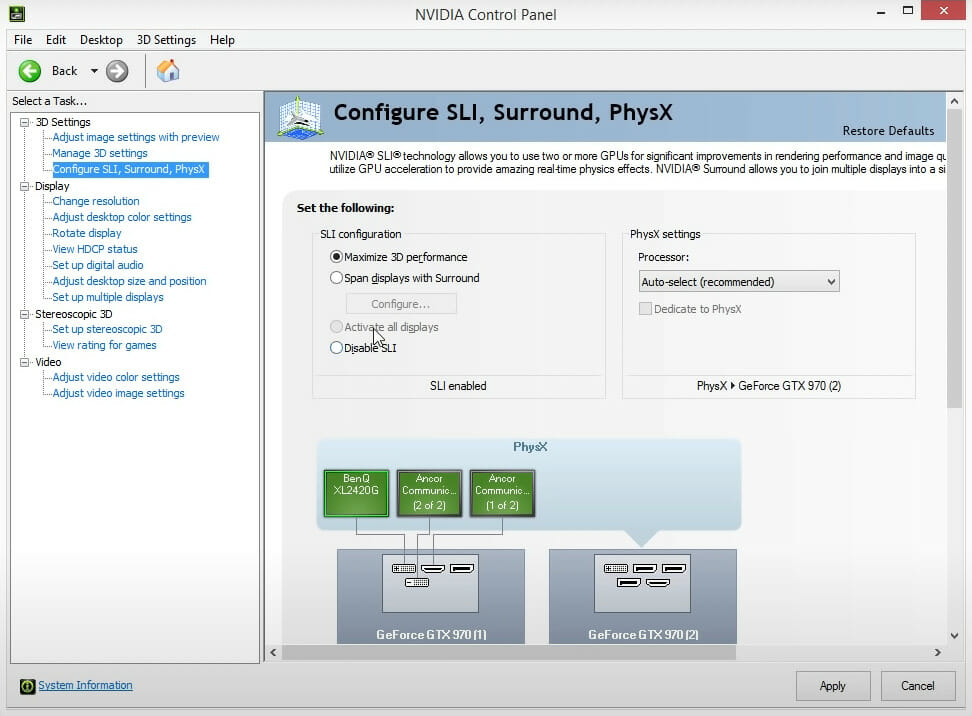
Many gamers use two Nvidia graphics cards in SLI mode for better performance. Although this sounds great, it has been reported that SLI can cause the system_service_exception DXGKRNL.sys error.
There’s a memory leak in VRAM when you use SLI on Windows 10, so to fix this issue, it’s advised that you disable SLI.
After disabling SLI on your computer, verify if the DXGKRNL.sys fatal error is fixed.
3. Turn off Nvidia Surround
Nvidia Surround is a feature on Nvidia GPUs that lets you enjoy a 3D experience on multiple monitors.
Although this sounds like a fantastic feature for gamers, this feature has led to issues on Windows 10 and the System_Service_Exception DXGKRNL.sys BSOD error.
So far, the only solution is to turn off Nvidia Surround to fix this error. However, we also have to mention that sometimes Nvidia Surround can’t be turned off easily, and users have suggested using the CTRL + ALT + S or CTRL + ALT + R shortcut to turn it off.
If the shortcut isn’t working for you, try unplugging other monitors and booting with only one monitor plugged in. When you do that, the Nvidia Surround should be turned off automatically.
4. Keep your Windows 10 and GPU drivers updated
It has been reported that the graphics card driver causes this issue. Do you happen to you use the Nvidia graphic card? You should make sure you’re using the latest GPU driver available.
If you want to download any driver easily, you should install a third-party driver updater that will scan your PC for compatible hardware and software and then install the latest drivers.
All you have to do is choose whether to update all of the drivers at once or individually if you have reasons not to install specific ones.
5. Change graphics memory size in BIOS
- Restart your computer and keep pressing Del, F2, or F10 while your computer boots. The specific key may be different on your computer and should be listed during boot, or you can verify the same from the system manufacturer’s website.
- The Advanced, Advanced Chipset, or Advanced Features menu must be found.
- Locate Graphics Settings or Video Settings and change the memory size to 128 MB or more.
If you’re using integrated graphics, you might be able to fix this BSOD error by changing the graphics memory size in BIOS.
Users have reported successfully fixing errors caused by DXGKRNL.sys on ASUS laptops with integrated Intel HD 4400 graphics.
This solution should work for any other laptop or integrated graphic card, including DXGKRNL.sys latency AMD.
We must mention that changing the memory size for the integrated graphic card isn’t the same for all computers, and the process might be different depending on the BIOS you’re using.
6. Check for hardware malfunctions
There have been a few cases where a faulty RAM module or motherboard caused this issue. If your PC is under warranty, you might want to take it to the repair shop and have it checked for hardware malfunctions.
Since any installed hardware might be the underlying cause, the repair shop can quickly identify the one and make the necessary repairs to fix it or replace it with a functional component.
7. Run the SFC scan
- Type Command Prompt in the Search bar, and click on Run as administrator.
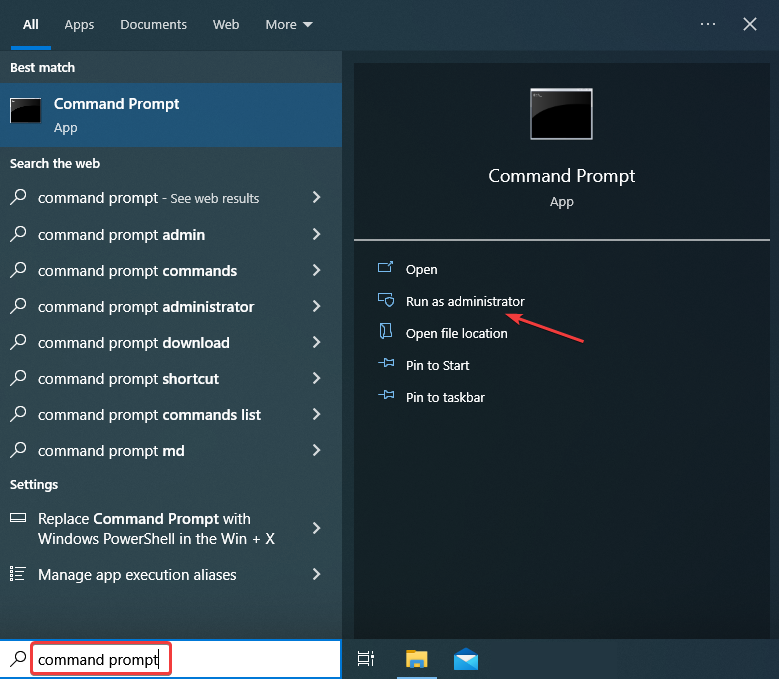
- Click Yes in the UAC prompt.
- Type in the following command, and press Enter:
sfc/scannow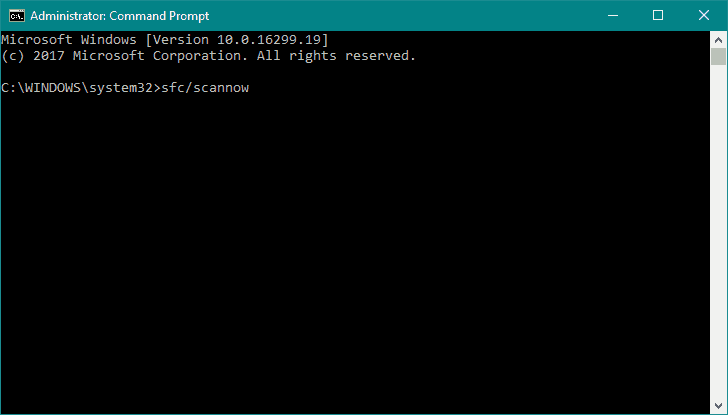
- Wait for the process to finish.
- Restart your computer.
If none of the solutions from above managed to fix the DXGKRNL.sys not loaded error, it could be the corrupt system files to blame. And in this case, the SFC (System File Checker) scan will come to your aid.
8. Run the Blue Screen Troubleshooter
 NOTE
NOTE
- Press Windows + I to open the Settings app, and click on Update & Security.
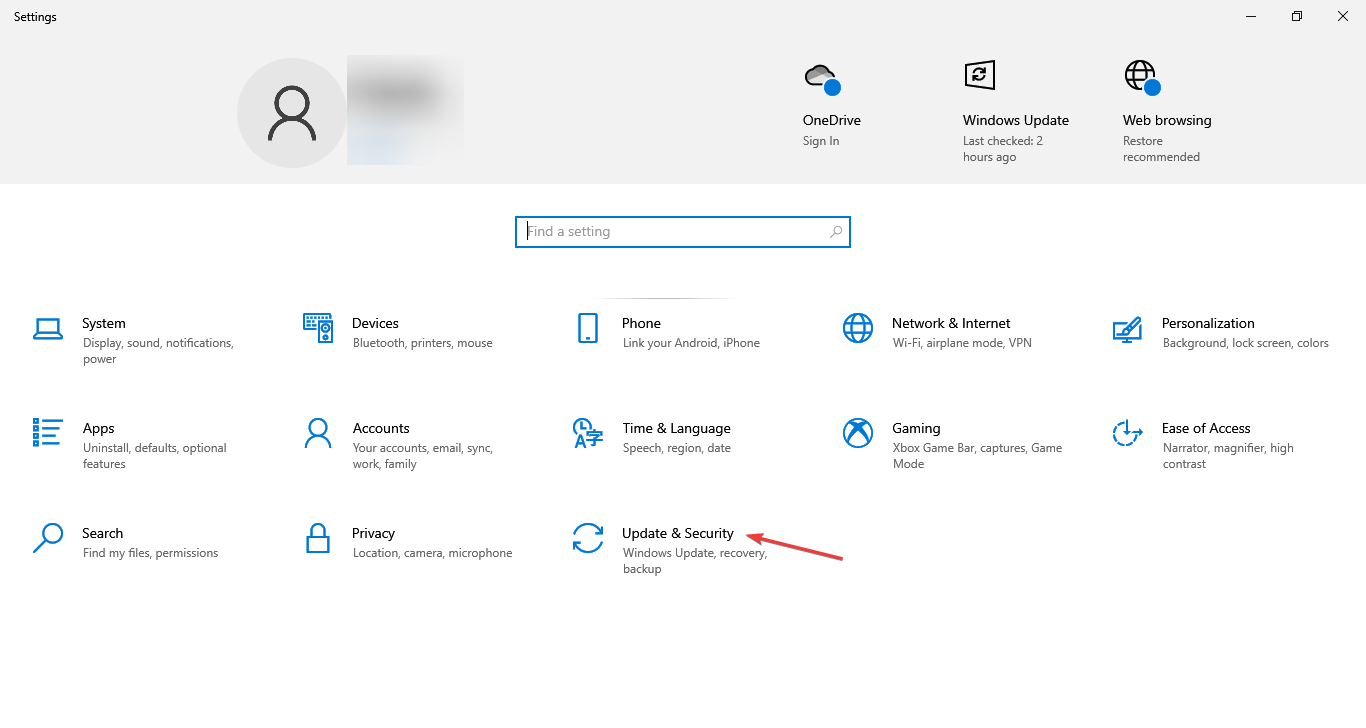
- Select Troubleshoot from the navigation pane, and click on Addition troubleshooters.

- Now, select Blue Screen, and click on the Run the troubleshooter button.
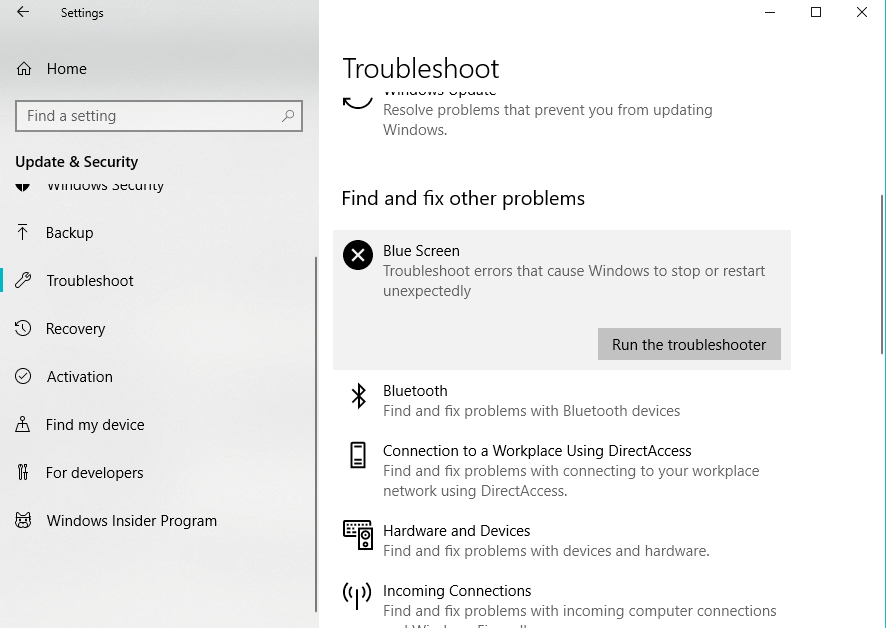
- Follow further instructions, and let the wizard finish the process.
- Restart your computer.
The following troubleshooting tool we’re going to try is Blue Screen, a built-in troubleshooter in Windows 10. After you are done with it, verify if the problem is resolved. If not, head to the final solution.
9. Run DISM
- Press Windows + R to open Run, type cmd, and hit Ctrl + Shift + Enter.
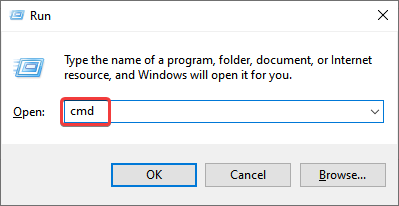
- Click Yes in the UAC prompt.
- In the command line, copy-paste these lines one by one and press Enter after each:
DISM/online/Cleanup-Image/ScanHealthDISM/Online/Cleanup-Image/RestoreHealth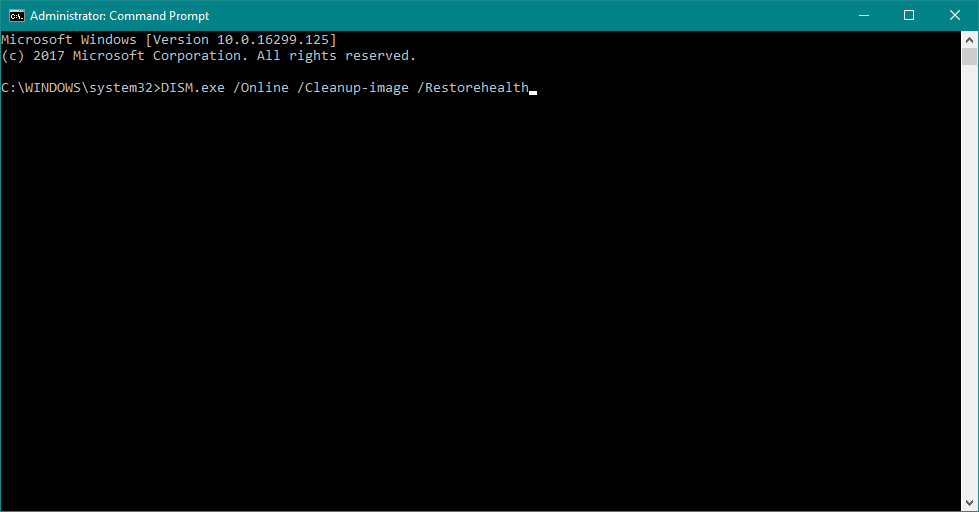
Lastly, run the DISM (Deployment Image Servicing and Management) tool. It has been found to fix many BSOD errors and might help in the case of DXGKRNL.sys.
How do I replace Dxgkrnl sys?
DXGKRNL.sys is a DirectX Kernel File with a .sys (system) extension. It’s a critical file, which, when it goes missing or is corrupt, you are bound to encounter issues.
Now, if you plan to replace it, several websites claim to offer DXGKRNL.sys for download. However, proceed at your own risk after verifying the authenticity and reliability of the source.
A simple solution in case you are getting the DXGKRNL.sys error would be to perform a System Restore, and it would get the file back to its normal state, given you choose a restore point created before the error was first encountered. Another option is to factory reset Windows.
And that’s about it! We hope one of our solutions helped you eliminate the DXGKRNL.sys BSOD error on Windows 10.
Also, please find out the location of the BSOD log file since it will help identify the underlying cause and fix things.
If you have any other questions or suggestions, feel free to leave them in the comments section below, and we will certainly check them out.
Read our disclosure page to find out how can you help Windows Report sustain the editorial team. Read more


Improve this guide


User forum
0 messages