USB Drive Not Mounting in Windows 10: How to Fix it
Check verified solutions to get the USB drive running!
5 min. read
Updated on
Read our disclosure page to find out how can you help Windows Report sustain the editorial team. Read more
Key notes
- When you connect an external USB drive, it should ideally show up, but for many users, the drive was not mounting.
- The problem arises due to a driver issue or a problem with the port it was connected to.
- To fix things, connect the drive to another port, update all the relevant drivers, or change the power settings.
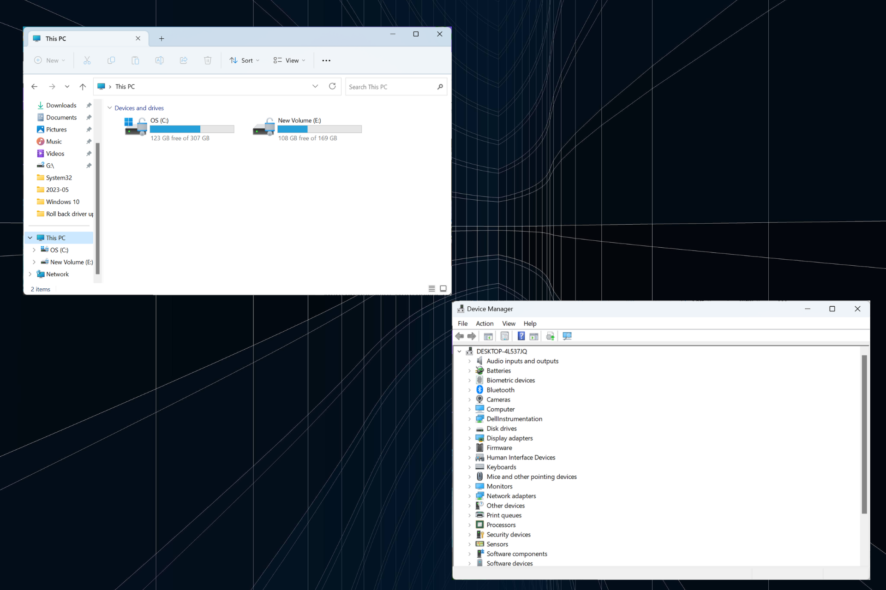
Have you ever tried to plug in your external USB drive to your computer, but it’s not mounting in Windows?
This can be problematic, especially when you urgently need the files saved in the drive or your drive is the only tool you have to save your files for use elsewhere.
The first instinct would be to unplug and plug it back through another port. However, if this doesn’t resolve the issue, then either your external USB drive has a problem, and if not, there are various solutions you can use to resolve it. Keep reading to find out!
What can I do if USB drive is not mounting in Windows 10?
Before we head to the slightly complex solutions, try these quick ones:
- Restart the computer.
- Unplug any USB hub connected to your computer and remove other devices.
- Check for any pending updates from Windows Update.
- If the external USB drive has a power switch, power it on.
- Try your external USB drive on a different computer. If it still isn’t working, then the drive has a problem.
- Sometimes Windows may ask you to format the external USB drive. Don’t do it yet because you may lose all your files. It is possible your drive was formatted on a different operating system, so you can either read it on a different OS or choose a third-party program to help you read its contents. Otherwise, if you don’t need the files, choose Format disk and proceed.
If none work, head to the fixes listed next.
1. Scan for hardware changes
- Right-click the Start button.
- Select Run.
- Type devmgmt.msc.
- The Device Manager will open, then select the USB entry.
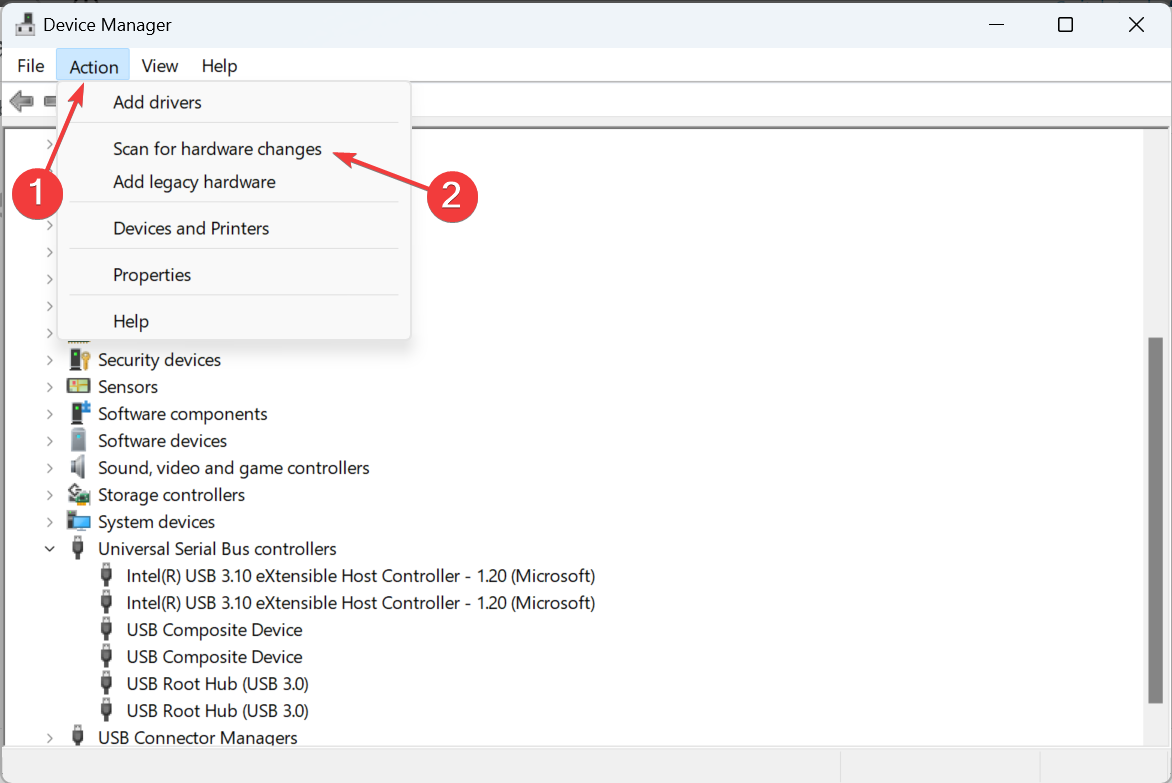
- Go to the Action tab, and select Scan for hardware changes.
If this still doesn’t resolve the issue with your external USB drive, then the next solution.
2. Uninstall and reconnect the external USB drive
- Right-click the Start button and select Device Manager.
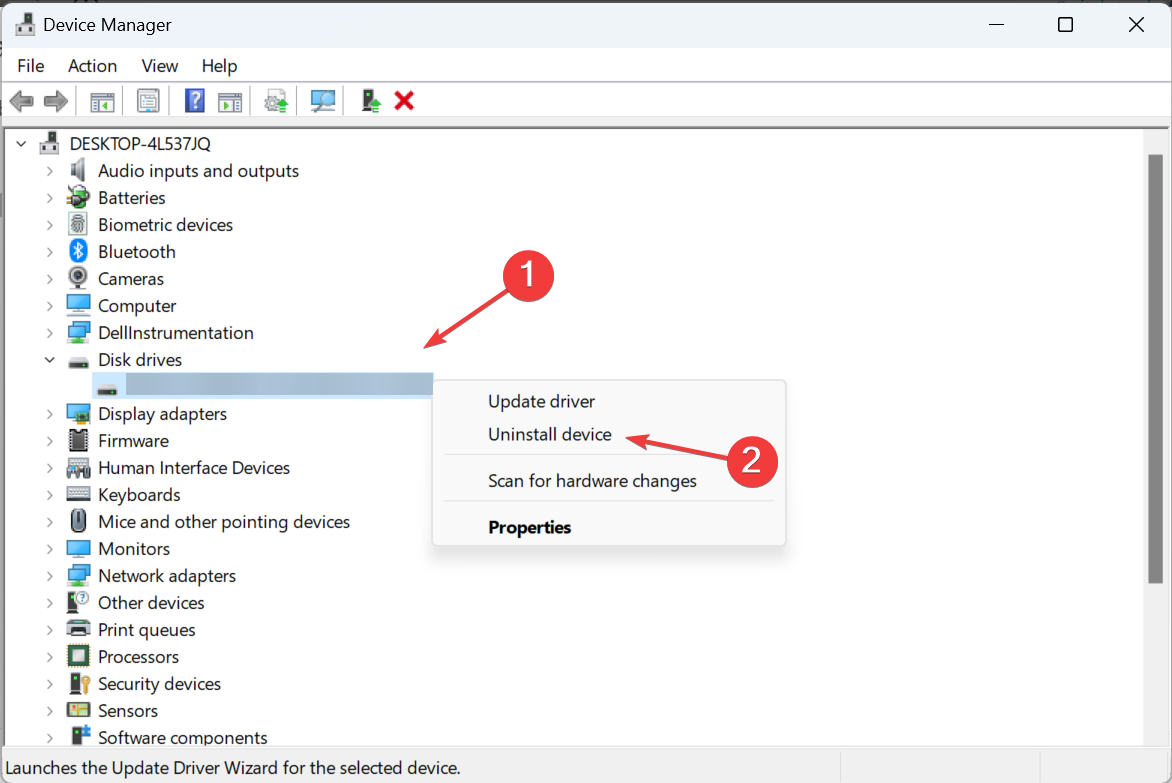
- Select Disk Drives.
- Right click on the problematic external USB drive, and click Uninstall device.
- Unplug the external USB drive, then wait for about a minute and reconnect it again.
Once you do the above, the drive should load automatically. To be sure it has been recognized, go to Windows/File Explorer and check for it.
3. Reinstall USB controllers
- Right-click the Start button.
- Select Device Manager.
- Find Universal Serial Bus controllers and click to expand it.
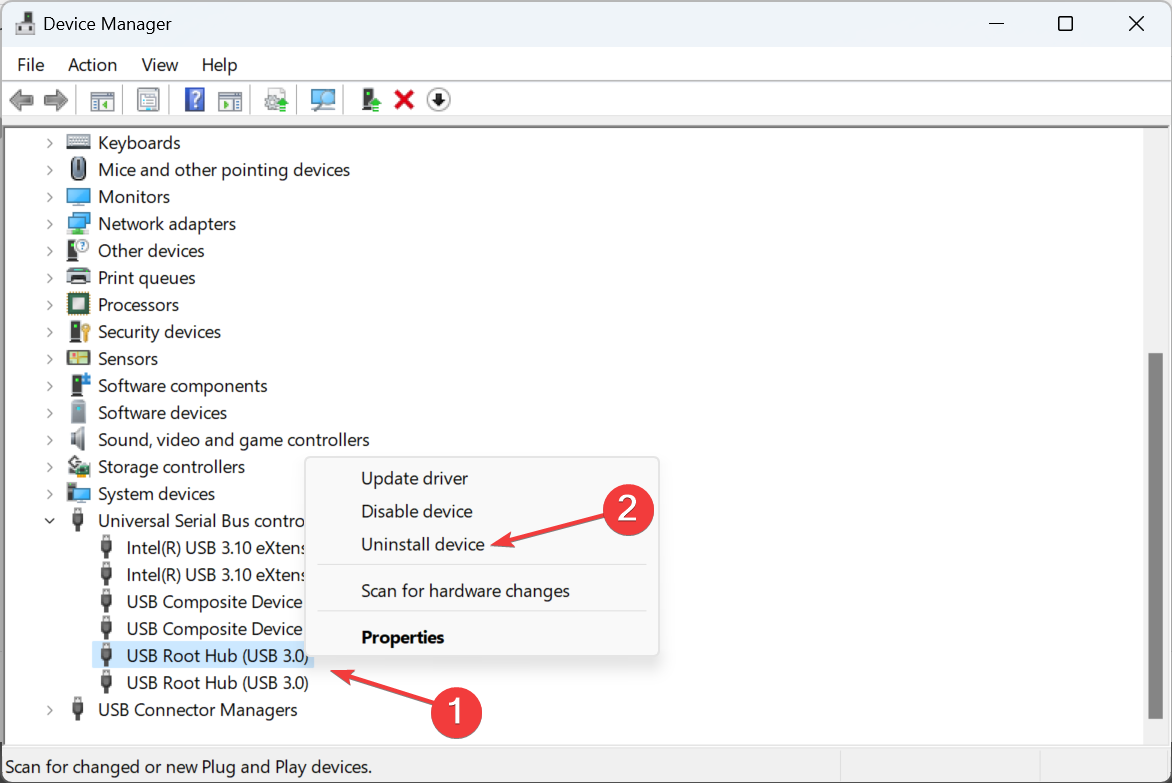
- Right-click on the device.
- Click Uninstall device.
- Rinse and repeat for all other problematic devices.
- Reboot your computer.
Once you do the above, the drive should load automatically.
4. Disable USB selective suspend
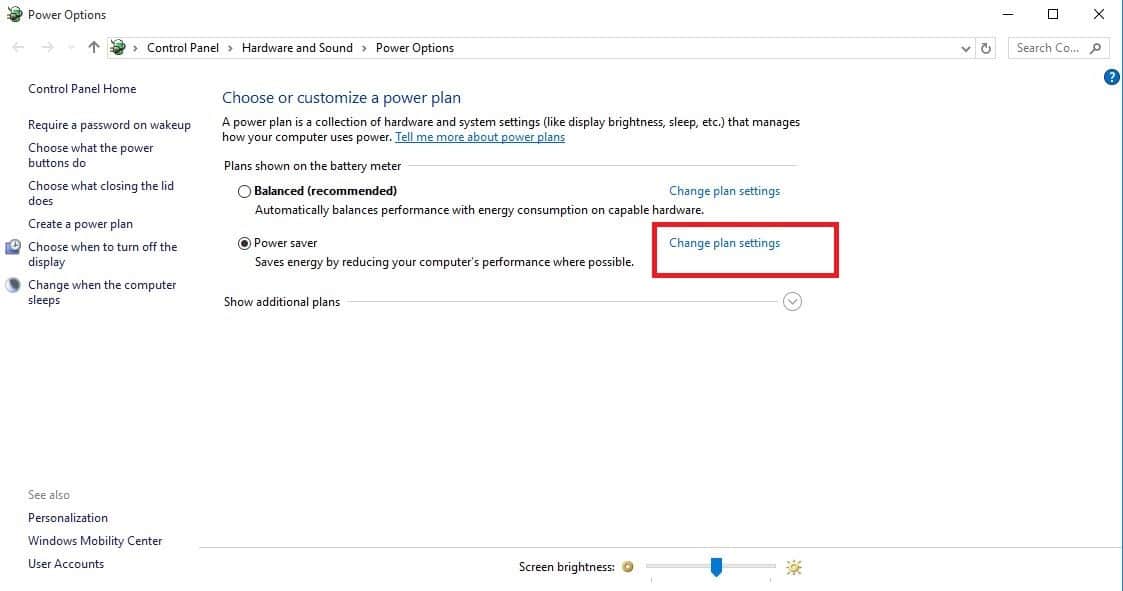
- Click on the battery icon from the taskbar and select Power and sleep settings.
- Click on Additional Power settings.
- Next to your current power plan, choose Change plan settings.
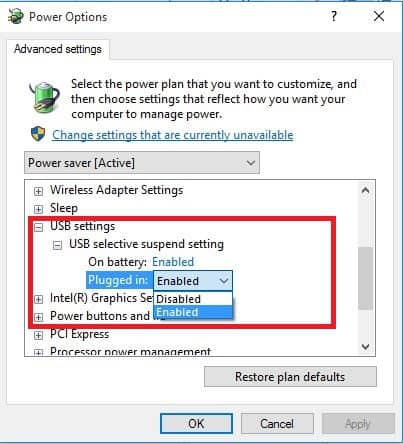
- Click on Change Advanced Power Settings.
- A pop up will appear.
- Find USB settings, and expand it.
- Expand USB Selective Suspend.
- Click on the drop down menu, and choose Disabled.
- Click Apply, then OK.
Ensure you have a system restore point created first, and if these solutions do not yield any results, remember to restore your old settings back.
5. Update the drivers
- Right-click the Start button.
- Choose Control Panel.
- Under Hardware and Sounds, click View Devices and Printers.
- Your computer will start scanning for available devices.
- Check for any entry on any Unidentified USB device or Unknown Device.
- Open the Properties of the unknown or unidentified external USB drive.
- Update the driver if there’s an update available.
6. Prevent computer from turning off device
- Right-click the Start button.
- Select Device Manager.
- Click on Universal Serial Bus Controllers to expand the list.
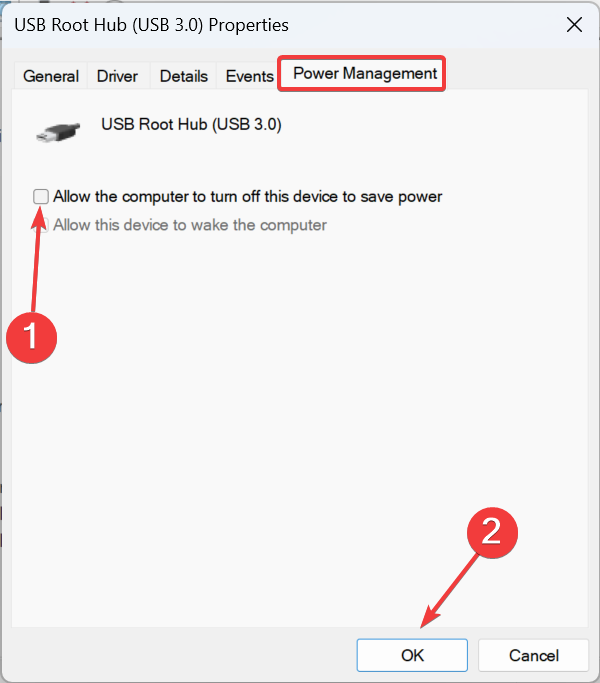
- Select the USB Root Hub for your drive.
- Right-click and select Properties.
- A popup box will appear. Navigate to the Power Management tab.
- Uncheck the Allow the computer to turn off this device to save power option, and click OK.
In case the USB drive is still not mounting in Windows 10, head to the next method.
7. Update the USB drive drivers
- Right click Start button
- Select Device Manager
- Click on Universal Serial Bus Controllers to expand the list
- See whether there are any devices with either a yellow exclamation mark, question mark, down-arrow mark, or an error notification or code.
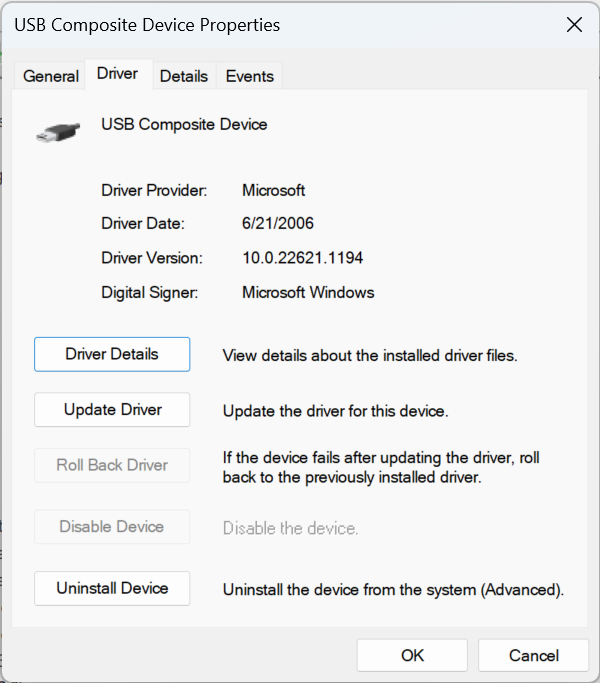
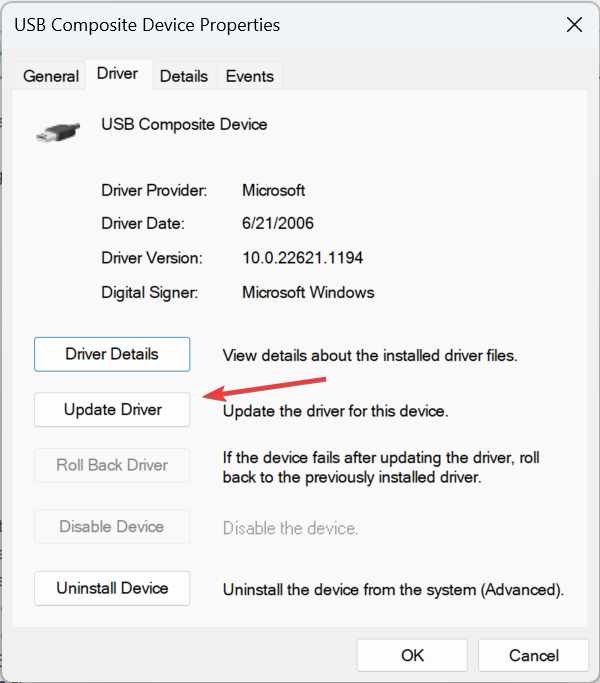
- If the driver has a yellow exclamation mark on it, double-click on it, then open Properties
- Under Drivers tab, choose Update Driver, and follow the on-screen instructions to complete the process.
Perhaps your computer cannot identify or see the external USB drive, but it is visible on other computers. This indicates that something is wrong with your USB drive drivers. In this case, updating the drivers will do the trick.
And if the USB drive was not mounting earlier, it should be listed both under the Device Manager and File Explorer now.
Hope these solutions worked. But let us know your experience.



User forum
0 messages