FIX: 0x00000004 error code for good
5 min. read
Updated on
Read our disclosure page to find out how can you help Windows Report sustain the editorial team. Read more
Key notes
- The stop code 0x00000004 is a blue screen error that might appear due to incorrectly configured system settings.
- Automatic Repair is a built-in Windows 10 option that may solve this issue.
- There is a great command-line tool that can be used for fixing many blue screen problems.
- If you couldn't get rid of the error code: 0x00000004, try resetting your operating system.

If you have a clean installed Windows OS and are experiencing the IRQ_NOT_LESS_OR_EQUAL blue screen of death error with the stop code 0x00000004, a repair using a bootable drive can fix the issue.
However, several users have reported this error in different situations as well.
I just restored my entire system about 2 months ago and have been getting the BSOD for almost the entire time since. I have a lot of software on this system and have not been able to determine the culprit.
You should be aware that you can experience this kind of error for multiple reasons including hardware failure, outdated or incompatible drivers, and antivirus interferences.
Besides that, this BSOD error will be resolved with specialized tools that can assist you with hardware malfunctions or other system concerns.
If you are also troubled by this error, here are a couple of troubleshooting tips to help you resolve the 0x00000004 – IRQ_NOT_LESS_OR_EQUAL error in Windows.
How do I fix the 0x00000004 error code?
1. Use the Automatic Repair option
- Click on Start and select Settings.
- Go to Update & Security.
- Open the Recovery tab from the left pane.
- Scroll down to the Advanced Startup section and click the Restart now button.
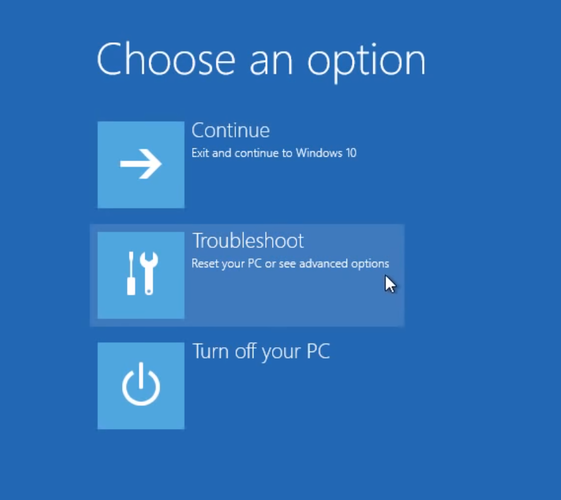
- Choose an Option, click on Troubleshoot.
- Select Advanced Options under Troubleshoot.
- Click on Startup Repair.
- Windows will now scan your PC for any startup issues and fix the problem.
- If you get the Startup repair failed messages, click on Shut down and then restart your PC.
What if you are unable to boot into Windows?
- Shut down your computer.
- Press the power button and press F8 / F11 / F12 or Shift + F8 as soon as the black screen appears to access the Advanced Boot option.
- If that did not work, try accessing the Advanced Boot option using Windows media.
Access Advanced Boot Options using Windows media
- First, you need to create a bootable Windows 10 installation media. If you don’t have one, follow these steps to create a bootable Windows 10 USB flash drive.
- Once the drive is ready, insert the flash drive to your computer.
- Restart your system and press any key to boot from the installation media.
- If the Press any key to boot now from CD or DVD message is not displayed, then you may have to change the boot priority in BIOS.
- Once you are in the Windows Setup screen, click Next.
- Click on the Repair your computer link.
- Under Choose an option, click on Troubleshoot.
- Click on Advanced options > Startup Repair.
Windows will now scan the system for any issues that are preventing the system from booting normally.
2. Run the System File Checker tool
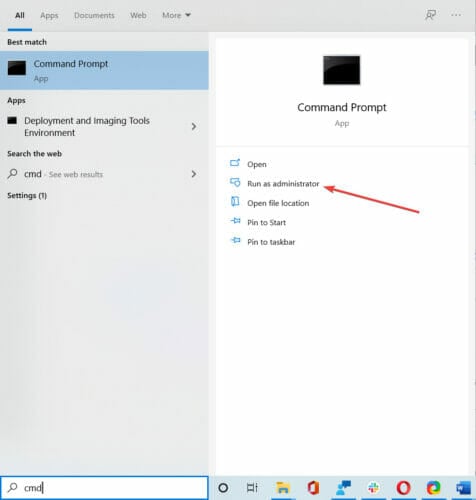
- Click on Start and type cmd.
- Click on Run as Administrator for the Command Prompt option.
- In the Command Prompt, type the following command and hit Enter:
sfc /scannow - The System File Checker tool will scan the system for missing or corrupted files and replace them with new files.
- Close the Command Prompt once the verification is 100% complete.
The System file checker is a command-line tool that will scan your system for potential issues and resolve them on the way, of course, if possible.
If you encounter errors while running SFC, it stops or does not work at all on Windows 10, you can use our dedicated guide in order to fix this problem.
3. Check for driver issues
The error can occur due to incompatible hardware drivers for recently installed devices. If you know which device is causing the issue, you can update it from Device Manager.
However, searching drivers yourself or updating manually from Device Manager can be time-consuming. Instead, you can use an automatic tool to keep your drivers up to date.
With this automated assistance, you can cover multiple drivers’ problems and fix the corrupted ones, plus replace them with the right versions.
In this way, you fix screen errors and avoid other system malfunctions that may occur from incompatible drivers. With this tool, the process goes smoothly due to the automatic detection and installation of up-to-date drivers.
4. Reset/Reinstall Windows
- Click Start and select Settings.
- Go to Update & Security.
- Click the Recovery tab.
- Click the Get started button under Reset this PC section.
- Windows offers two options to Reset your PC.
Keep my files – Select this option first. It will remove apps and settings, but keep your files.
Remove everything – Removes all of your personal files, apps, and settings. - Once the PC is set to factory default, check if the error is resolved.
If the issue persists, you may try cleaning and installing Windows. Clean installing Windows will erase the installation drive. So, make sure to create a backup before performing a clean install.
Sometimes, you can see the message There was a problem resetting your PC. If this is the case, use our dedicated guide to solve the error.
You can fix the 0x00000004 error code in Windows 10 by repairing the corrupt installation files. However, if that does not work, try other steps listed in the article above.
If you have any other suggestions for us that we should include in our guide, please write us a comment below.









User forum
0 messages