0x80070bc9 Update Error: 5 Ways to Quickly Fix It
Run the Windows Update troubleshooter for this error
Key notes
- You can encounter 0x80070bc9 update error due to a Windows Update Components error.
- The error can be resolved by running a Windows Update Troubleshooter.

Updating Windows allows you to install new features and security patches to ensure the stability and reliability of your computer. However, you can encounter a 0x80070bc9 update error in the process. Thus, we will examine ways to fix the 0x80070bc9 update error.
Likewise, you can read about fixing and diagnosing Windows updates not working on Windows PCs.
What causes 0x80070bc9 update error?
The 0x80070bc9 error code can occur due to various reasons. Some of the most common causes of this error include:
- Corrupted system files – When the system files are corrupted, Windows Update may fail to install updates resulting in error code 0x80070bc9.
- Windows Update Components Issues – The error may occur due to issues with the Windows Update service not running or other components required to complete the update process.
The causes of this error vary in different circumstances. However, we will discuss solutions to fix the error.
How can I fix the 0x80070bc9 update error?
Try the following preliminary checks to fix the 0x80070bc9 update error code before proceeding with advanced troubleshooting:
- Install the updates individually – Should you have issues installing pending updates, check our guide here for fixes.
- Uninstall all third-party antivirus on the PC and turn on Microsoft Firewall – Disabling third-party antivirus can also help with this problem.
You should proceed with the advanced steps below if the issue persists.
1.1 Perform SFC/DISM scans
- Press the Windows button, type Command Prompt, and click on Run as administrator to open it.
- Click Yes if the Windows User Account Control prompt appears.
- Type the following and press Enter:
sfc /scannow
- Run the following command:
DISM.exe /Online /Cleanup-image /Restorehealth
- Restart your PC and check if the error persists.
Performing SFC/DISM scans alone will not be enough. You need to run the windowsupdate.diagcab tool also. Follow the steps below:
1.2 Run a Windows Update troubleshooter
- Press the Windows + I to open the Windows Settings.
- Select System, and choose Troubleshoot.

- Then click on other troubleshooters.

- Select the Windows update and click the Run button.

- In the new version of Windows Update troubleshooter, Click Next.
- Select Apply this fix.

- Wait for the process to complete, close the Settings window and restart your device.
The Windows Update Troubleshooter is an in-built tool to diagnose and fix Windows Update errors. Check our detailed guide on how to run Windows Update troubleshooter on your system.
Also, some users claim that they run the SFC scan again after completing this step before attempting the update.
2. Reset the Windows Update components
- Left-click the Start button, type Command Prompt, and select the Run as administrator option.
- Click Yes on the User Account Control prompt.
- Copy and paste the following commands and press Enter after each one:
net stop wuauservnet stop cryptSvcnet stop bitsnet stop msiserver
- Then, input the following and press Enter after each one:
ren C:\Windows\SoftwareDistribution SoftwareDistribution.oldren C:\Windows\System32\catroot2 Catroot2.old - Input the following commands and click Enter:
net start wuauservnet start cryptSvcnet start bitsnet start msiserver
- Exit the Command Prompt and restart your PC.
Resetting the Windows Update components will fix the issues affecting its performance and resolve the update error.
Read our article if you encounter issues running the Command Prompt as an administrator on Windows 11.
3. Fix Registry Editor issues
- Right-click the Windows icon, select Run from the list, type regedit, and press Enter to open the Registry Editor.

- Navigate to the following path in the Registry Editor:
HKEY_LOCAL_MACHINE\SOFTWARE\Policies\Microsoft\Windows\WindowsUpdate - Select the WUServer and WIStatusServer, right-click and Delete them.

- Restart your PC and check if the error is fixed.
Deleting the WUServer and WIStatusServer folder will clear the Windows update cache. Learn how to master the Windows Registry with Registry Editor on Windows with our detailed guide.
4. Install updates manually
- Go to the Microsoft Update Catalog page, type the update code, and click the Search button.

- Select an update version compatible with your operating system, then click the Download link.

- Follow the on-screen instructions to download the update.
- Restart your PC and check if the update installs.
Manually installing the update will help get past issues with other updates that can prevent it from installing.
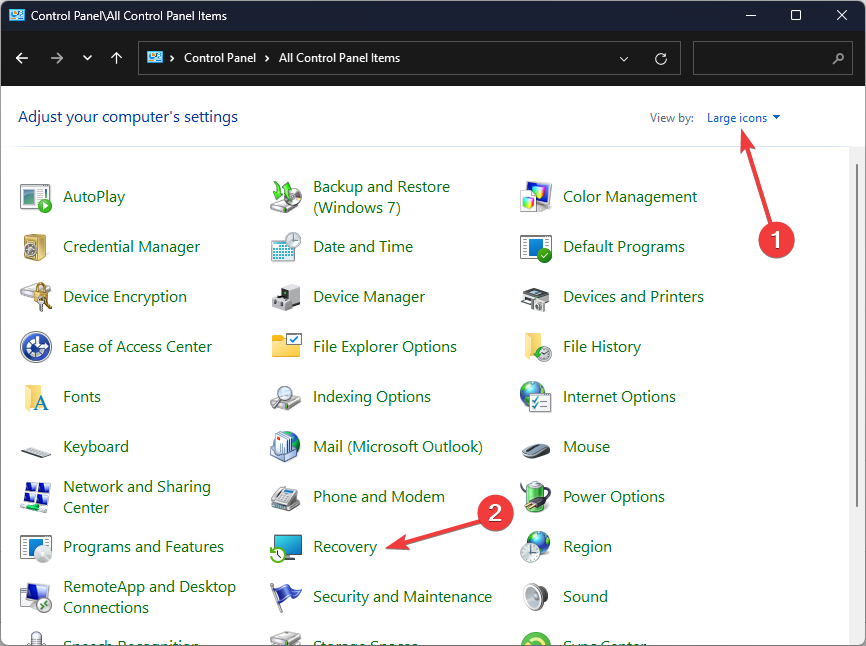
5. Perform a system restore
- Press the Windows key, type Control panel, and click Open.
- Select View by as Large icons and click Recovery.
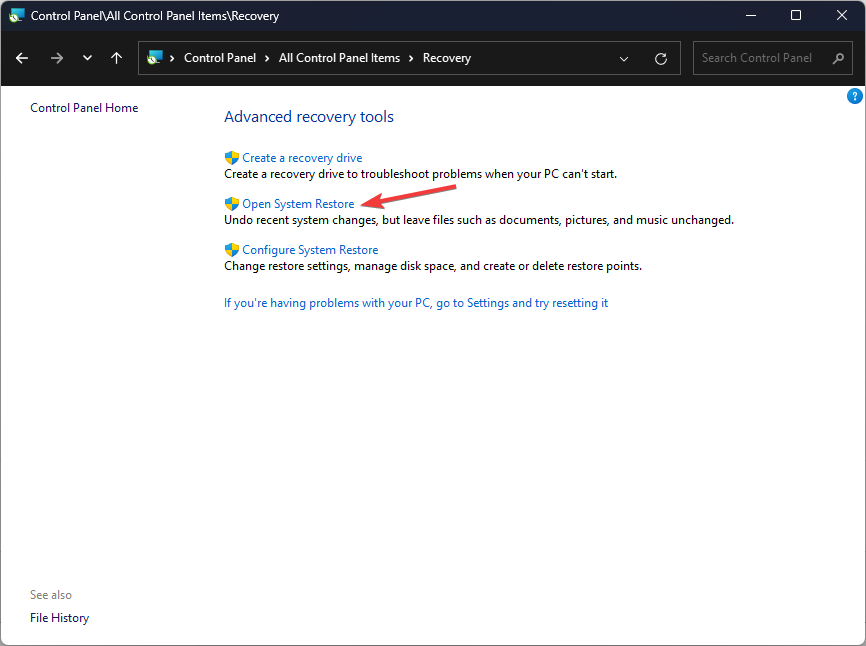
- Click Open System Restore.

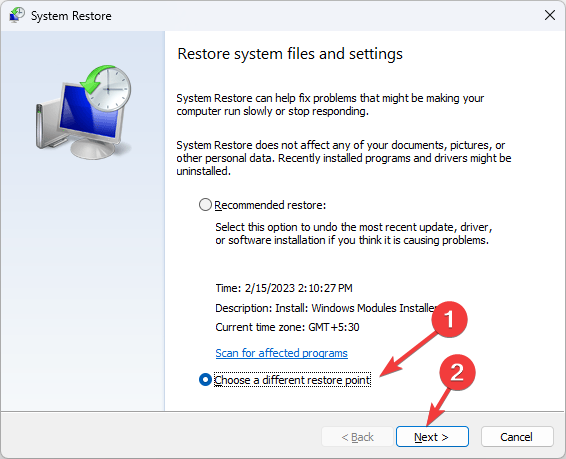
- On the System Restore window, select Choose a different restore point and click Next.

- Select the restore point and click Next.

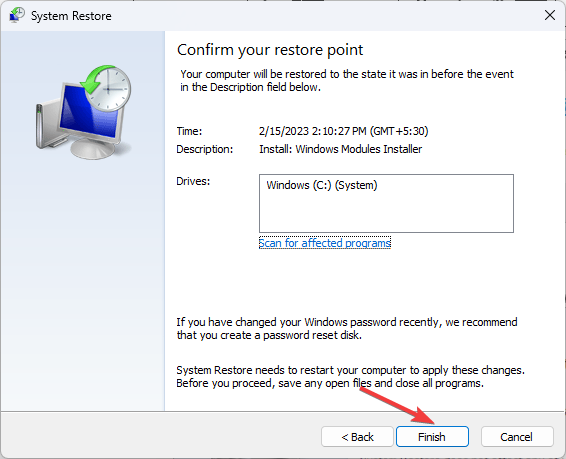
- Click Finish to initiate the process.
Windows will restart and restore the previous version.
Conclusively, check our guide on how to fix problems while installing the updates error on Windows PC. Also, we have a detailed guide on fixing Windows Update error 800f0902 on your computer.
If you have any questions or suggestions, kindly drop them in the comments section.
Read our disclosure page to find out how can you help Windows Report sustain the editorial team. Read more


Improve this guide


User forum
0 messages