How to Fix Error 0x80072f8f 0x20000 in Windows 7
Uninstall any conflicting applications to resolve this error
Key notes
- Error 0x20000 is one of the most common ones that can occur while installing Windows 7.
- This error can be caused by many things, but there are a few fixes that will help you get rid of this problem, such as uninstalling conflicting apps.

Error 0x80072f8f 0x20000 in Windows 7 is a common error that occurs when you try to upgrade your OS. This error can appear in any version of Windows 7 and other Microsoft operating systems.
Although the error also occurs in other later operating systems, Windows 7 is more at risk because Microsoft stopped issuing security updates. This means the operating system is at risk and as such, you will need software to fix most of the errors.
Why I’m I getting the error 0x80072f8f 0x20000 in Windows 7
If you are seeing this error message, then it means that the installation of a program has failed. This could be due to one of the following reasons:
- Compatibility issues – The program is not compatible with your Windows version.
- Permission settings – Note that the permissions settings on the file/folder or registry entry might be incorrect.
- The antivirus or firewall is blocking the installation process – In this case, you may have to disable the antivirus temporarily.
- The file/folder or registry key is missing or damaged – If that’s the cause in your case, you may need a registry cleaner to get rid of such issues.
- Modified files – Keep in mind that this has nothing to do with you, but the program might have modified its own files by mistake during installation.
How can I fix error 0x80072F8F in Windows 7?
Before jumping into the more technical solutions, check the following things first:
- Ensure that the date and time of your computer are set correctly. You may have to sync your time with the Microsoft server.
- Run the Media Creation Tool with administrative privileges.
- Disconnect your internet connection while updating.
- Ensure your drivers are up-to-date.
1. Uninstall conflicting apps
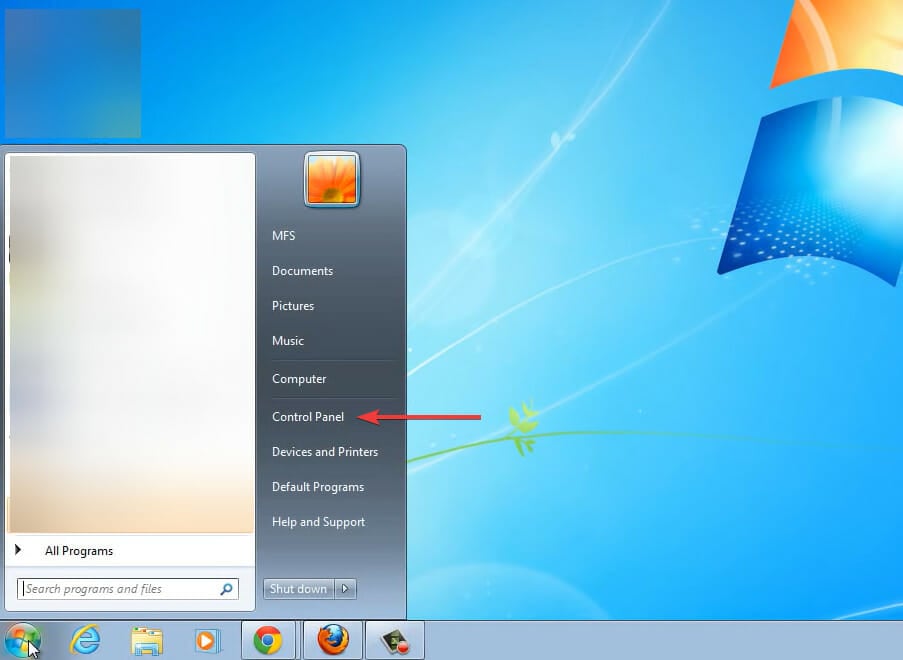
- Click on the Start icon or press the Windows key to launch the Start menu, and then select Control Panel from the options on the right.
- Locate Programs and click on Uninstall a program.
- Now, select the program you want to remove, and then click Uninstall at the top.
Usually, if this problem started after installing an app, it would be best to uninstall it. The main issue is usually a conflict in software or downloading from unverified sources. To prevent such instances in the future, we recommend you equip your system with an antivirus program.
Antivirus programs can easily detect any corrupt files and stop them before they have the potential to cause any further damage.
ESET HOME Security Essential is one of the best antivirus programs because it can run smart scans and effectively protect your device against all types of threats so your PC can never be at risk.
⇒ Get ESET HOME Security Essential
2. Scan for viruses
- Click on the Start icon, search for Microsoft Security Essentials, and click on the relevant search result.
- Now, select Full scan from Scan options.
- Finally, click on Scan now and wait for the scan to complete.
Given that Windows 7 doesn’t get critical security updates from Microsoft anymore, it is more susceptible to malware attacks. This necessitates a virus removal program for your device to work extra at detecting threats.
3. Start the critical services
- Press Windows + R to launch the Run command dialog box, type services.msc in the text field, and either click OK or Enter to launch the Services app.
- Locate and double-click on the Background Intelligence Transfer Service (BITS) to launch its Properties.
- Now, click on the Startup type dropdown menu, and select Automatic from the list of options.
- Next, click on the Start button under Service status, if it’s not running, and then click on OK to save the changes.
- Make similar changes to Application Identity, Cryptographic, and Windows Update service.
Critical services are important to the operation of your PC. If you stop or disable these critical services, it can cause your Windows to stop working properly. Nevertheless, there are some critical services you can disable that won’t affect your PC’s performance.
4. Perform a clean boot
- Hit the Start icon, type msconfig and press Enter.
- Navigate to the Services tab, check the box for Hide all Microsoft services then click Disable all.
- Go back and click on the Startup tab, select Disable all then click OK.
The clean boot allows you to restart your PC with only the essential services so that if a third-party program is causing the error, you will be able to single it out.
5. Force the update
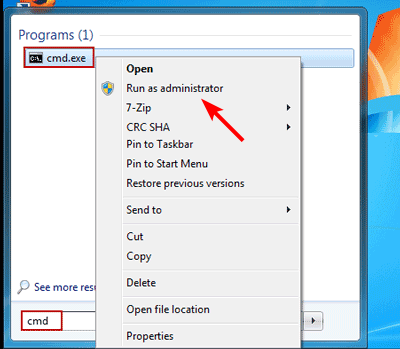
- Hit the Start icon, type cmd, and select Run as administrator.
- Type this command and press Enter:
wuauclt.exe /updatenow
The wuauclt.exe command is a tool used to check for Windows Update and install any pending updates that are available. You can also use it to repair Windows Update components.
You may also run into an error where the Media creation tool does not have enough space so be sure to check out our article on how to fix it.
Should you face any other issues such as Windows 7 won’t upgrade to Windows 10, we also address various fixes in our detailed guide.
That’s all for this article and hopefully, you have found a fix for this error. Let us know which solution worked for you in the comments section below.
Read our disclosure page to find out how can you help Windows Report sustain the editorial team. Read more




User forum
0 messages