How to Fix 800700c1 Windows Update Error
Reset Windows Update components to fix the problem
![]() 6 min. read
6 min. read
![]() Updated on
Updated on
Share this article

Improve this guide
Read our disclosure page to find out how can you help Windows Report sustain the editorial team Read more
Key notes
- This update error occurs if you have missing system files, a weak internet connection, or a malware infection.
- To fix this, you can run SFC & DISM scans, run the Windows update troubleshooter or perform a system restore.
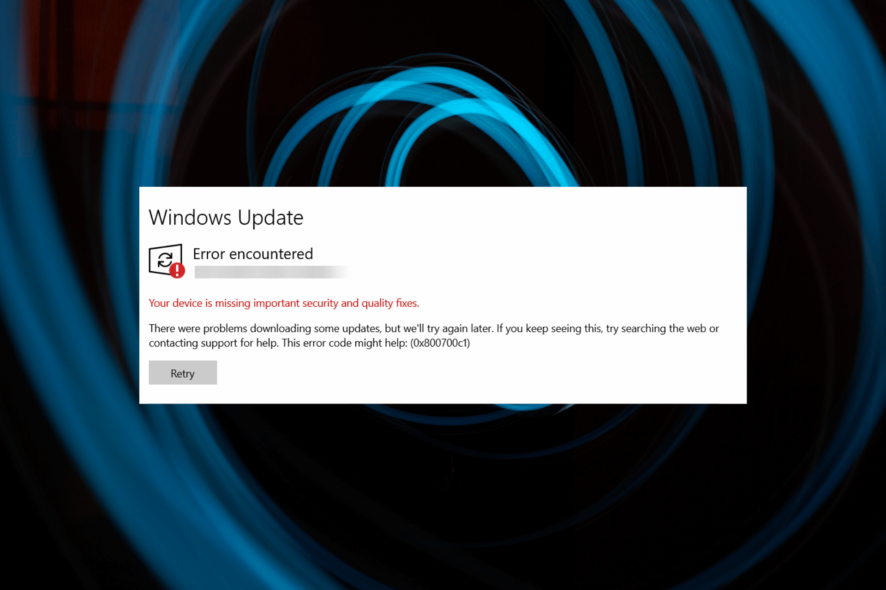
If you have encountered the Windows Update error 0x800700c1 while trying to update Windows, this guide can help!
We will discuss some of the working solutions to fix the issue right after talking about the causes of the problem.
What causes the Windows Update error 0x800700c1?
There are several reasons for this Windows update error; some of the common ones are mentioned here:
- Weak Internet connection – If your internet connection is not stable or you often have network connectivity issues, you may get this error. Try troubleshooting your internet connection.
- Missing system files – System files related to Windows updates, if damaged or corrupted, could cause this Windows Update error. Try repairing the system files to fix the issue.
- Services related to Update not starting – If the services associated with Windows Updates are not starting up, they could stop you from installing Windows updates. Check the services.
- Improper software installation – Any software if not installed correctly or was interrupted while getting updated, you may see this error.
- Malware infection – If your computer is infected with viruses, it could damage it, causing various issues. Try running a deep scan using an antivirus tool.
Now that you know the causes, let us move on to the solutions to fix this Windows Update error.
What can I do to fix the Windows Update error 0x800700c1?
Before engaging in advanced troubleshooting steps, you should consider performing the following checks:
- Restart your computer.
- Disable antivirus temporarily.
If these minor tweaks didn’t work for you, check out the detailed methods below.
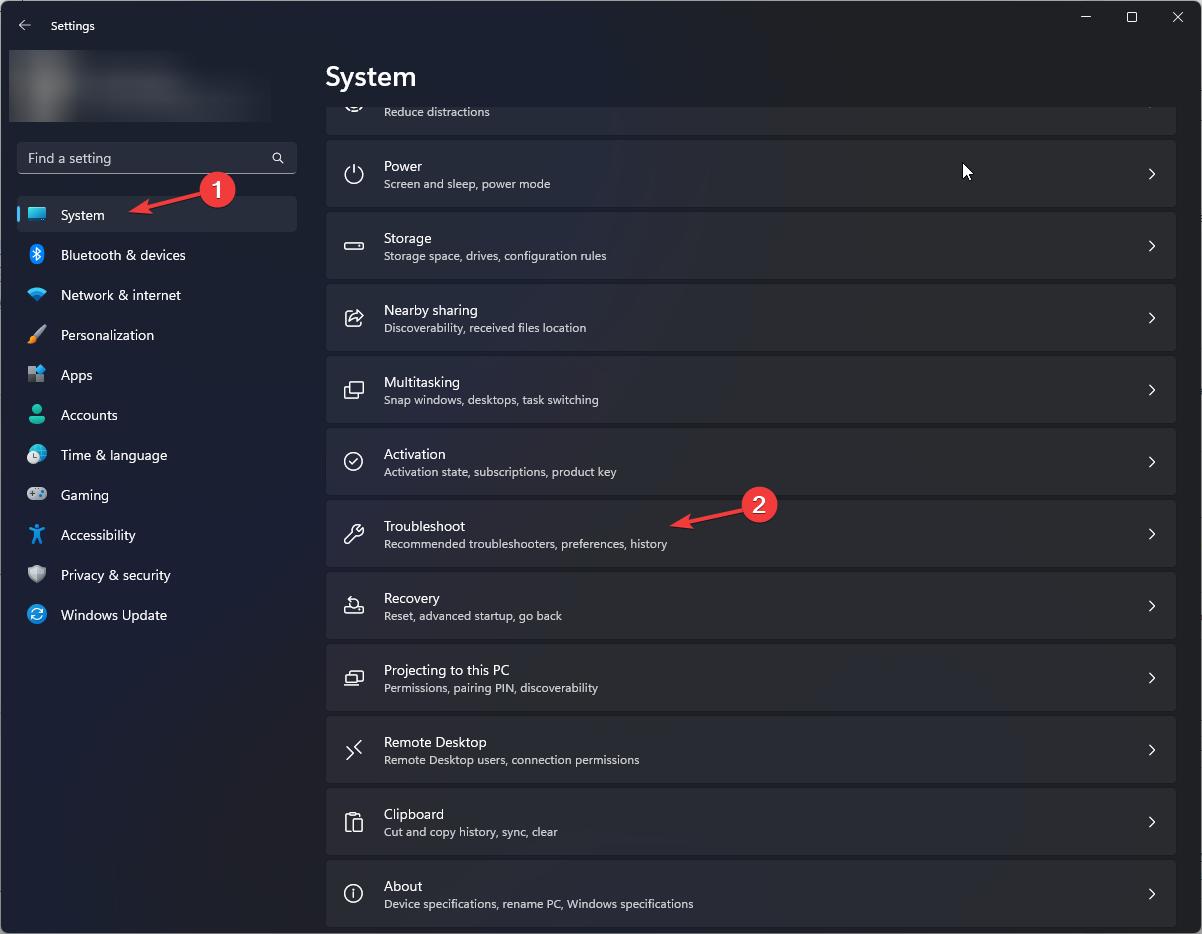
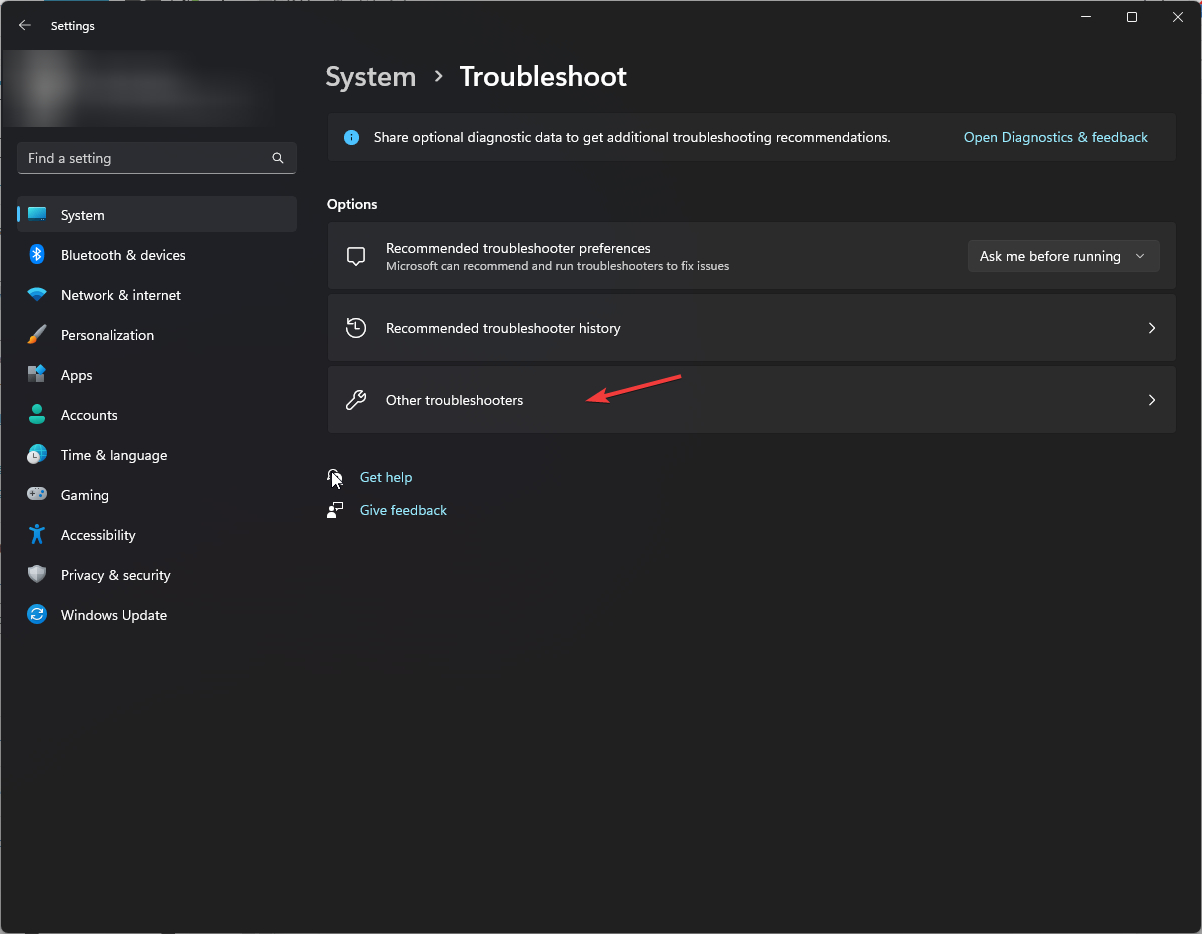
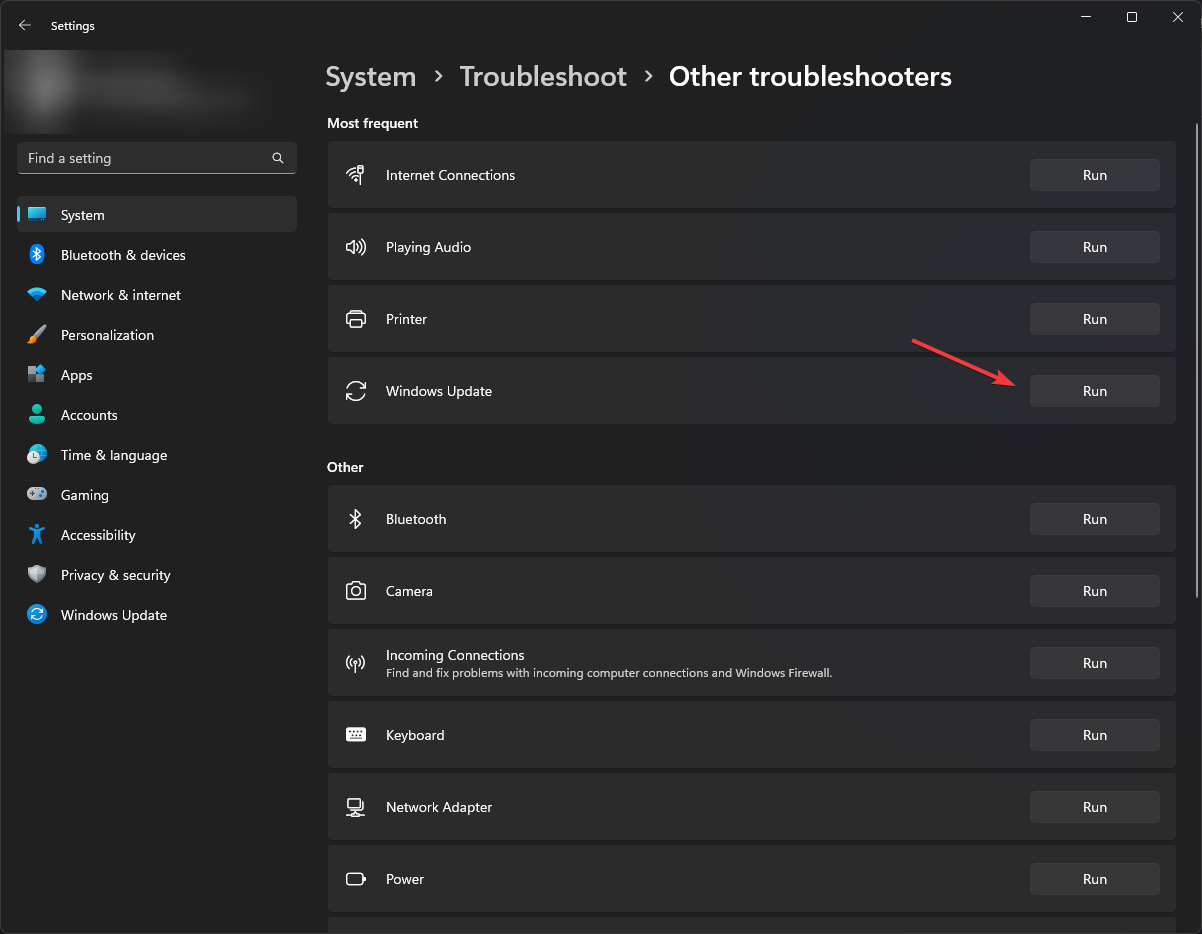
1. Run the Windows Update troubleshooter
- Press Windows + I to open the Settings app.
- Go to System, and click Troubleshoot.

- Click Other troubleshooters.
- Locate Windows Update from the list and click Run.
- Follow the onscreen process to complete.
Alternatively, you may consider a dedicated repair tool that fixes update issues rather than following the manual steps above.
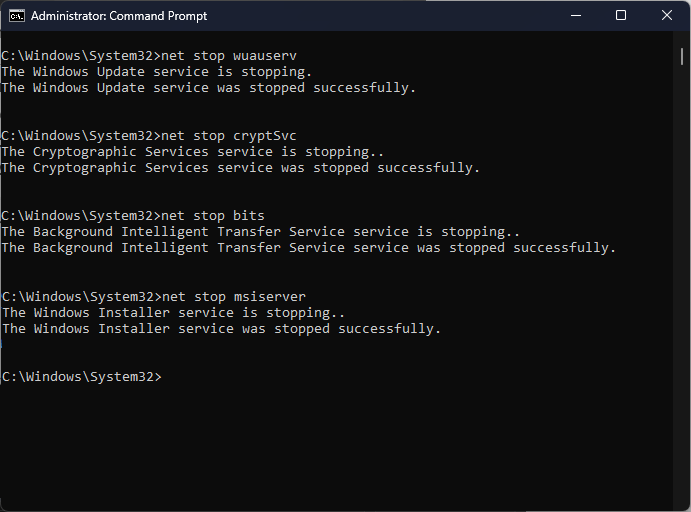
2. Reset Windows Update components
- Press the Windows key, type cmd, and click Run as administrator.

- Type the following commands one by one to stop BITS, Windows Update, & Cryptographic services, and press Enter after every command:
net stop bitsnet stop wuauservnet stop cryptsvc
- To delete the qmgr*.dat files, copy & paste the following command and hit Enter:
Del %ALLUSERSPROFILE%\Application Data\Microsoft\Network\Downloader\qmgr*.dat - To rename DataStore, Download, & catroot2, type the following commands one by one, and press Enter after every command:
Ren %Systemroot%\SoftwareDistribution\DataStore DataStore.bakRen %Systemroot%\SoftwareDistribution\Download Download.bakRen %Systemroot%\System32\catroot2 catroot2.bak - Copy & paste the following commands one by one to reset the BITS & Windows Update to the default security descriptor, and hit Enter after every command:
sc.exe sdset bits D:(A;CI;CCDCLCSWRPWPDTLOCRSDRCWDWO;;;SY)(A;;CCDCLCSWRPWPDTLOCRSDRCWDWO;;;BA)(A;;CCLCSWLOCRRC;;;IU)(A;;CCLCSWLOCRRC;;;SU)sc.exe sdset wuauserv D:(A;;CCLCSWRPLORC;;;AU)(A;;CCDCLCSWRPWPDTLOCRSDRCWDWO;;;BA)(A;;CCDCLCSWRPWPDTLOCRSDRCWDWO;;;SY) - Type the following command and press Enter:
cd /d %windir%\system32 - To reregister the BITS files and Windows Update files, copy & paste the following commands one by one and hit Enter after every command:
regsvr32.exe atl.dllregsvr32.exe urlmon.dllregsvr32.exe mshtml.dllregsvr32.exe shdocvw.dllregsvr32.exe browseui.dllregsvr32.exe jscript.dllregsvr32.exe vbscript.dllregsvr32.exe scrrun.dllregsvr32.exe msxml.dllregsvr32.exe msxml3.dllregsvr32.exe msxml6.dllregsvr32.exe actxprxy.dllregsvr32.exe softpub.dllregsvr32.exe wintrust.dllregsvr32.exe dssenh.dllregsvr32.exe rsaenh.dllregsvr32.exe gpkcsp.dllregsvr32.exe sccbase.dllregsvr32.exe slbcsp.dllregsvr32.exe cryptdlg.dllregsvr32.exe oleaut32.dllregsvr32.exe ole32.dllregsvr32.exe shell32.dllregsvr32.exe initpki.dllregsvr32.exe wuapi.dllregsvr32.exe wuaueng.dllregsvr32.exe wuaueng1.dllregsvr32.exe wucltui.dllregsvr32.exe wups.dllregsvr32.exe wups2.dllregsvr32.exe wuweb.dllregsvr32.exe qmgr.dllregsvr32.exe qmgrprxy.dllregsvr32.exe wucltux.dllregsvr32.exe muweb.dllregsvr32.exe wuwebv.dll - Type the following command to reset winsock and press Enter:
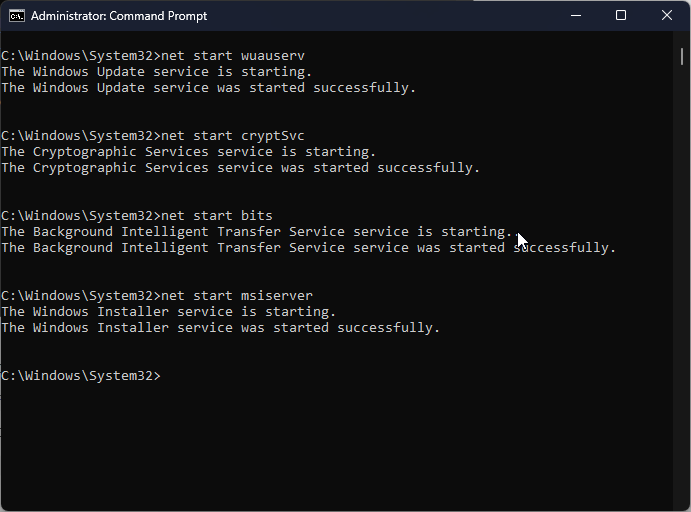
netsh winsock reset - To restart BITS, Windows Update & Cryptographic service, copy & paste the following commands one by one and press Enter after every command:
net start bitsnet start wuauservnet start cryptsvc - Reboot your computer to let the changes take effect.

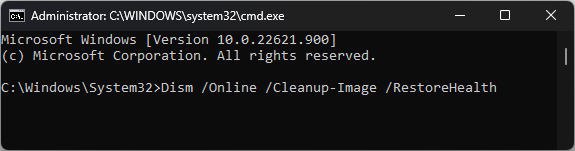
3. Run SFC & DISM scans
- Press the Windows key, type cmd, and click Run as administrator.

- Type the following command to repair system files and press Enter:
sfc/scannow
- Wait for the scan to complete, copy & paste the following command to repair the Windows OS image, and hit Enter:
DISM /Online /Cleanup-Image /RestoreHealth
- Once the command is executed successfully, restart your computer.


4. Run a malware scan
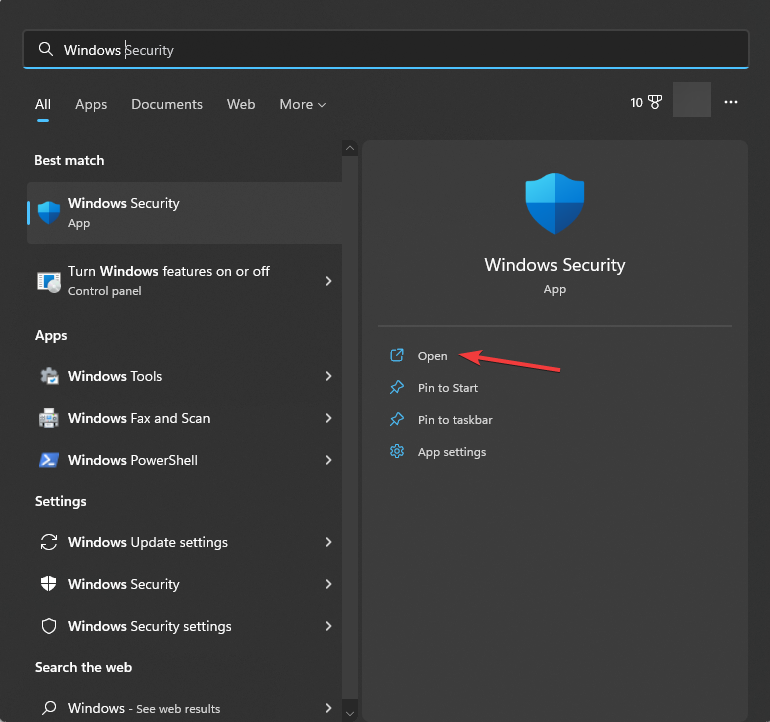
- Press the Windows key, type windows security, and click Open.

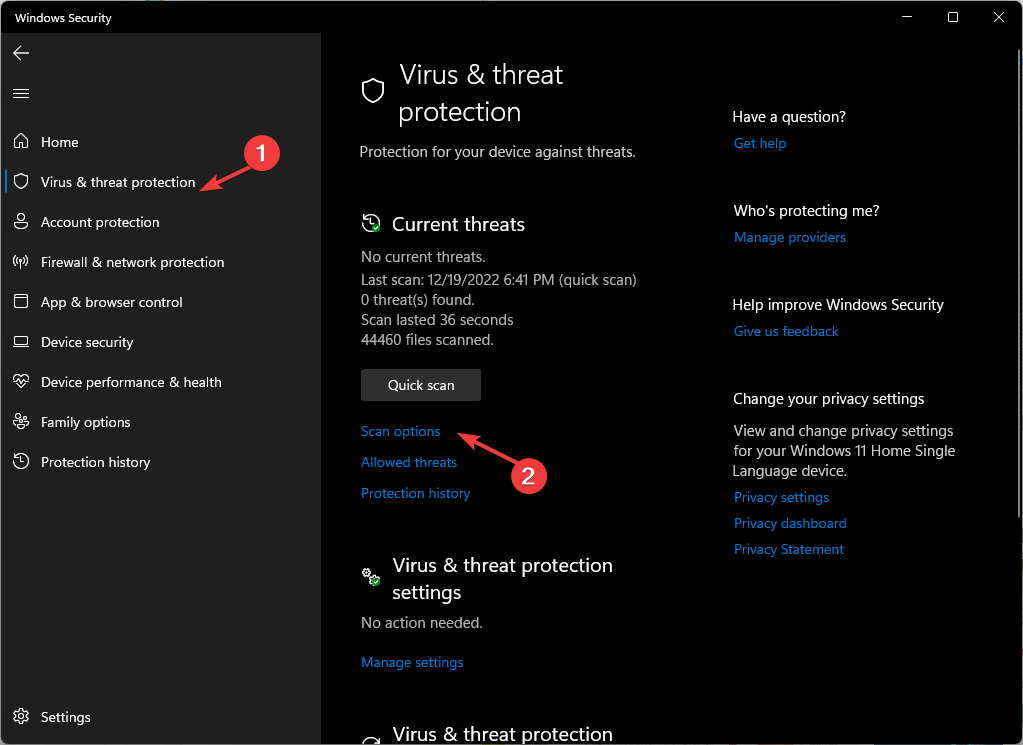
- Go to Virus & threat protection and click Scan options.

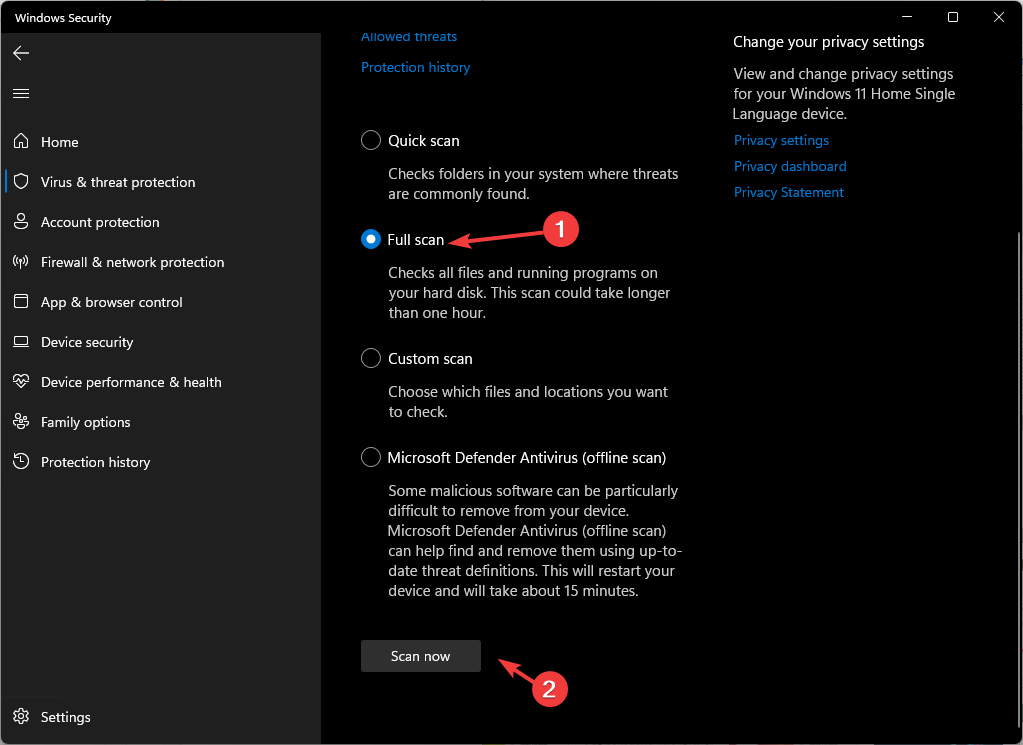
- Select Full scan and click Scan now.
- The security tool will scan and find the infected files. Delete them when prompted.
5. Perform a System Restore
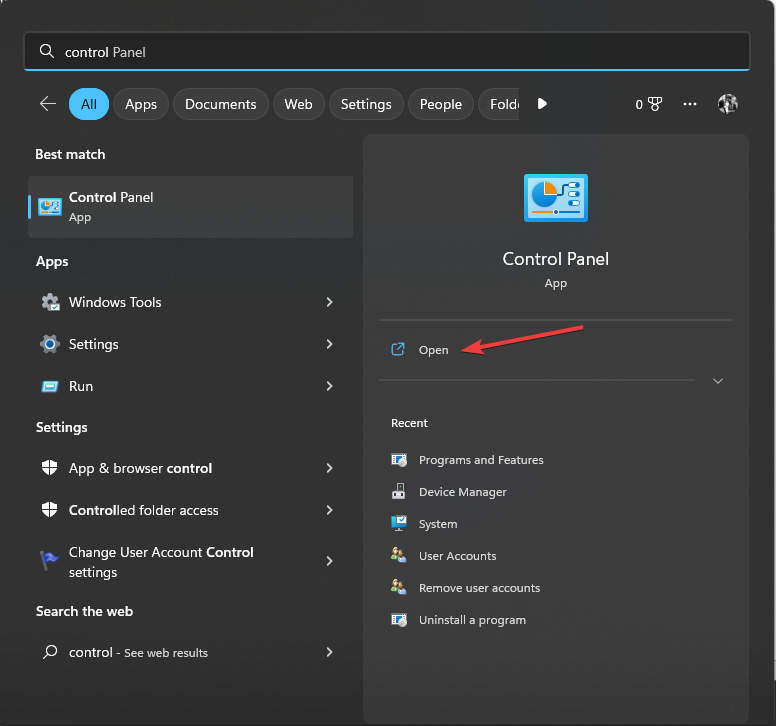
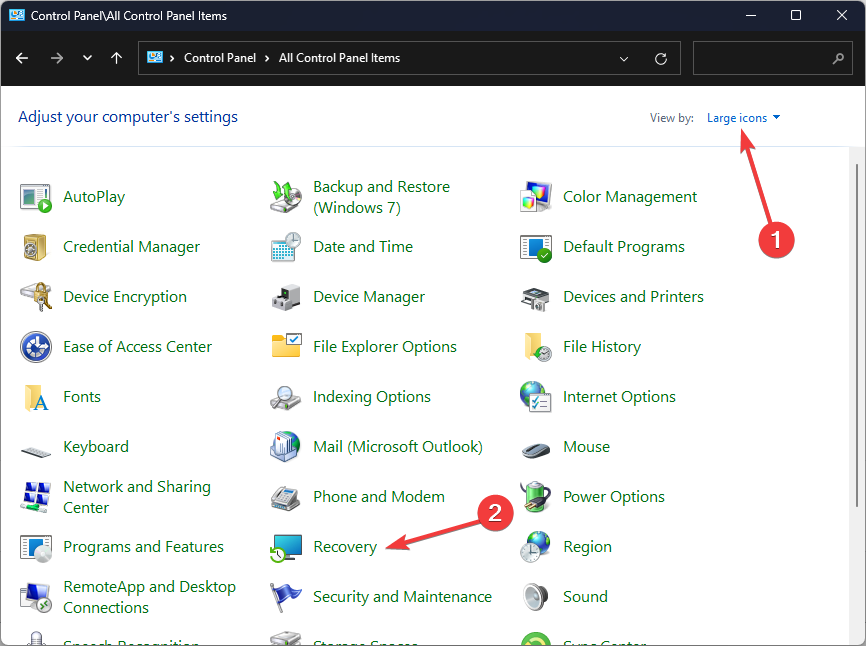
- Press the Windows key, type control panel, and click Open.

- Select View by as Large icons and click Recovery.

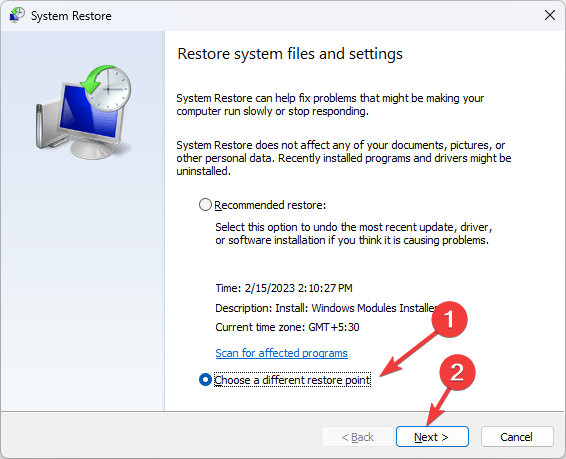
- Click Open System Restore.
- On the System Restore window, select Choose a different restore point and click Next.

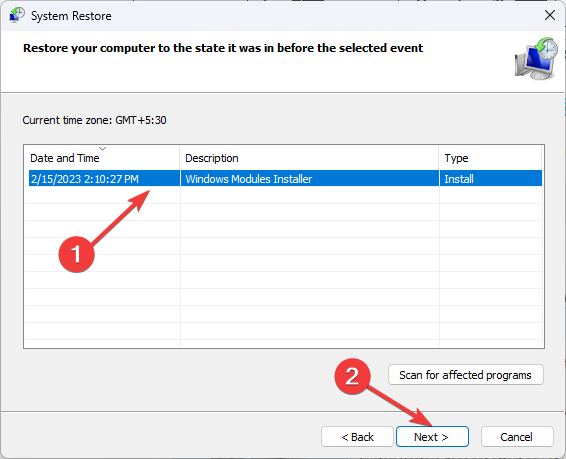
- Select the restore point and click Next.
- Now click Finish to initiate the process.


Windows will restart and will be restored to the previous version selected. If the System Restore doesn’t work for you, we recommend you check out this guide to know the detailed solutions.
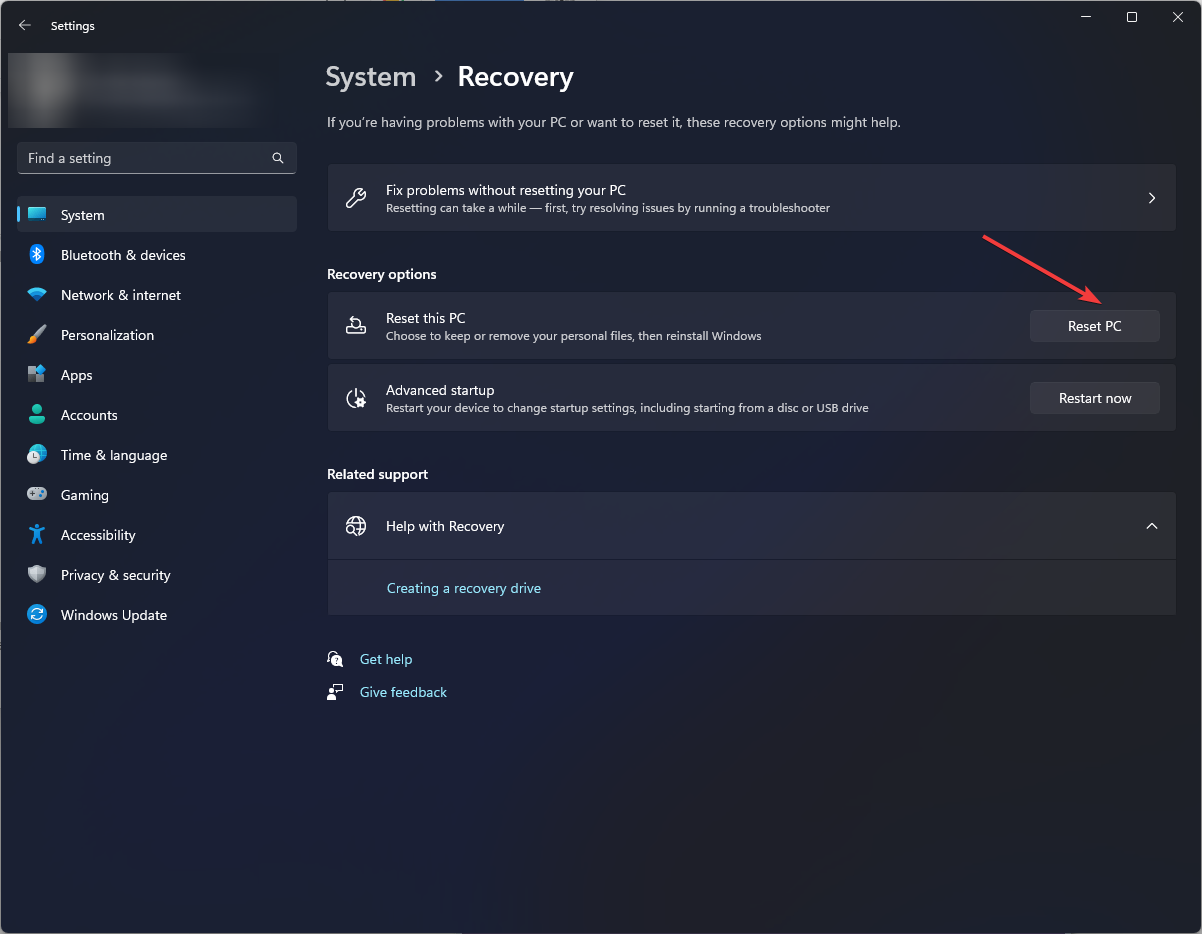
6. Reset the PC
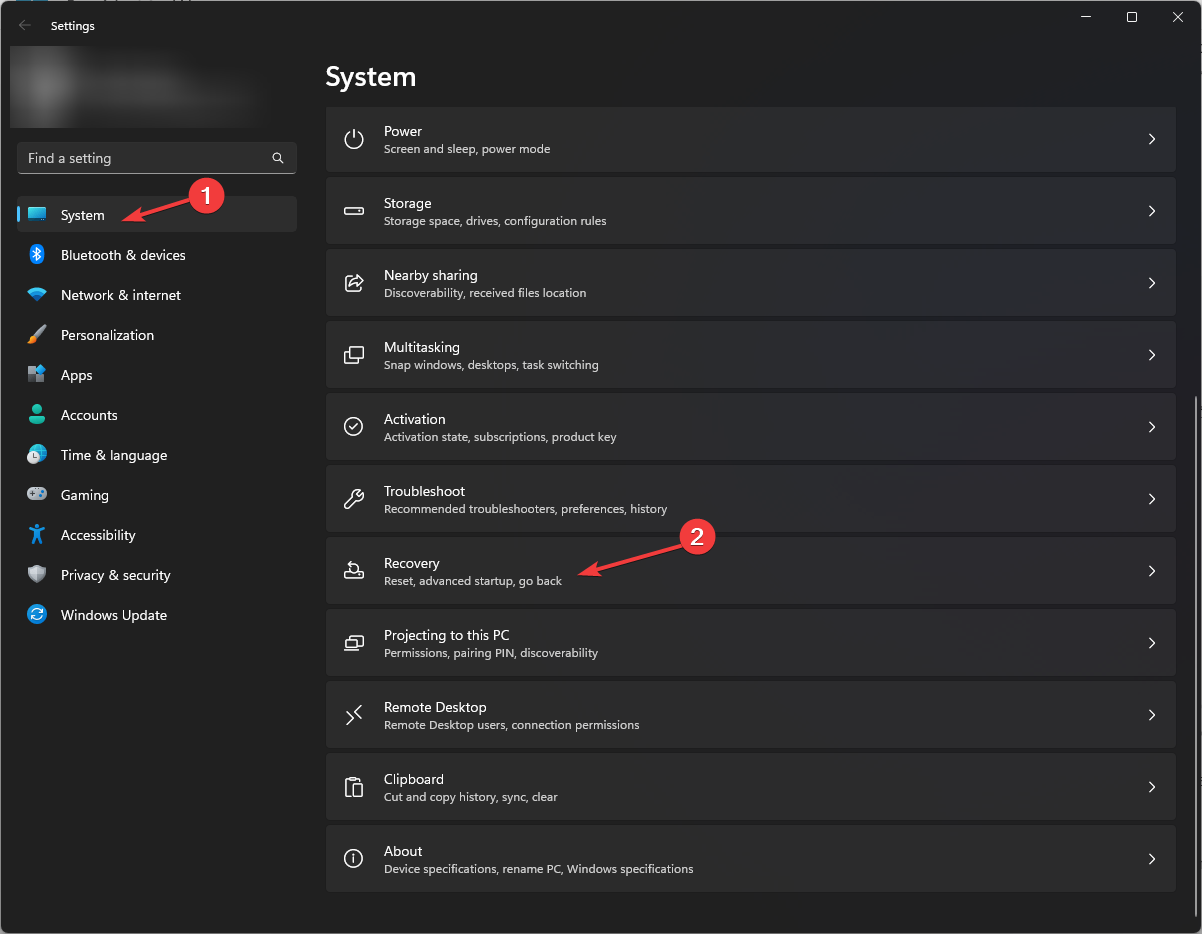
- Press Windows + I to open Settings.
- Go to System, then click Recovery.
- Under Recovery options, click Reset PC.
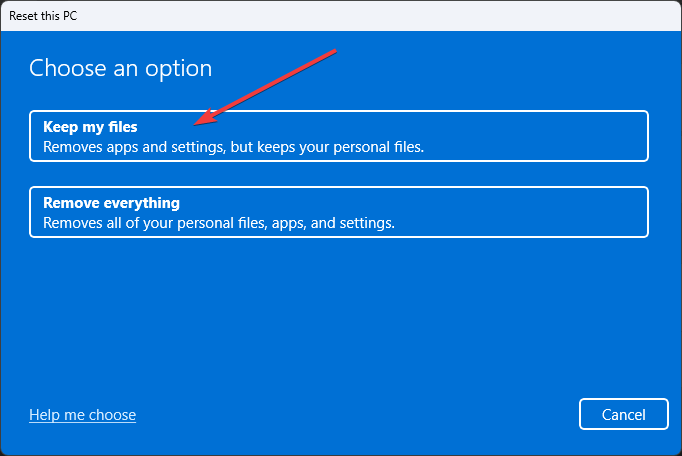
- Now on Choose an option window, select Keep my files.

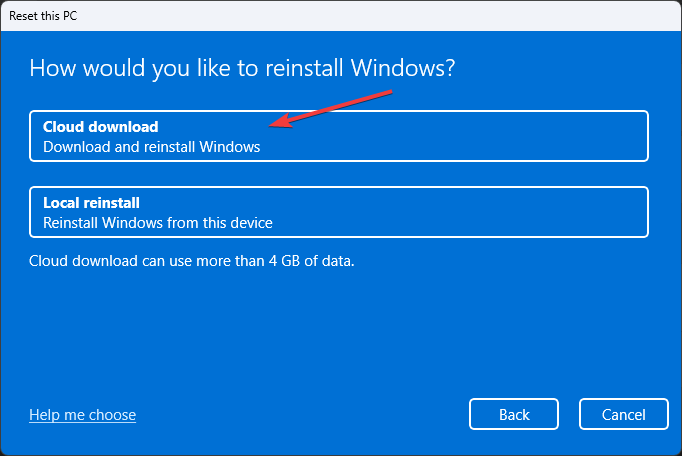
- On How would you like to reinstall Windows window, select Cloud download.
- Now on the Additional settings page, click Next.
- On Reset this PC page, click Reset.
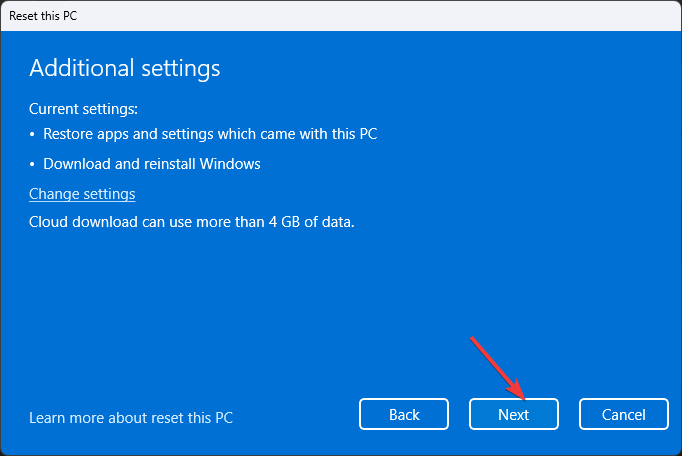
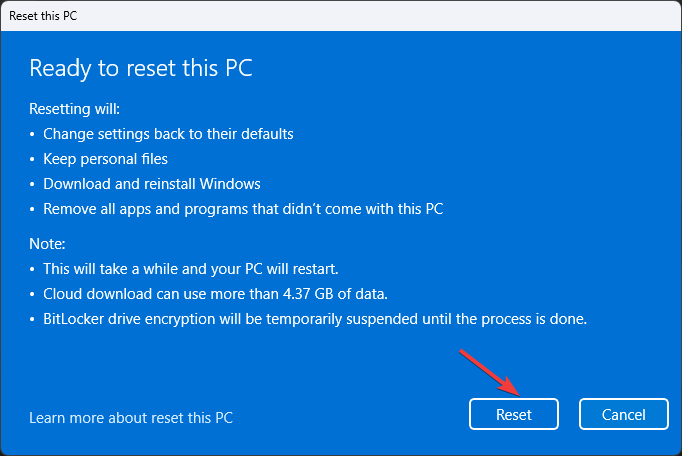
Windows will be reinstalled, and the settings will be set to default, but you will have your files intact.
So, these are steps you can follow to fix the Windows Update error 0x800700c1. If you have any questions or suggestions, feel free to mention them in the comments section below.