Fix: Mouse and Keyboard Not Working After Power Outage
Outages cause corruption which you need to immediately clear out
7 min. read
Updated on
Read our disclosure page to find out how can you help Windows Report sustain the editorial team. Read more
Key notes
- Power outages can cause your computer and its accessories to malfunction like the mouse and keyboard.
- Inputs may not be read correctly or at all, but fortunately, there are tons of solutions for this type of problem.
- You can try running an SFC scan to clear out any corruption that has come as a result of the outage.
Power outages, and the surges that come with one, can be pretty disastrous as they can cause serious damage to a computer, like frying internal systems, so nothing can be read.
And in this particular instance, we’ll recommend what you should do when those devices stop working. It would be a shame if your keyboard got ruined by a power surge.
What other problems can a power outage cause?
Before going into the solutions, it’s important to point out the other computer problems a power outage can cause. That way, if they ever happen to you, you’ll know how to fix it:
- USB ports can suffer from connectivity problems – You might also get an error message stating your USB drive has malfunctioned. In this instance, you should update the USB driver.
- The internet connection may start malfunctioning – Check if there are any flashing lights on your internet router. We also recommend resetting the router.
- Data on your hard drive can become corrupt – To clear out the corruption, you will need to run the CHKDSK command on your computer.
- Your computer might not even turn on – While this is a worst-case scenario that rarely happens, it still can and is quite debilitating. You should get a technician to check out your machine.
To fix these peripheral errors, there are a variety of hardware and software solutions that you can do. There are a ton of fixes that you can try out. Even if one doesn’t work, you’re bound to find one that does.
How can I fix my mouse and keyboard after a power outage?
Here’s what you should do first:
- Try unplugging and replugging your peripherals into a different USB port. A lot of the time, doing that simple action is what you need to do to fix the malfunction.
- Use your mouse and keyboard on a different computer. See if they work on the other machine. If they don’t, then it’s recommended that you replace them.
- Run the Windows 11 System Restore to return your computer to the previous state before the problem started. Power outages can mess with the settings.
- However, if the mouse and keyboard work on the second computer but not on yours, you have a driver problem. You will need to download any recent Windows Updates.
- And if all else fails, you will need to contact your computer’s manufacturer and see if there’s anything that can do. Otherwise, you may have to replace the machine outright.
1. Run Hardware Troubleshooter
- Launch the Command Prompt through the Windows 11 Search bar. You don’t need to run it with administrator permissions.
- Type the following command into the window and press Enter on the keyboard:
msdt.exe -id DeviceDiagnostic - On the Hardware and Devices window, click Next.
- Give the program enough time to finish scanning for any hardware changes.
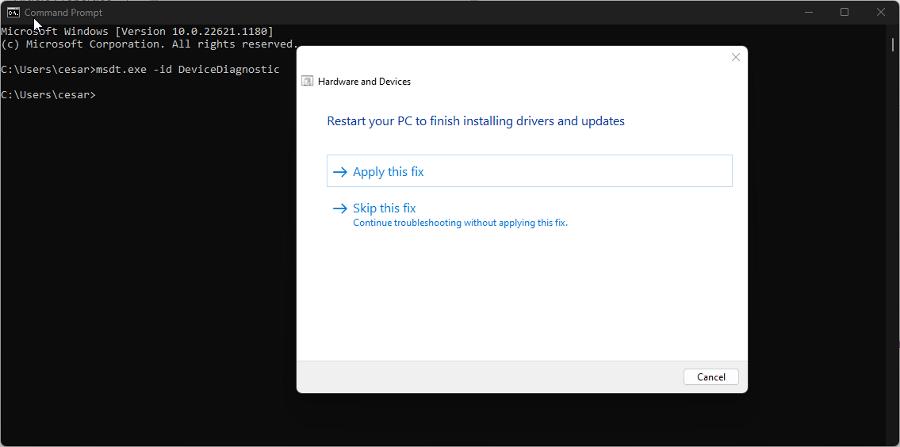
- Once it finishes scanning, select Apply this fix to restart the machine and fix the problematic USB port. Otherwise, select Skip this fix.
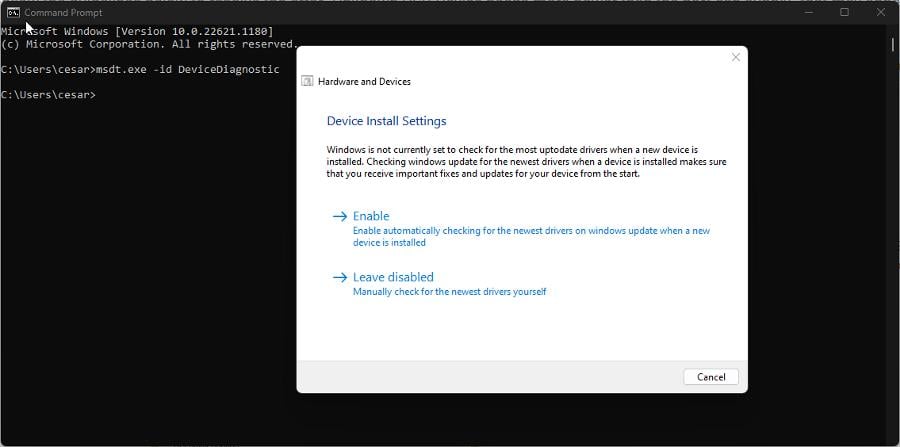
- If you choose Skip this fix, you configure how Windows 11 checks the latest whenever a new device is installed, whether automatically or manually.
If you’re using a laptop, it’s recommended that you first unplug all of your USB peripherals and then restart the computer using the touchpad.
2. Reinstall drivers for the mouse and keyboard
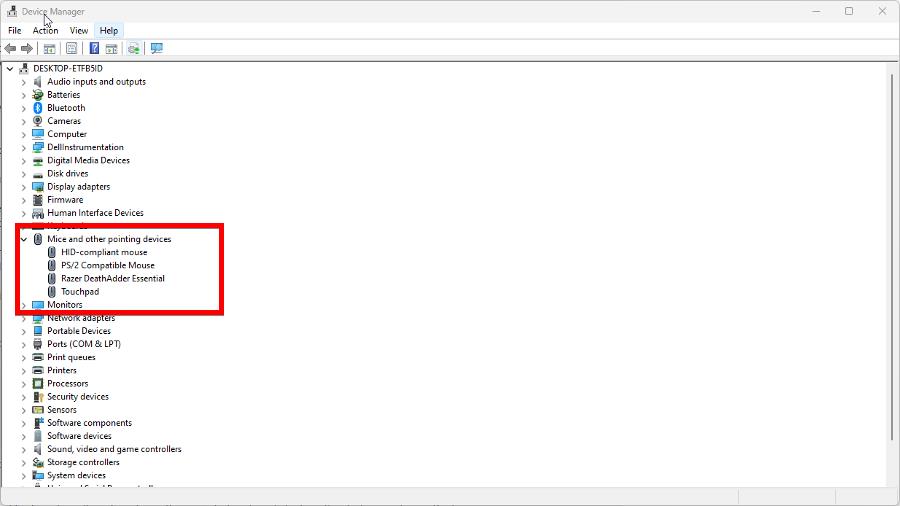
- Launch the Device Manager from the Search bar.
- Expand the entry for the device drivers you want to uninstall, be it the mouse or keyboard.
- Right-click the device name and select Uninstall device.
- In the following window, select the Uninstall button.
- Now go to the website of your device’s manufacturer and download the latest drivers. Below is a sample image.
3. Turn off Power Management settings
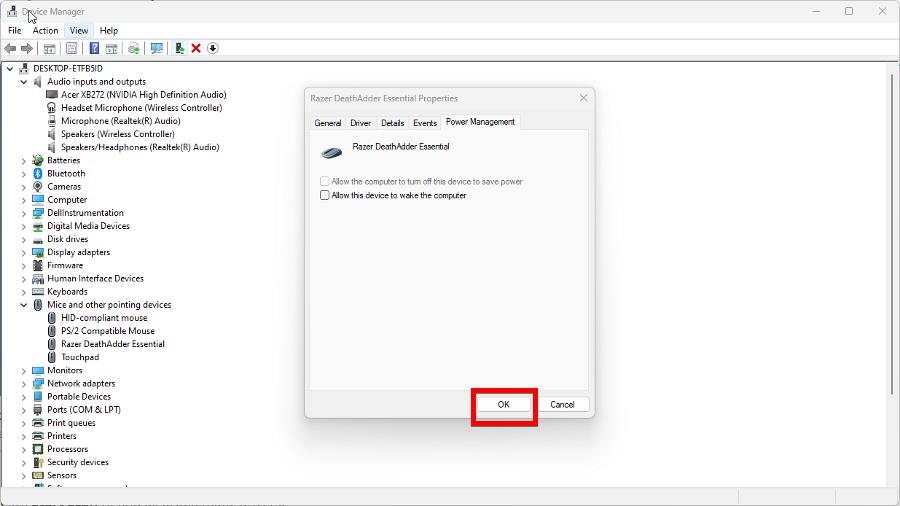
- Return to the Device Manager, right-click your peripheral, but this time, select Properties.
- Go to the Power Management tab in this new window.
- Uncheck the box next to Allow this device to wake the computer, then select OK.
4. Run System File Checker
- Bring up the Command Prompt on the Windows 11 Search bar and select Run as administrator.
- Type the following command in and hit Enter to begin scanning:
sfc /scannow - Give your computer enough time to complete the process.
- If you’re still experiencing problems, type in the following three commands and hit Enter one after the other:
DISM /Online /Cleanup-Image /CheckHealthDISM /Online /Cleanup-Image /ScanHealthDISM /Online /Cleanup-Image /RestoreHealth - Once that’s done, try running the SFC scan and see if that works.
Power outages can cause drives and files on your computer to become corrupted. This is why you should run both an SFC scan and a Disk Check to clear the corruption.
5. Run Disk Check
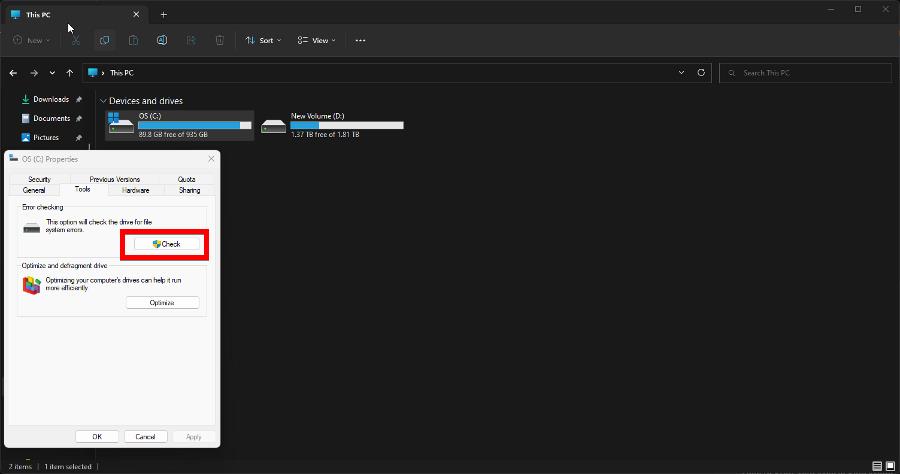
- Open File Explorer and right-click the hard drive you want to scan.
- Select Properties.
- Go to the Tools tab. Click Check underneath Error Checking to begin scanning.
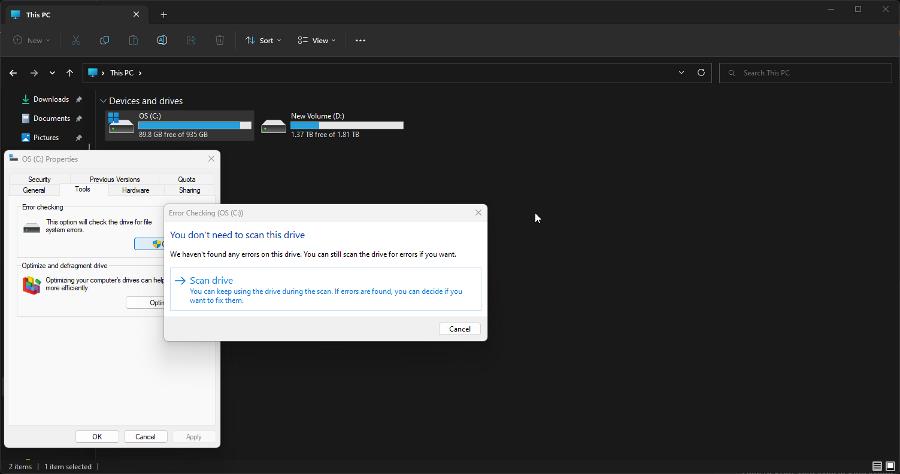
- Select Scan drive in the new window that appears.
- Give your computer enough time to finish scanning.
Disk Check is a Windows system tool that scans that hard drive for any system errors. If it does detect anything, the tool immediately cleans it out.
We recommend running Disk Check semi-regularly to keep up with good computer hygiene. After scanning, the tool creates a log file telling what it found. Be sure to check it out.
6. Clean boot Windows 11
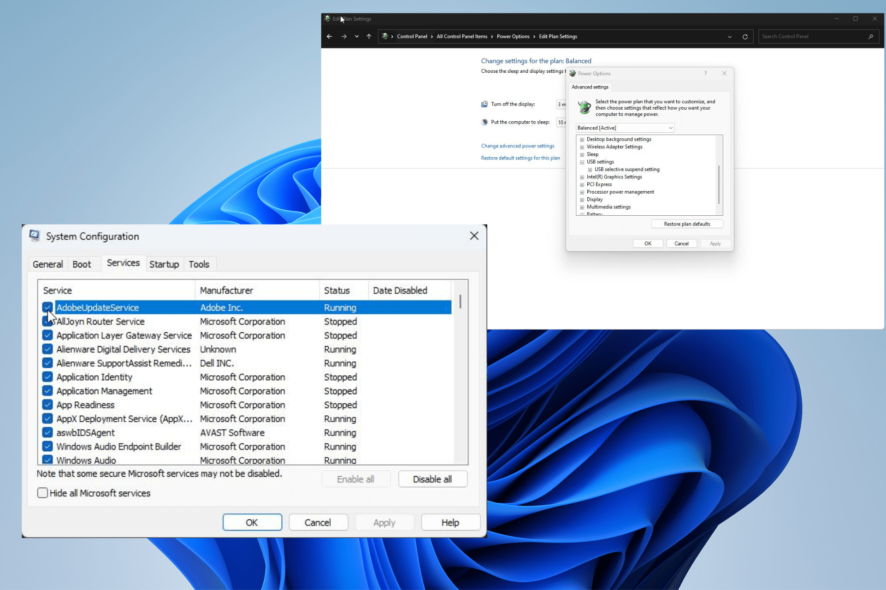
- Launch System Configuration from the Search bar.
- Go to the Services tab, then select Hide all Microsoft services.
- Click Disable all next. Right after that, select Apply.
- Now go to the Startup tab of System Configuration and select Open Task Manager.
- In this new section, disable each app with the Enabled status. You can do this by selecting a program and clicking Disable in the upper right corner. Pay attention to what you disabled.
- Close the Task Manager to return to System Configuration. Click OK to restart your computer.
After restarting, your computer will launch under a Clean Boot. Go back to the Task Manager and reenable the apps you disabled earlier. See if there are any issues that arise.
If you encounter any problem with an app, uninstall it. If you don’t, you may have a faulty Windows Update affecting your computer, which you should immediately roll back.
7. Disable Selective Suspend
- Launch the Control Panel and select Power Options. Make sure the View By setting is set to Large Icons.
- Select Change plan settings next to the computer’s selected power plan.
- On the following page, click Change advanced power settings.
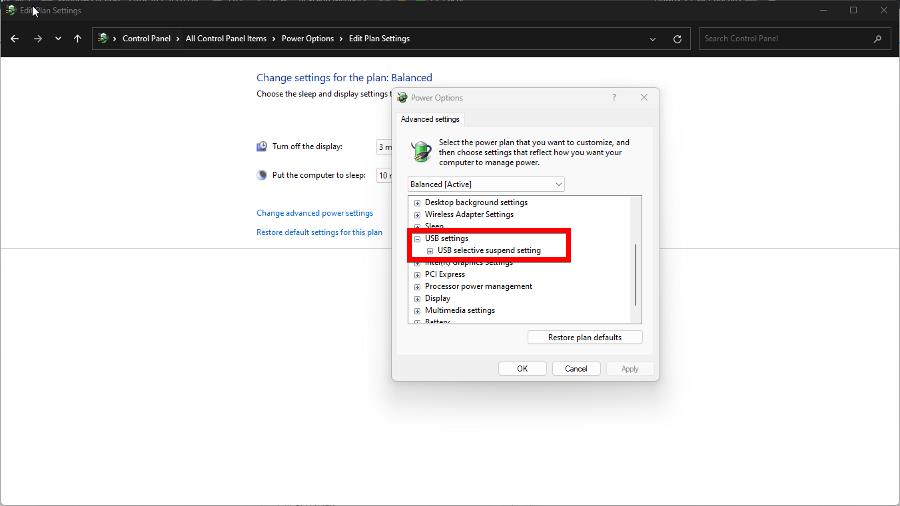
- Scroll down in the new small Power Options window until you find USB settings. Expand that entry.
- Click each entry you see, if there are multiple, and set them to Disabled.
What can I do if my motherboard is failing?
Power outages can also short-circuit a motherboard which can result in systemic failures, random reboots, and crashing, complete with the infamous Blue Screen of Death.
Fixing this problem is a multi-step process you can do right at home. It does require you to open up your computer, replace some damaged parts, and clean out the motherboard.
If something like this intimidates you, you should take in your computer for repairs or send it back to the manufacturer.
Feel free to comment below if you have questions about other keyboard or mouse problems. And please tell us if there’s a specific guide for a Windows 11 error that you’d like to see.













User forum
0 messages