5 Ways to Fix Problem With Printhead on Your HP 6830 Printer
A test printout will tell you all you need to know about the printhead
5 min. read
Updated on
Read our disclosure page to find out how can you help Windows Report sustain the editorial team. Read more
Key notes
- Printhead problems are normally due to ink leakages or clogged nozzles so cleaning them up should fix this issue.
- If not, you can turn to HP's dedicated tool to diagnose the problem and recommend fixes.
- Stay tuned as we lay down more of these tips to get your printhead working again.

Have you encountered a problem with the printhead on your HP 6830? If so, don’t panic. We narrowed down the top solutions that worked for us.
Common reasons for printhead problems:
If you don’t use your printer often enough or if you use it too much, it may become clogged with ink. Other possible reasons could be a damaged printhead, incorrectly installed or incompatible printhead with your HP printer model.
How do I fix the printhead problem on my HP printer?
Start off with the following preliminary checks:
- Ensure that the ink cartridge is correctly installed in the printer and verify all connections are connected properly or securely closed.
- Make sure you have downloaded all the latest updates for your operating system.
- If you have multiple printers installed on your computer, try removing one of them and restart your printer and PC.
1. Update your printer software
- Navigate to your browser and go to the Software and Driver Downloads page for HP printers.
- Click on Printers, enter the required model number, and press the Submit button.
- Expand the Firmware category on the printer’s software page.
- Click Download to save the firmware listed there to a folder.
- Open the folder that includes the downloaded firmware. Then open the firmware file and follow the on-screen instructions to install the latest firmware.
2. Run HP’s maintenance tool
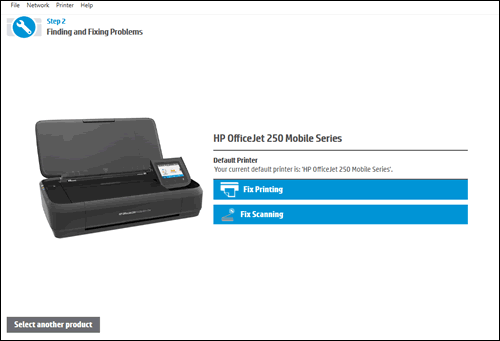
- Download the HP Print and Scan Doctor application.
- Open HPPSdr.exe from the download location. You might need to be an administrator to be able to do this.
- Click on Start and select your printer. If your printer is not present, reboot your printer, then choose Retry.
- Follow the prompts the application gives you and choose Yes if it asks to turn on printer updates. Then set your default printer.
- Now, select the printer that the Problem with printhead error arises for, and click the Next button.
- Select the Fix Printing option.
- HP Print and Scan will then display some troubleshooting results. Follow the troubleshooting instructions if the software displays any X crosses, highlighting unresolved printer errors.
3. Clean the printhead
3.1 Automatically
- Open your HP printer paper tray and load some plain paper.
- Go to the printer control panel and select Setup.
- Scroll until you reach the Printer Maintenance option, then tap to select.
- Select Clean Printhead, and a test page will print.
- Examine the test page.
3.2 Manually
- Turn off your HP printer and unplug the power cord from the wall outlet.
- Wait five minutes or until the printer cools down completely before proceeding further to avoid electric shock or injury from hot surfaces while handling parts inside the printer.
- Open the cartridge access door, remove all the cartridges, and put them somewhere with the ink opening up. Do not leave the cartridge outside of the printer for longer than 30 minutes.
- Now carefully, lift the latch handle on the print carriage until it stops and remove the printhead, also by lifting it up.
- Use an alcohol wipe to clean the copper contacts on both sides of each cartridge. Do not touch any other part of these cartridges or let any liquid get inside them.
- Blow out any remaining dried ink or dust from inside each nozzle opening on your printhead. Do not use anything sharp or abrasive to clean inside your nozzles.
- Replace each cartridge in its slot and ensure it is firmly seated before closing and locking them back into place. You should hear a click sound as confirmation.
4. Reset your printer
- Switch on the printer if it’s off, then remove the power cord from the back of the printer.
- After that, unplug the power cord from the wall.
- Next, plug the printer’s power cable back into the wall socket for a few minutes.
- Plug the power cable into the back of the printer and switch the printer on.
5. Replace your printhead
Depending on how old your printer is, this can be an expensive affair. Over time, HP discontinues some printer models and versions to make way for newer ones. Unfortunately, you cannot get a generic printhead or else you’ll get the this printhead is incorrect error because of compatibility issues.
If you’re lucky, you can get a replacement for your model. Better yet, if your warranty is still valid, you can take your HP 6830 to one of HP’s offices, and a qualified technician will have a look at it for further diagnosis and assistance.
However, if not, you may have to replace your printer. Lucky for you, we’ve lined up a few affordable HP printers whose performance is great and won’t cause too much damage to your pockets.
What are some tips for printhead maintenance?
- Clean your printhead regularly by running cleaning cycles, as recommended by the manufacturer.
- Replace ink cartridges once they have run out to prevent any clogging from happening due to leftover ink.
- Use only genuine HP cartridges and papers in order to avoid any problems with quality and performance.
- Avoid staying for long periods without printing, and keep your printer drivers updated to avoid the printer validation error.
These instructions are suitable for resolving the problem with printhead on HP 6830 printer as well as other HP printers. Unfortunately, printhead errors do not end here but we’ve covered most of them in our expert guide so don’t hesitate to review it if you experience a variation of this error.
There are many tactics to fix printer problems so if you have your own that is missing from our list, feel free to share it with us in the comment section below.




User forum
0 messages