Chroma Visualizer not Working: X Ways to Enable it Again
First verify you are on a supported platform
4 min. read
Updated on
Read our disclosure page to find out how can you help Windows Report sustain the editorial team. Read more
Key notes
- When Razer Audio Visualizer is not working, some services or packages needed might be disabled or not installed.
- Users have confirmed enabling certain services helped them fix Razer Audio Visualizer.
- Some users might need to adjust specific Razer Audio Visualizer settings to get their visualizations to work.
Let us explore all you should know about Chroma Visualizer not working, how to sort it out, and what implications these actions might have.
The Razer Audio Visualizer software enables dazzling audio-lighting effects for Chroma keyboards and other compatible devices.
However, some users have said on the Razer forum that Audio Visualizer’s lighting effects don’t work for them. These fixes might get Audio Visualizer’s light effects working.
Why is my Razer Visualiser not working?
There could be multiple reasons why your Razer Visualizer is not working; here are some common reasons:
- Outdated software or drivers – Some users may still be running on old drivers for your Razer Visualizer.
- Incorrect settings – If the Visualizer is not enabled and configured correctly in your device settings, it may lead to this problem.
- Unsupported platform – Ensure your device and operating system are compatible with the Razer Visualizer.
- USB connection issues – Also, if the USB port is not working or the device is not connected correctly, it could be a trigger.
- Hardware issues – A hardware problem with your device may need to be addressed.
It is good to ascertain the cause of the problem so that you know which solutions we recommend below will work.
How can I fix the Razer Chroma visualizer if it’s not working?
Before venturing into the solutions below, check your device compatibility.
Audio Visualizer only works with supported Chroma hardware devices. So, none of the fixes here will work if Audio Visualizer doesn’t support your peripherals.
Hence, open the Audio Visualizer download page, including a list of supported devices that work with the visualization software.
1. Uninstall and reinstall Chroma SDK
You can uninstall the Chroma SDK software with the default Windows uninstaller, but many third-party uninstaller utilities have better features. IObit Uninstaller is among the more highly-rated uninstaller tools that can remove Chroma SDK and all its leftover residual files and registry entries.
Furthermore, you can uninstall almost anything with IObit Uninstaller. That utility enables users to uninstall browser extensions and plugs, UWP apps, and Windows updates. You can also utilize IObit Uninstaller to identify and uninstall unwanted bundleware.
Other useful IObit Uninstaller features
- It includes a File Shredder utility for deleting files
- The Software Updater feature in IObit Uninstaller enables users to update software
- Users can uninstall software with IObit Uninstaller’s Force Uninstall tool
- IObit Uninstaller’s Install Monitor logs system changes for software installation

IObit Uninstaller
Fix the Razer Audio Visualizer not working issue with just a few clicks of your mouse and this amazing software.2. Install Visual C++ Redistributable for Visual Studio 2015
- If Visual C++ Redistributable for Visual Studio 2015 isn’t installed on your PC, open the Visual C++ Redistributable page in a browser.
- Click the Download button on that webpage.
- Select either vc_redist.x64.exe (64-bit) or vc_redist.x86.exe (32-bit), depending on your PC’s architecture. Then click Next to download the package.
- After that, open the folder you downloaded the Visual Studio package to.
- Lastly, click the Visual C++ installer to install the package.
4. Make sure you have Chroma apps enabled
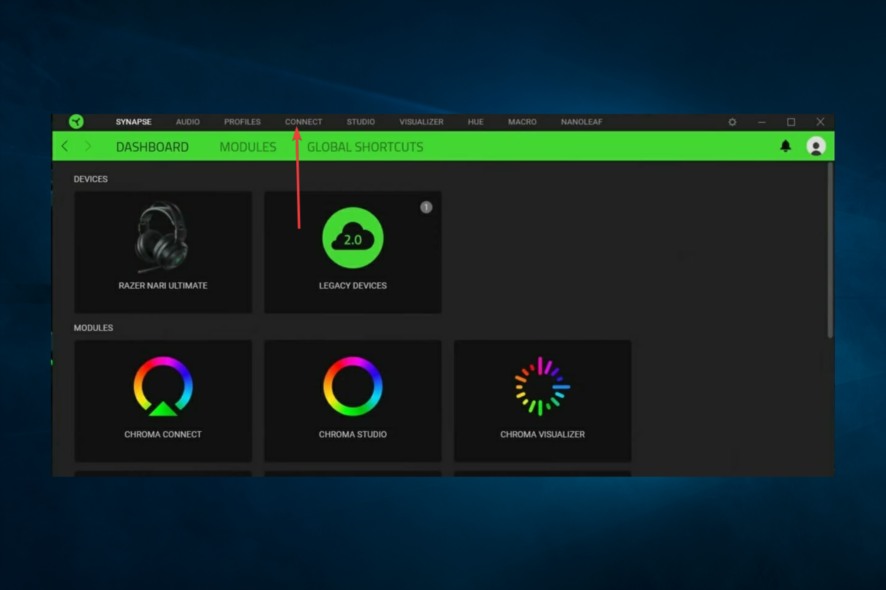
- Open your Razer Synapse software.
- Select the Connect tab in Razer Synapse.
- Then click Apps, and toggle on the Chroma Apps or Enable this app option.
5. Enable Razer Chroma SDK services
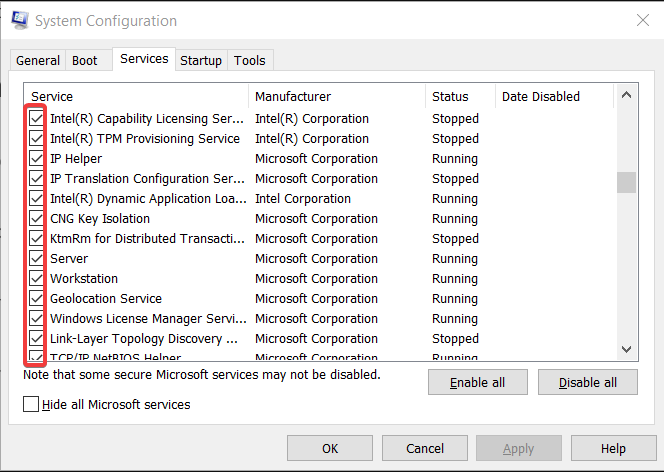
- Press the Windows key and R simultaneously, type MSConfig, and hit Enter.
- Click the Services tab, then tick the checkboxes for Razer Chrome SDK Server and Razer Chrome SDK Service.
- Press the Apply and the OK buttons to save the service settings, and finally, Restart on the System Configuration prompt that opens.
6. Raise the Amplitude setting
Some users have also said they needed to raise the Amplitude setting in the Audio Visualizer software to fix the lighting.
- Open the Keyboard Visualizer window, and enter a higher value (like 7,000) in the Amplitude box.
- Then press the Save Settings button.
Those are some of the resolutions users have confirmed to fix the Razer Audio Visualizer. So, with Audio Visualizer fixed, you’ll witness its unique Razer Chroma keyboard visualizations rocking your beats.
Finally, we are curious to know what has worked for you. Please tell us in the comments section below.





User forum
0 messages