How to Add a Watermark in Word [2 Great Tips]
Use either a preconfigured or custom made watermark in Word
Key notes
- Watermarks are texts and images inserted behind a document to claim ownership or tell the document's purpose.
- It helps prevent counterfeiting and can only be removed by the original owner of the document.
- You can add watermarks to a document in Word by using a predesigned sample or a custom watermark.

The watermark feature in Microsoft Word allows you to add a light and faded image of text, picture, and logo that appears behind the main content. Sadly, many users have complained about not knowing how to use it. Hence, this guide will discuss how to add watermarks in Word.
Also, we have a detailed guide on fixing Word experiencing an error when opening the file error on Windows 11.
Why add a watermark to a file?
There is one primary reason for adding watermarks to files, and it is to prevent counterfeiting. It protects the documents shared from being counterfeited and altered by other users downloading them. So, adding a watermark to a file helps you retain ownership regardless of who has the file.
Also, file owners use watermarks to indicate the purpose of a document like CONFIDENTIAL, DO NOT COPY, DRAFT, SAMPLE, etc.
They cannot be removed except by the original owner and can’t be copied by others or used without permission. This document protective method has proven to be effective against counterfeiting.
How can I add a watermark in Word?
1. Use a preconfigured watermark
- Open the document you want to add a watermark to in Word.
- On the top taskbar, select the Design tab. Click on the Watermark option on the top bar menu’s right side.

- Choose the watermark you want to insert by clicking on it from the preconfigured images, then it will reflect on all the pages.

Check our guide on what to do if Microsoft Word has stopped working on your PC.
2. Use the Custom watermark option
- Repeat steps 1-2 above, then click on Watermark.
- Go to the bottom of the page and select Custom Watermark from the available options.

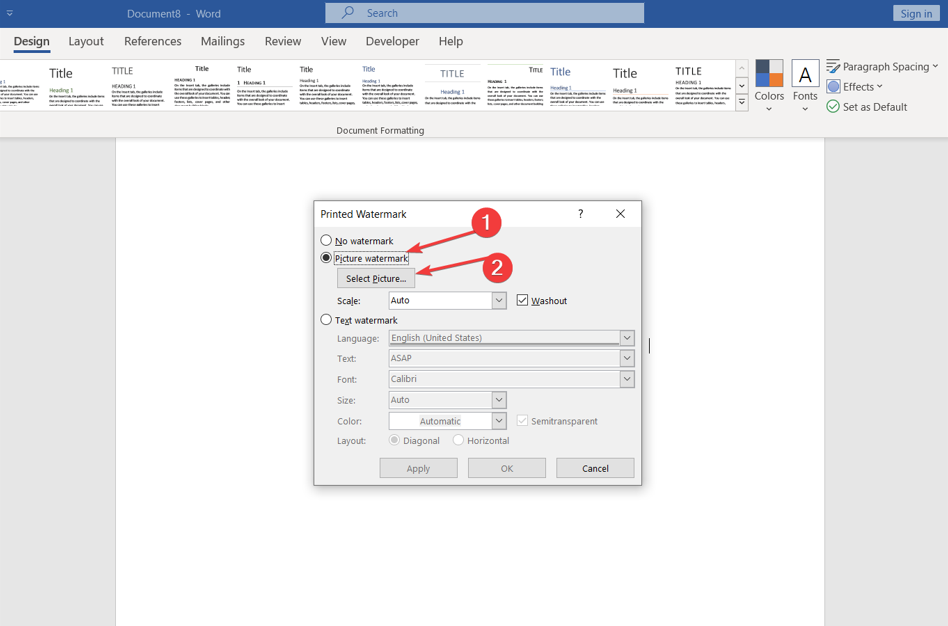
- Click the Picture watermark on the new page, then tap the Select Picture button. The picture will reflect behind the document.
- Go to Texts, input your watermark’s text in the text box, and select a desired font from the Font tab.

- Go to the Size and Color tab and select the size and color of your watermark, then select the Layout option of your choice.
- Click on Apply and then OK to add the watermark.

Conversely, some of our readers may be interested in our detailed article about how to remove watermarks in Word in a few steps.
Conclusively, you can check our review of the best batch watermark software for protecting your images online.
Should you have further questions or suggestions regarding this guide, kindly drop them in the comments section below.
Read our disclosure page to find out how can you help Windows Report sustain the editorial team. Read more


Improve this guide


User forum
0 messages