Adobe Premiere Pro not Exporting Full Video? How We Fixed it
Fix Adobe Premier error and get back to work in no time
5 min. read
Updated on
Read our disclosure page to find out how can you help Windows Report sustain the editorial team Read more
Key notes
- Even though Adobe Premiere Pro is an industry-standard in terms of video editing software, sometimes it won't export videos.
- A first step would be to make sure that Adobe Premiere Pro is updated to the latest version available.
- Also, you should make some adjustments in the rendering optimization settings, among other solutions.
- Find in the article below more troubleshooting steps for this video exporting issue in Premiere Pro, so read on!
Adobe Premiere Pro has become an industry standard when it comes to video editing, but many users reported that Adobe Premiere does not export video.
This can be a big problem, and that’s why we have found the best solutions for you to solve this problem easily, so keep reading.
What can I do if Premiere Pro is not exporting any video?
1. Install the latest Premiere Pro updates
Before proceeding with any troubleshooting steps, ensure the root of the problem isn’t just you having an outdated version of Adobe Premiere Pro.
Remember that Adobe constantly updates its software, meaning your current version is most likely dated by now.
That being said, make sure you have the latest version installed, only go for the troubleshooting steps afterward.
Additionally, you should install the newest software updates and get brand-new features of Adobe Premiere Pro.
2. Restart your PC
You would be surprised to know how often the errors can be solved with a simple computer restart.
Restarting your computer is always the first thing you should do after encountering an error and before applying any other fixes.
3. Ensure that you have enough storage space
If Adobe Premiere does not export video, it’s possible that you don’t have enough storage space. To fix this issue, try freeing up some space and try again.
The error may also occur if you are using an external hard drive as a storage device for exported videos. Try to export the videos to the internal hard drive and see if it is resolved.
This is particularly helpful if you get Disk Full, I/O Error, or Invalid output drive errors.
4. Close the other programs
If you are getting Unable to save file. Destination file is in use by Premiere, or destination file is in use by Adobe Media Encoder error, then look for any other application that might be using the destination file.
If you have other programs using the same file or trying to access the location, close the program and relaunch Adobe Premiere Pro.
5. Change the rendering optimization preferences
- Launch Premiere Pro.
- Go to Edit, and select Preferences.
- Click Optimize rendering for, and select Memory.
- Click OK to save the changes.
- Close Premiere Pro and reopen the project for changes to take effect.
If Adobe Premiere does not export video, the issue might be related to virtual memory. You can fix this by changing the rendering optimization preference from Performance to Memory.
6. Check for Folder permission
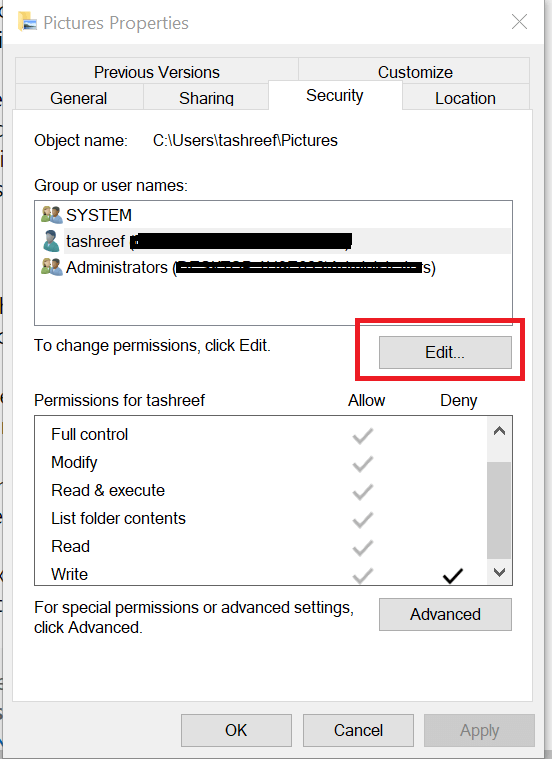
- Go to the folder location where the exports are saved.
- Right-click on the Folder, and select Properties.
- Open the Security tab, and click on Edit.
- Under Group or user names, look for your username. If not found click on Add.
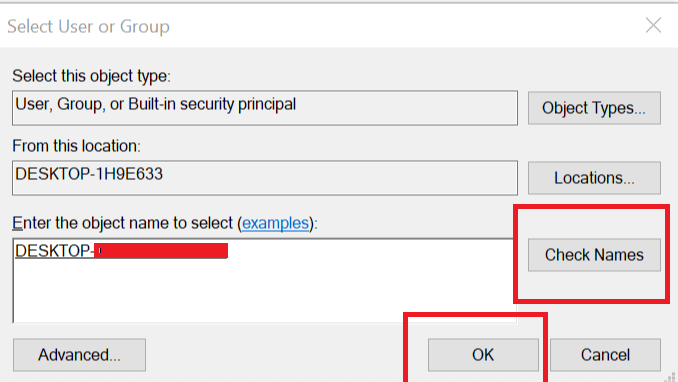
- Enter your username, and click Check Names.
- Click OK to add the user.
- Under the Permissions for username check the Full Control option.
- Click on Apply, and press OK to save changes.
If you are writing into a folder without appropriate permission, you may encounter Unable to create or open output file error. To fix this, you must take full control of the said folder.
Adobe Premiere Pro does not require Full Control on any location but only permission for reading and writing. However, providing Full Control permission can resolve permission-related errors.
7. Change the codec format
- Open Export Settings.
- For Format: click on Drop-down menu, and select QuickTime or None.
- For Video Codec select Photo – JPEG from the drop-down menu.
- After that, try to export the video.
By default, Premiere Pro uses h.264 or MPEG codec format for rendering videos. However, due to compression issues, you may get the following message error:
Codec compression error. This codec may be unable to support the requested frame size, or there may be a hardware or memory problem error.
To fix this, try to change the codec format as explained above.
8. Check Media for file corruption
If Adobe Premiere does not export video, some project frames may be corrupt.
One way to fix this is to disable all tracks but one and export the video. Do this for all the tracks until you can recreate the exporting error.
If found, save the project with a different name and export the project by removing the problematic frame or track.
After that, please create a new project, open the problematic track or frame, and save it with a new name. Open the exported video import the newly saved corrupt frame and insert it into the completed project.
Export the video, and you should be able to render it without any error.
Our guide on how to fix the Adobe Media Encoder not installed error may provide further solutions so check it out.
These are some solutions you can try if Adobe Premiere does not export video. Be sure to try them, and let us know which fix worked for you in the comments.

