Fix: All USB Devices Disconnect and Reconnect on Windows 11
First, run the Hardware & Devices troubleshooter
Key notes
- To fix the all USB devices disconnect and reconnect on Windows 11 issue, reinstall the universal serial bus controller driver, modify the power management settings, or disable the USB select suspend setting.
- Keep reading to know the detailed steps for each method!

If your USB devices keep disconnecting and reconnecting themselves on your Windows 11 computer, this guide can help!
We will discuss the common causes behind the issue along with the expert-recommended solutions to fix it in no time.
Why do all my USB devices keep disconnecting and reconnecting?
- Loose or damaged USB cables/ports or USB drives with bad sectors.
- Outdated or corrupted USB drivers could cause connectivity issues.
- Insufficient power supply.
- Third-party apps or corrupted system files may conflict with USB devices.
How do I stop my USB devices from disconnecting and reconnecting in Windows 11?
Before engaging in advanced troubleshooting steps to fix the USB hub keeps disconnecting and reconnecting issue, you should consider performing the following checks:
- Shut down your PC, unplug the power cables, press & hold the Power button for 30 seconds, plug in the power cables, then restart your PC.
- Ensure the USB port works fine & verify if the the USB drive is compatible with your device.
- Check for Windows updates, and update your BIOS firmware.
- Connect the flash drive or external disk to another port or computer to ensure they are not causing the issue.
- Perform a clean boot and check if you can single out the app causing the issue.
1. Run the Hardware and Devices troubleshooter
- Press Windows + R to open the Run dialog box.

- Type the following command and click OK to open Hardware and Devices troubleshooter:
msdt.exe -id DeviceDiagnostic - Click Advanced.
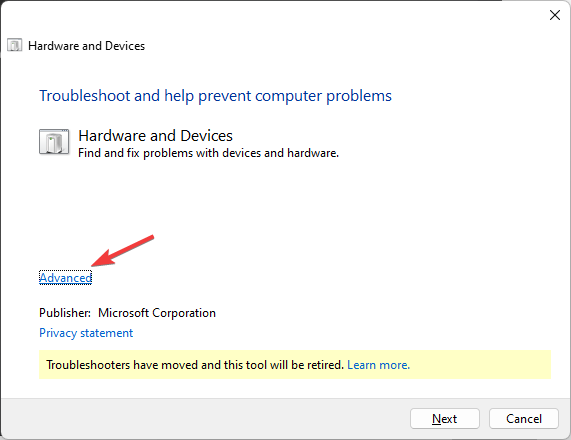
- Place a checkmark next to Apply repairs automatically and click Next.

- Select the device from the list.
- Click Apply this fix.
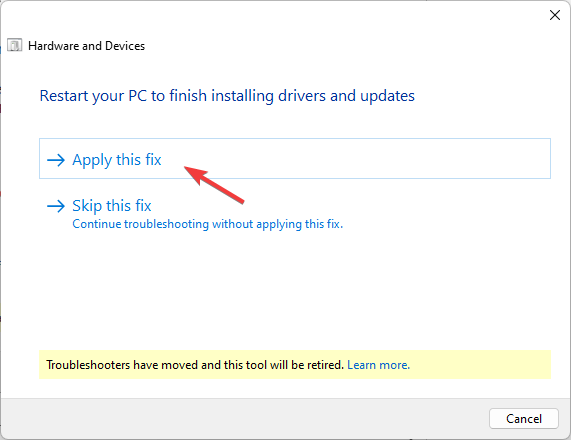
- On Restart your PC screen, click Next. Your computer will reboot, so make sure before you click Next save up all your work to avoid losing any data.
Running the Hardware and Devices troubleshooter is the quickest way to fix similar issues like the USB port not working after a power surge.
2. Check the Power Management settings
- Press Windows + R to open the Run dialog box.

- Type devmgmt.msc and click OK to open the Device Manager app.
- Locate and double-click Universal Serial Bus controllers to expand it.
- Right-click the affected USB driver and choose Properties from the context menu.

- On the Properties window, switch to the Power Management tab and remove the checkmark next to the Allow the computer to turn off this device to save power option.

- Click OK, then restart your computer to confirm the changes.
If you have multiple USB devices connected, repeat the steps for all of them to disable the power-saving option.
3. Update/reinstall the USB driver
- Press Windows + R to open the Run dialog box.
- Type devmgmt.msc and click OK to open the Device Manager app.
- Locate and double-click Universal Serial Bus controllers to expand it.
- Right-click the affected USB driver and choose Update driver from the context menu.

- Click Search automatically for drivers.

- If an update is available, follow the on-screen instructions to complete the process.
Restart your computer and plug in the USB to check if it is still disconnecting and reconnecting on your Windows 11 computer. If yes, then follow these steps to reinstall the device:
- On the Device Manager app, locate and double-click Universal Serial Bus controllers to expand it.
- Right-click the affected USB driver and choose Uninstall device from the context menu.

- Next, go to Action, then select Scan for hardware changes to reinstall the driver.

As per our WR experts, reinstalling the USB drivers can fix various USB-related problems like PC shuts down after connecting a USB device; read this guide to know more.
- Download and install Outbyte Driver Updater.
- Launch the software.
- Wait for the app to detect all faulty drivers.

- Now, it will show you all the malfunctioning drivers listed to select the ones to Update or Ignore.
- Click on Update & Apply Selected to download and install the newest versions.
- Restart your PC to ensure the applied changes.

Outbyte Driver Updater
Secure your Windows PC with Outbyte from various errors caused by problematic drivers.4. Disable the USB selective suspend setting
- Press the Windows key, type control panel, and click Open.

- Select Large icons for View by and click Power Options.

- Click the Change the plan settings link.

- Click Check advanced power settings.

- On the Power Options window, locate and click USB settings to expand it.
- Click the USB selective suspend setting and select Disabled for On battery and Plugged in.

- Click Apply, then OK.
- Reboot your PC to let the changes take effect.
5. Run SFC & DISM scans
- Press the Windows key, type cmd, and click Run as administrator.

- Type the following command to scan & verify the integrity of system files and replace the corrupted ones with backup copies stored in a local cache, then hit Enter:
sfc/scannow
- Copy & paste the following command to restore the system image for Windows OS and press Enter:
Dism /Online /Cleanup-Image /RestoreHealth
- Restart your computer to save the changes.
6. Perform an in-place upgrade (Last resort)
- Go to the Windows 11 official website and under the Download Windows 11 Disk Image (ISO) for x64 option, select Windows 11 (multi-edition ISO) and click Download Now.

- Next, choose language from the drop-down, click Confirm, then click the Download button.
- Once downloaded, locate the ISO file, right-click, and choose Mount from the context menu.

- Now double-click setup.exe file to open the Windows 11 Setup wizard and click Yes on the UAC prompt.

- On the Install Windows 11 dialog box, click Next.
- Click on Accept on the license terms page.

- On the Ready to install page, ensure the Keep personal files and apps option is checked to keep your files. If it is not selected, click Change what to keep and choose to keep files.
- Next, click Install.

Your computer will restart a few times to complete the process. Once done, you will be greeted with the login screen. Enter your password, reconnect all USB drives, and check if they keep disconnecting.
To conclude, keeping your USB drivers updated, disabling the power saving option, and running SFC & DISM scans can help you resolve the problem, and similar ones like the USB Wi-Fi adapter keeps disconnecting.
Did we miss a method that helped you? Don’t hesitate to mention them in the comments section below. We will happily add them to the list.
Read our disclosure page to find out how can you help Windows Report sustain the editorial team. Read more


Improve this guide

User forum
0 messages