AMDPPM.sys: What Causes This BSOD & How to Fix It?
Explore the expert-tested methods to fix the issue
Key notes
- This BSOD error could occur due to malware infection, overclocking or incompatible software.
- This guide will cover all the available methods to fix the error.

Encountering a BSOD error can be frustrating as it prevents you from accessing your computer. For example, one of the most common BSOD errors users face on Windows 10 and 11 is amdppm.sys.
AMD Primary Processor Module (AMDPPM) is a driver used to enable both internal and external components, including graphics cards, drives, printers, or other input devices. If it is missing or corrupted, you get this error.
This guide will cover all the available solutions to fix the error right after discussing the causes of the issue.
What causes the amdppm.sys BSOD error?
There are various reasons for this BSOD error; some of the common ones are:
- Malware infection – If your computer is infected, you might be unable to perform normal functions on your computer and get BSOD errors.
- System files corrupted – If the system files are missing or corrupted, you might encounter BSOD errors like this.
- Overclocking enabled – Sometimes, overclocking can cause BSOD errors. To fix it, you need to disable overclocking.
- Outdated file – If the amdppm.sys file is corrupted, outdated, or missing; then it can cause this BSOD error.
What can I do to fix the amdppm.sys BSOD error?
Before engaging in advanced troubleshooting steps, you should consider performing the following checks:
1. Use the Registry Editor
- Press the Windows + R to open the Run window.

- Type regedit and press Enter to open Registry Editor.
- Follow this path:
Computer\HKEY_LOCAL_MACHINE\SYSTEM\CurrentControlSet\Services\amdppm - Locate the Start key, right-click it, and change the Value data to 4.

- Then, restart your computer to let the changes take effect.
2. Disable overclocking settings
- Press Windows + I to open Settings.
- Go to System, and click Recovery.

- Locate Advanced startup and click Restart Now.

- On the Choose an option screen, select Troubleshoot.

- Click on Advanced options.

- Now select UEFI firmware settings and click Restart.

- Choose an appropriate option to enter BIOS.
- Go to the Advanced tab, and choose Performance.
- Look for Overclocking option, and disable it.
- Press the Esc key, and select Save and Exit to restart your computer.
3. Reset the BIOS
- Shut down your computer completely. Then, press the power button to restart the device.
- Now press F2, F10, or the designated key to enter BIOS as per your device’s manufacturer.
- Locate Load Defaults or Reset to default option.

- Follow the onscreen prompts to complete the process.
4. Use the Command Prompt
4.1 Reregister AmdPPM.sys
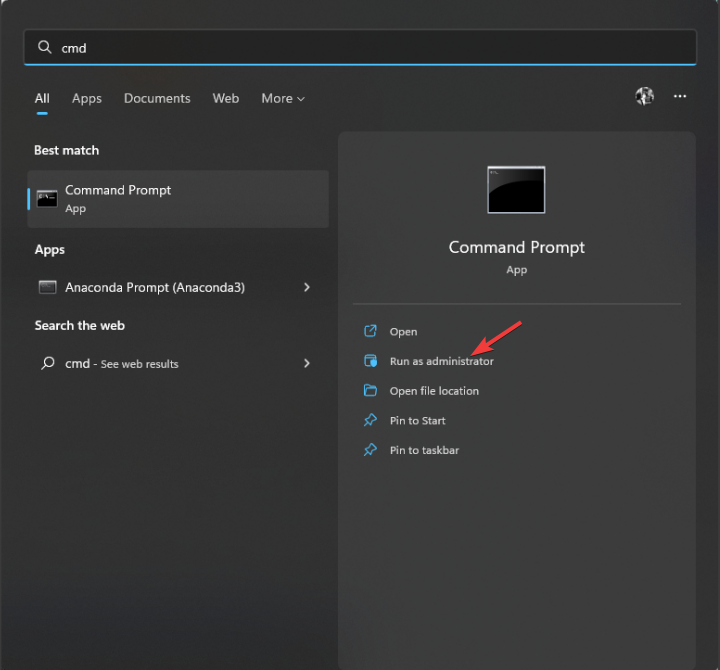
- Press the Windows key, type CMD, and click Run as administrator.
- Copy and paste the following commands one by one to reinstall AmdPPM.sys and press Enter after every command:
regsvr32 /u AmdPPM.sysregsvr32 /i AmdPPM.sys
4.2 Run SFC & DISM commands
- Open Command Prompt with administrator rights.
- Type the following command to repair the system files and press Enter:
sfc/scannow
- Next, copy and paste the following command and press Enter:
DISM /online /cleanup-image /restorehealth
- Finally, restart your computer to let the changes take effect.
5. Run the Disk Cleanup
- Press Windows + R to open the Run console.

- Type cleanmgr and press Enter to open the Disk Cleanup window.
- On the Disk Cleanup: Drive Selection window, select C Drive and click OK.

- Now click Clean up system files.

- Again on Disk Cleanup: Drive Selection window, select C Drive and click OK.
- Under Files to delete, place a checkmark for all items listed and click OK.

- Now click Delete Files.

6. Restore your computer settings using System Restore
- Press Windows + R to open the Run dialog box.

- Type rstrui and press Enter to open System Restore.
- Select Choose the different restore point on the System Restore window and click Next.

- Select the Restore point from the list and click Next.

- Click Finish, and Windows will restore your computer to the chosen point.

7. Update the drivers
- Press the Windows key, type Device Manager, and click Open.

- Now go to Display adapters, and expand them.

- Select the AMD driver, right-click, and choose Update driver.
- Now follow the onscreen prompts to complete the process.
Besides the manual process, you can as well choose a more efficient and secure way to automatically update any drivers.
The tool is called Outbyte Driver Updater and it starts with a full system scan that detects outdated or broken drivers, thus updating them with 1 click.
8. Reinstall the operating system
If nothing has worked for you, you might have to reinstall the operating system to fix this BSOD error. To reinstall the operating system, you can follow these steps:
8.1 Create an installation media
- Go to the Download Windows 11 page on Microsoft website.
- Under Create Installation media, click Download now.

- Double-click the downloaded file and click Yes on the UAC prompt.
- Insert the USB drive, and make sure the USB drive has 8 GB of space.
- The Windows 11 Setup page will appear; click Accept to agree to the license terms.

- On the Select language and edition window, choose Language, Edition, and click Next.

- On the Choose which media to use window, select USB flash drive and click Next.

- Follow the onscreen instructions and click Finish.
8.2 Reinstall Windows 11 on your PC
- Insert the USB drive and restart your computer.
- As your computer restarts, press the designated key for BIOS; it could be F2, Esc, F10, or DEL, depending upon your device manufacturer.
- When prompted, change the boot order and choose it to restart using a USB flash drive. When prompted, press any key to continue booting.
- Once your computer restarts, you will get the screen to install Windows 11.
- Choose the Language to install, Time and currency format, and keyboard or input method. Once you have made a choice, click Next.

- Follow the onscreen instructions, and click Install on the last screen to start the installation.

So, these are the steps you must follow to fix the amdppm.sys BSOD error on Windows 11. Try them and let us know what worked in the comments section below.
Read our disclosure page to find out how can you help Windows Report sustain the editorial team. Read more


Improve this guide


User forum
0 messages