The Audio Service is Not Running [Windows 11 Fix]
A common problem often caused by faulty updates
5 min. read
Updated on
Read our disclosure page to find out how can you help Windows Report sustain the editorial team Read more
Key notes
- One of the common problems on Windows 11 is the Audio Services not running error which can be caused by speakers not being set properly.
- Because it’s so widespread, this error is well documented, with many different solutions reconfiguring the services to updating drivers.
- Regardless of what solution you choose, each of them is easy to follow and quick to implement. For example, you may need to restart Windows Audio Services.
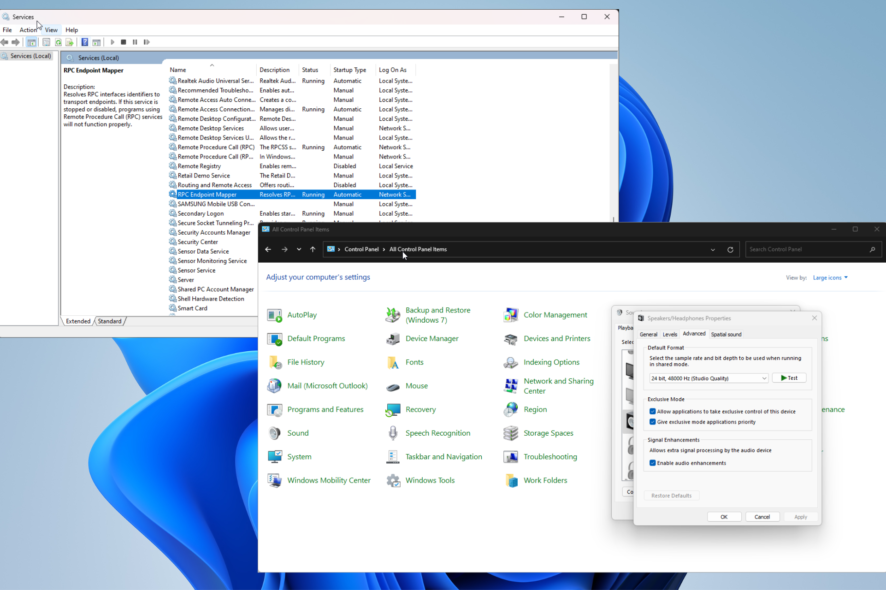
If you’ve ever experienced audio suddenly cutting off in the middle of playing music, you have a problem with Windows Audio Service. You may see a little message in the corner telling you it’s not running.
Audio Service not running is actually a pretty common problem that can manifest itself in different ways. And luckily, the solutions are pretty easy to solve.
What’s causing Audio Service not to work properly?
Being such a common problem, there are tons of reasons why Windows Audio Service will stop working. So instead of going through an exhaustive list, here are the most common reasons:
- You downloaded a faulty update: This is by far the most likely reason. The new Windows update has some problems, or something went wrong during installation. You can fix this by uninstalling it.
- Your computer’s speakers may be broken: We recommend bringing your machine in for repairs, but before you do that, you can try modifying the registry and see if that works.
- The default speakers aren’t correctly set: It’s possible computer audio is going to the wrong output. Change the output device, and you should be good.
- Your computer is infected with malware: Another likely culprit. Computer viruses are often the source of many Windows problems. We recommend downloading an antivirus app to clean up.
What can I do if the Audio Service is not running on Windows 11?
There are a handful of quick solutions you can try out to mend Audio Service malfunctioning before going to the complex ones:
- Double-check your cables and volume. Something may be loose or properly plugged in. And it’s possible you accidentally muted your computer.
- Run Windows Audio Troubleshooter. This software tool will scan your audio devices connected to your computer, then automatically repair them.
1. Adjust settings in Control Panel
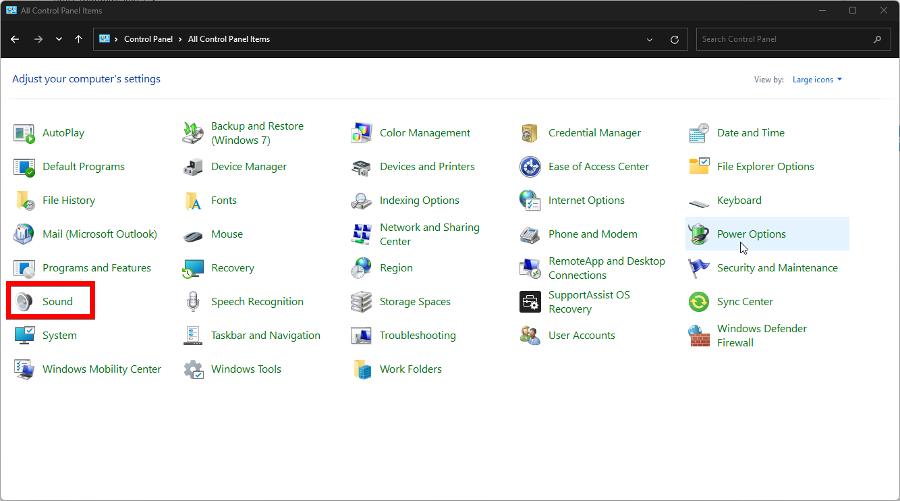
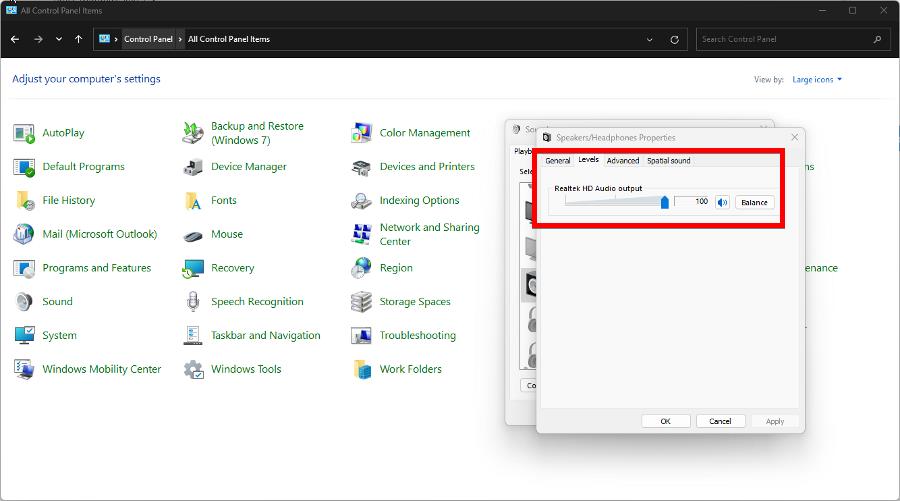
- Bring up the Windows Control Panel and click Sound. Make sure the View By selection is set to large icons.
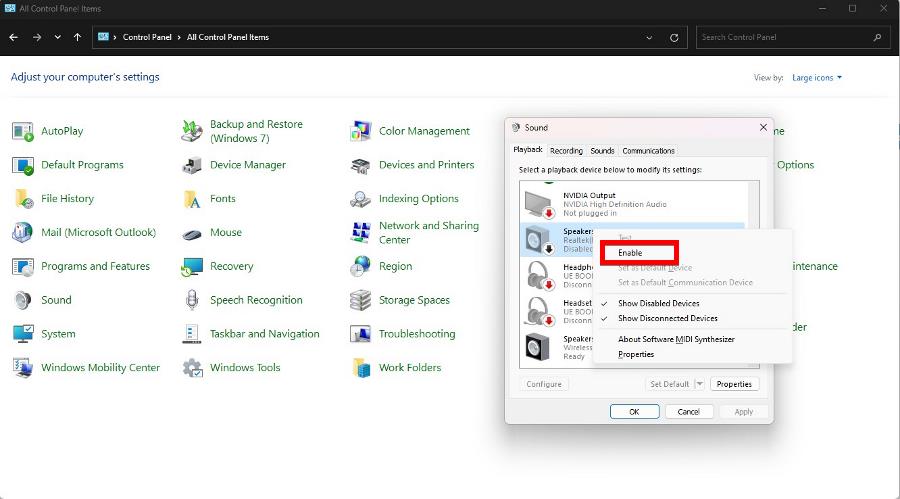
- In the Playback tab, right-click the Speakers selection and click Enable.
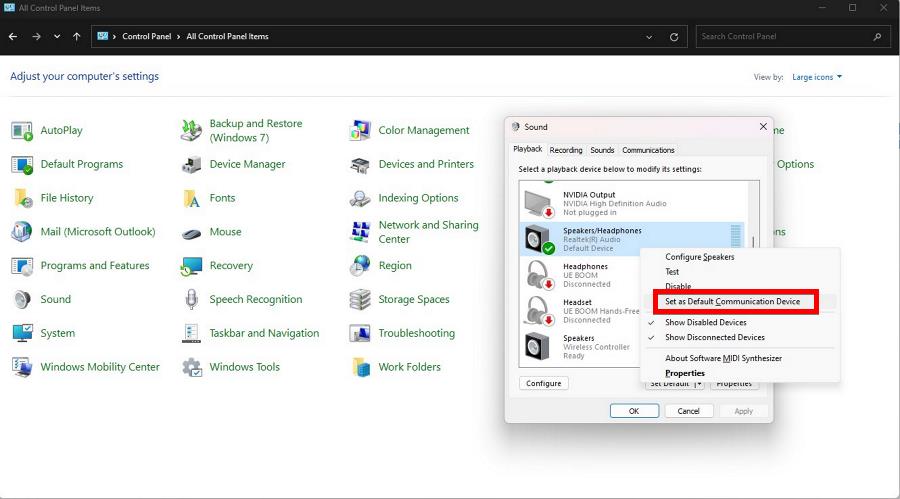
- Right-click it again and select Set as Communications Device.
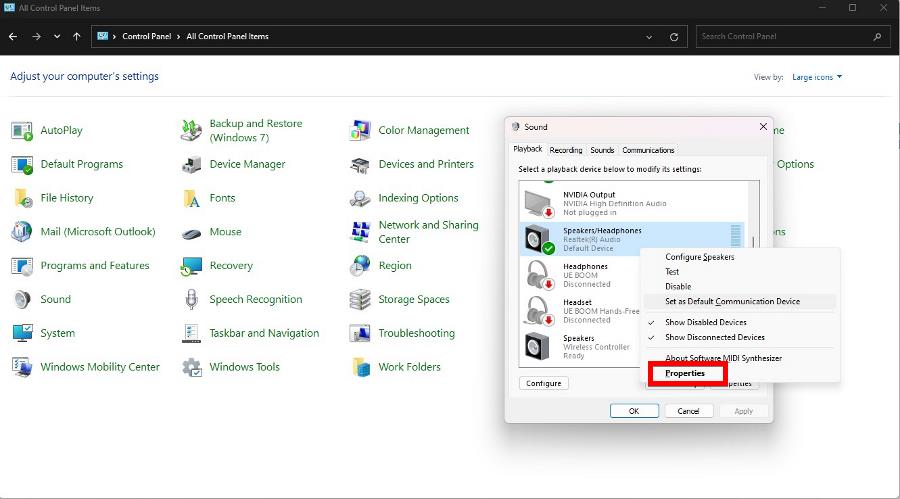
- Right-click Speakers one more time and select Properties.
- Go to the Levels tab and drag the slider all the way to the largest value.
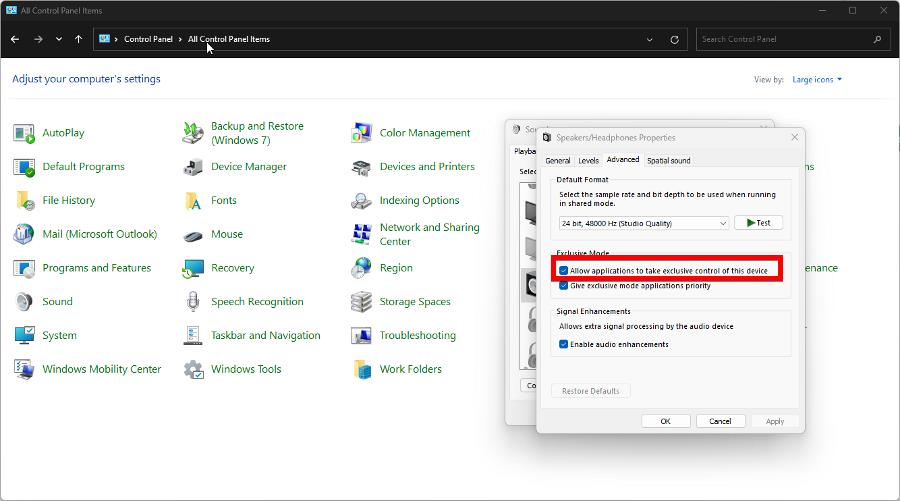
- Now go to Advanced and check off the box next to Allow applications to take exclusive control of this device.
- Restart your computer and see if your audio works.
2. Restart Windows Audio Services
- Right-click the Windows logo in the left-hand corner and click Run.
- Type in services.msc and hit Enter on your keyboard.
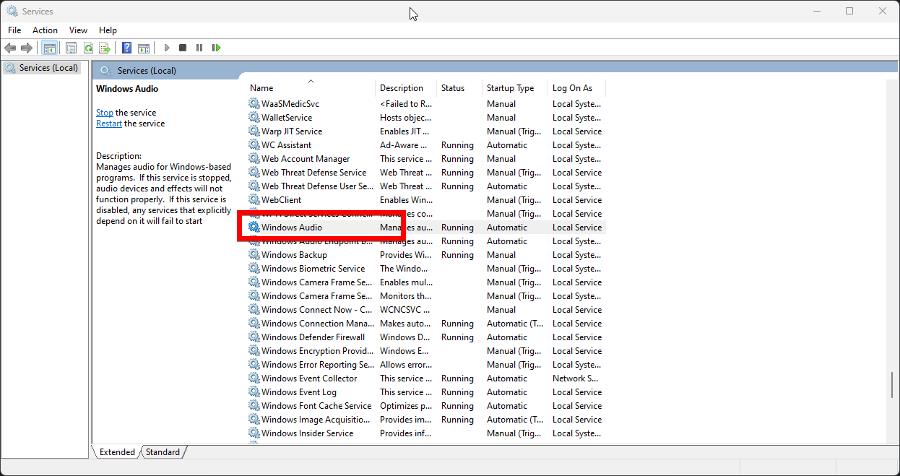
- Scroll down and locate the Windows Audio entry.
- Right-click Windows Audio, then select Restart.
- Right-click it again and select Properties.
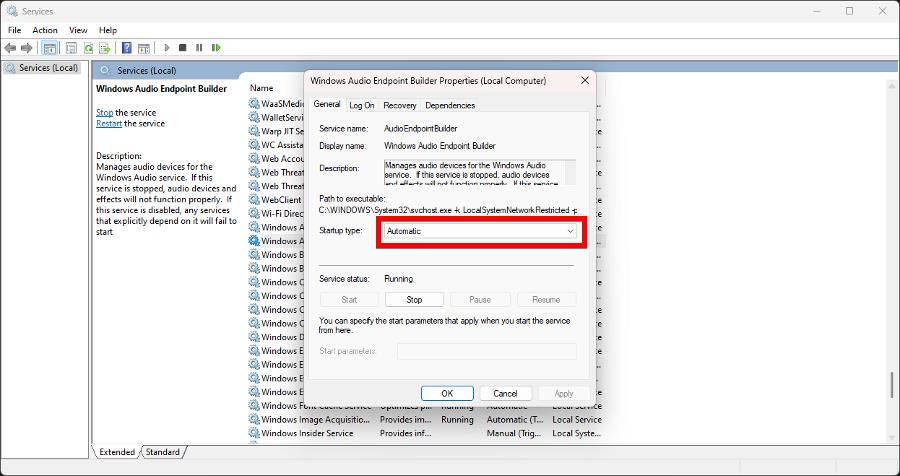
- Click the Startup Type menu. Change the entry to Automatic.
- Click Apply, then OK to finish.
- Now locate Windows Audio Endpoint Builder and do the same thing.
3. Adjust Dependencies in Windows Audio Services
- Reopen the Services program from the previous solution.
- Locate Windows Audio Service, right-click it, and select Properties.
- Click the Dependencies tab.
- Expand the services under the box titled This service depends on the following system components.
- Make a note of each of the entries seen there, like Remote Procedure Call (RPC) and RPC Endpoint Mapper.
- Locate each of the entries in the Dependencies tab on the Services program and ensure that they’re running.
- If not, right-click it and select Properties.
- Click the Start button to activate it.
4. Disable Audio Enhancements
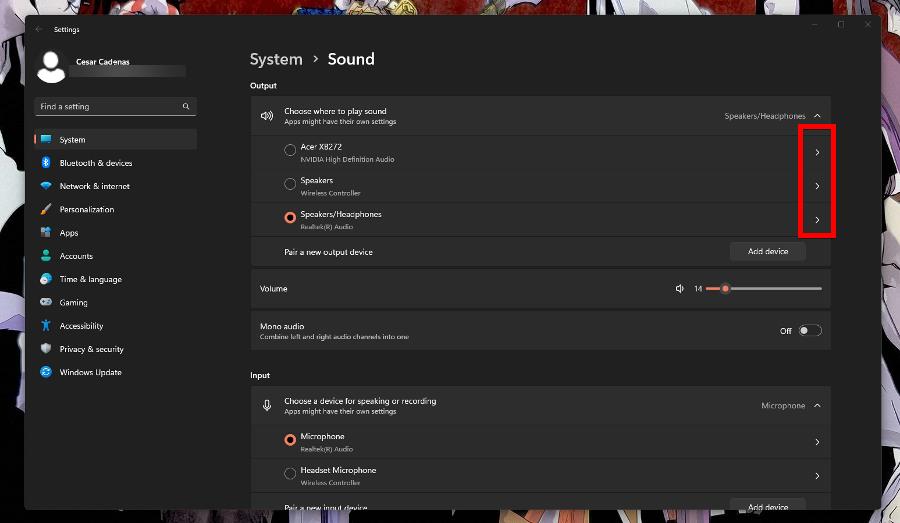
- Search for Sound Settings. Click the entry that appears.
- Select an audio output device by clicking the right-facing arrow.
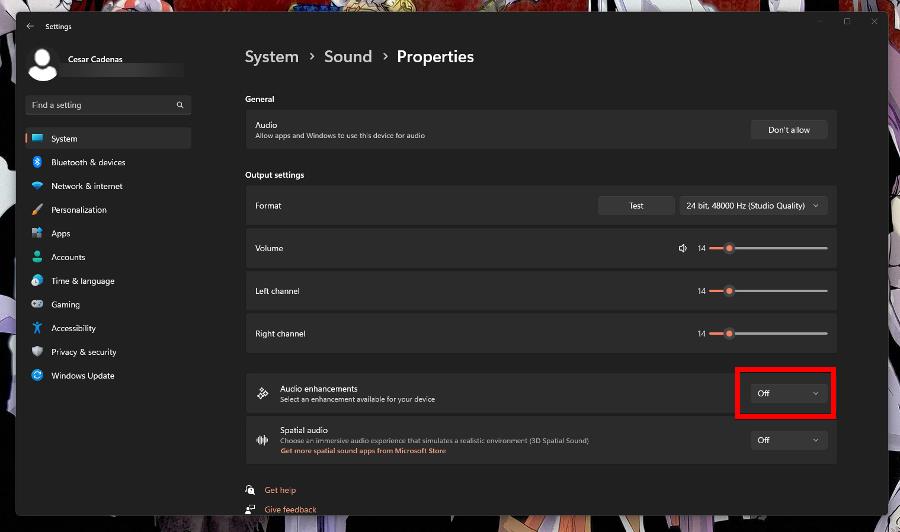
- Scroll down to Audio Enhancements, expand the right-side menu, and select Off.
5. Reinstall drivers
- Open the Device Manager.
- Expand Sound, video, and game controllers.
- Right-click your computer’s audio drivers and select Properties.
- In this new window, select Driver.
- Select Uninstall Device to uninstall the drivers.
- Restart your computer and Windows 11 will automatically reinstall the driver.
If your drivers didn’t update automatically, then you should visit the manufacturer’s website to install the versions manually.
We also have a quicker and simpler alternative to the above procedure and it consists in using a specialized tool named Outbyte Driver Updater that scans your PC for outdated drivers and locates the newest versions through its database.
If you’ve everything here, you can always try resetting Windows 11. This method should only be done as a last resort when else works because it will restore everything to its default configuration.
This means all third-party software you have installed be removed. We also recommend checking out our guide on what to do when the audio from your video game suddenly stops working. Another issue like YouTube has no sound in Windows 11 has also been addressed in our guide.
Most of the time, simply reinstalling the game will fix the audio, but you may need to adjust the audio buffer too.
Feel free to comment below if you have questions about other Windows 11 problems. And please tell us if there’s a specific guide for any Windows operating system you’d like to see.

